AdMob is Google’s advertising platform particularly created for mobile apps. By displaying targeted advertisements that meet your defined criteria, AdMob enables you to monetize your apps. So, if you’ve created an Android app and are looking to monetize your app, I’ll show you how to add several ad formats to your apps in this post.
You put a lot of effort into developing your app. With in-app advertisements, actionable data, and robust, user-friendly tools that help you expand your app business, AdMob makes it simple to generate money.
AdMob is without a doubt the leader in in-app advertising. This article explains how to use AdMob advertising to make money.
To prepare your app, complete the steps in the following sections. But first let’s discuss what exactly is AdMob.
WHAT IS ADMOB?
In brief, AdMob can be summed up as an incredible advertisement tool by Google. It is a holy grail for ad developers since it renders a streamlined revenue. It makes sure that the banner space is utilized with proper and appropriate content for the audience to view.
It is a common practice for app makers to incorporate in-app advertising monetization models. This serves as an ideal revenue source from apps that are free and allow developers to earn revenue. Banner ads placement is strategized in a way, so it does not ruin the user experience. Ads by AdMob are quite responsive, something that attracts more users.
Now let’s delve into the steps for setting up AdMob for your app.
HOW TO SET UP ADMOB FOR YOUR APP
APP PREREQUISITES
Make sure to use Android Studio 3.2 or higher
Additionally, ensure the following variables are utilized in your app’s build file as recommended by Google AdMob:
- A minSdkVersion of 19 or higher
- A compileSdkVersion of 28 or higher
SET UP YOUR APP IN YOUR ADMOB ACCOUNT
Register your app as an AdMob app by following these steps:
- Sign in to or sign up -> AdMob account.
- After getting your app registered with AdMob, this step creates an AdMob app with a unique AdMob App ID that is needed in the later steps.
CONFIGURE YOUR APP
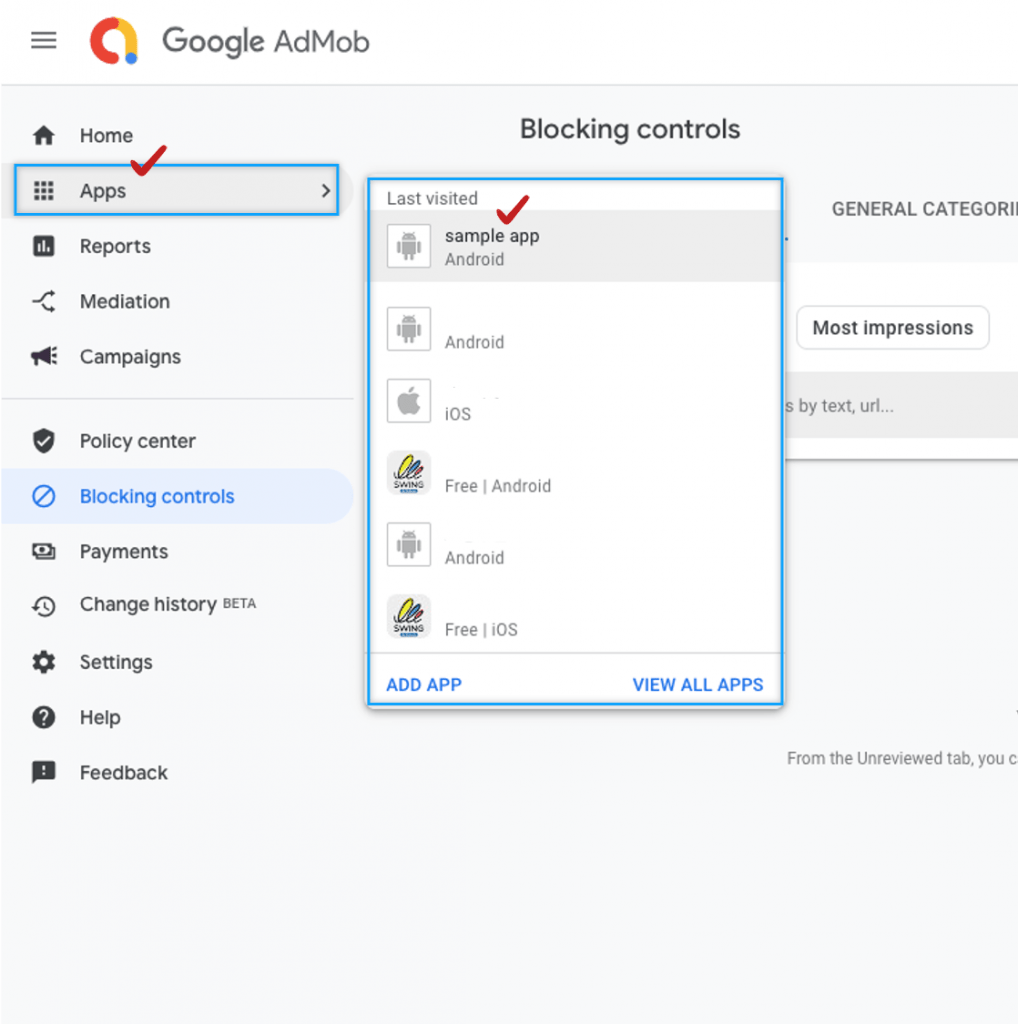
1. Open your dashboard after logging into AdMob. Now, click on Apps in the left panel> Add your Application these> Fill out the app details needed by AdMob> Click Add, this will create an AdMob ID for your app.
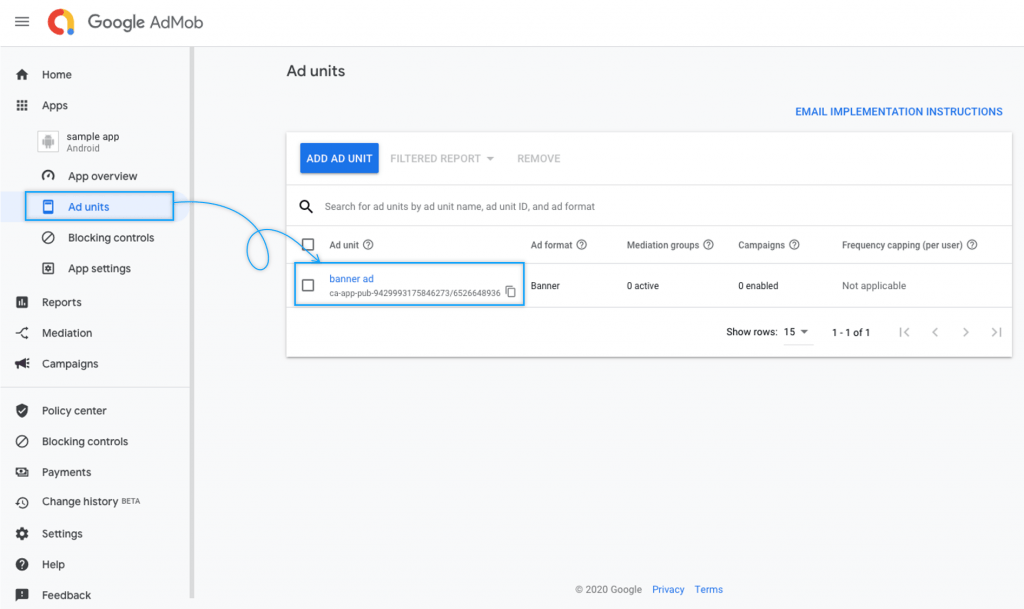
2. Click on Ad units -> ADD AD UNIT
3. Include Google’s Maven repository and Maven central repository in your project-level build.gradle file, in both buildscript and allprojects sections:
buildscript {
    repositories {
        google()
        mavenCentral()
    }
}

allprojects {
    repositories {
        google()
        mavenCentral()
    }
} 3. Add the following dependencies to your module’s app-level Gradle file (commonly app/build.gradle):
dependencies {

  implementation 'com.google.android.gms:play-services-ads:21.3.0'

} 4. Add the <meta-data>tag to your AndroidManifest.xml file to include your AdMob Application ID.
<manifest>

    <application>

        <!-- Sample AdMob app ID: ca-app-pub-3940256099942544~3347511713 -->

        <meta-data

            android:name="com.google.android.gms.ads.APPLICATION_ID"

            android:value="ca-app-pub-xxxxxxxxxxxxxxxx~yyyyyyyyyy"/>

    </application>

</manifest> Use your actual AdMob app ID rather than the one shown above in a real app. Use the example app ID displayed above if you merely want to test the SDK in a Hello World app.
INITIALIZE THE GOOGLE MOBILE ADS SDK
Your app should initialize the Google Mobile Ads SDK before loading ads by calling MobileAds.initialize(), which initializes the SDK and calls back a completion listener upon completion (or after a 30-second timeout). This should only be done once, ideally upon app launch.
1. Add the Google Mobile Ads SDK dependency to the build.gradle module file and initialize it.
implementation ‘com.google.android.gms:play-services-ads:19.1.0’
2. Prior to broadcasting any type of announcement from one of your activities, the Mobile Ads SDK must be initialized. This method should be called only once and as soon as possible, ideally when the application is launched.
class MainActivity : AppCompatActivity() {


    override fun onCreate(savedInstanceState: Bundle?) {

        super.onCreate(savedInstanceState)

        setContentView(R.layout.activity_main)


        MobileAds.initialize(this, "YOUR_ADMOB_APP_ID")

    }

} Wait until the finish handler is called before loading advertising if you’re using mediation, as this will guarantee that all mediation adapters are initialised.
INITIALIZE MOBILE ADS
The AdMob App ID is necessary to initialize MobileAds SDK in our app for ads to be loaded. Calling MobileAds.Initialize() with our AdMob App ID is the first step.
Here’s an example of calling initialize() in an activity.
package com.tutlane.admobexample;
import android.support.v7.app.AppCompatActivity;
import android.os.Bundle;
import com.google.android.gms.ads.MobileAds;

public class MainActivity extends AppCompatActivity {
    @Override
    protected void onCreate(Bundle savedInstanceState) {
        super.onCreate(savedInstanceState);
        setContentView(R.layout.activity_main);
        // Sample AdMob app ID: ca-app-pub-3940256099942544~3347511713
        MobileAds.initialize(this, "ca-app-pub-3214000786576152~8215460912");
    }
} After successfully importing the Mobile Ads SDK, we are now prepared to integrate advertisements into our application.
SELECT AN AD FORMAT
The Google Mobile Ads SDK is now imported, and you’re prepared to run an advertisement. You may select the ad type that best suits the user experience of your app from the variety of options offered by AdMob (banner, interstitial, and rewarded).
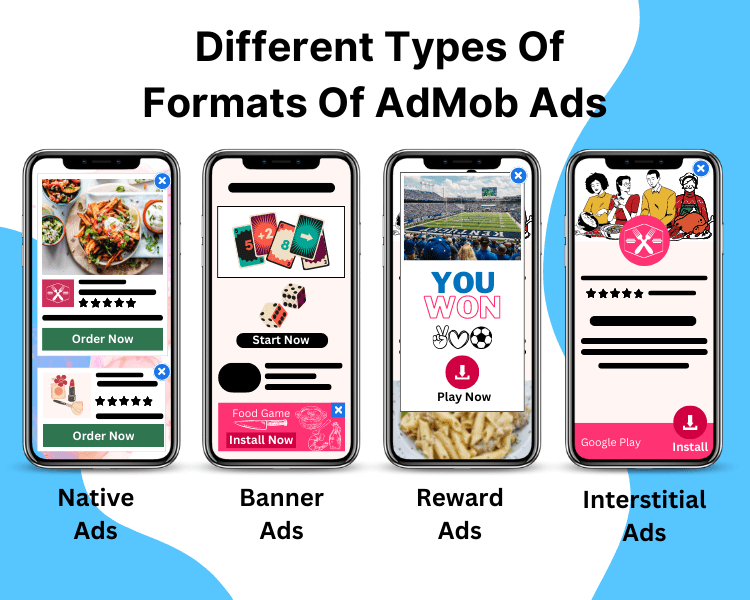
Let’s discuss about the different AdMob ad formats.
1. Banner Ads
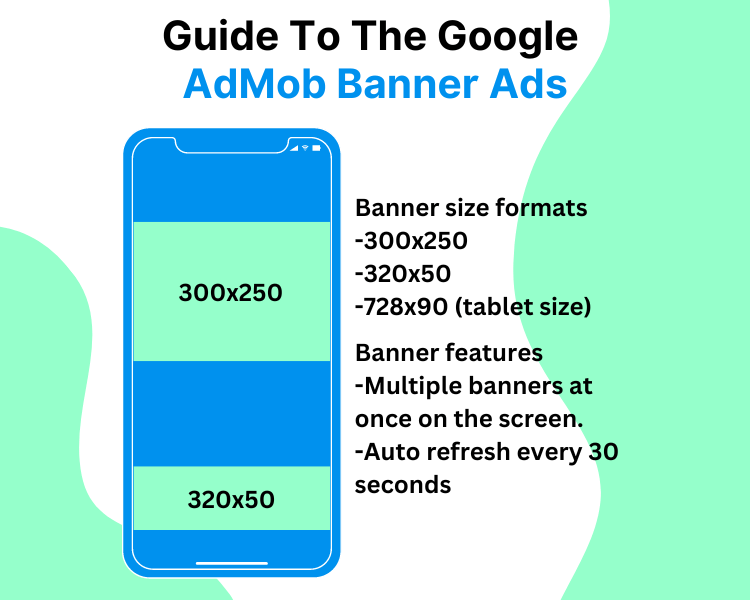
These are the AdMob Ads in a rectangle that show up at the top or bottom of the device screen. While users are engaged with the app, banner AdMob ads remain on the screen and have the option to automatically refresh. They’re a good place to start if you’re new to mobile advertising.
The most popular format for mobile banner AdMob advertising is owing to its ease of use and potential for higher CPMs with strategic placement. Mobile ad banners are often shown in static ad units that are positioned at the top or bottom of the device’s screen.
Although mobile banner AdMob ads size might vary, the most common sizes for smartphones are 320×480, 300×250 and 320×50.
Some fascinating insights on mobile banner advertising made by InMobi: On Android, lifestyle content has the greatest banner ad conversion (2.02%); on iOS, classified content has the highest banner ad conversion (2.7%).
When is it a good idea to use this form of advertising? Mobile banner advertisements can be a smart investment if you want to raise your brand’s visibility among people who are your prospective customers at a reasonable price.
Pros:
- accessible across all screens
- inexpensively offered
- Quick and simple deployment
- does not diminish the user’s experience
2. Interstitial Ads
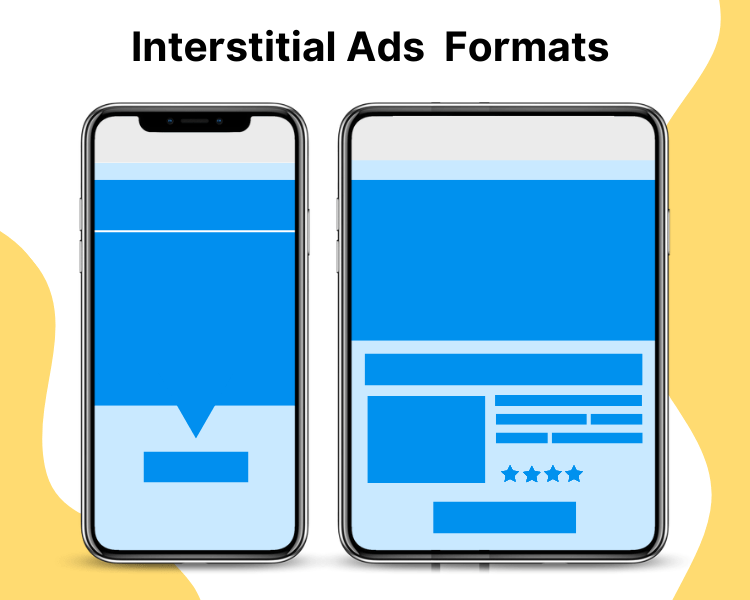
AdMob Advertisements that cover the entire interface of an app until the user closes them. Ideally, they should be used when there is a natural pause in an app’s flow, such as between levels in a game or just after tasks are completed.
Mobile interstitial advertising is a full-screen, interactive ad that appears during transitional times such as when opening or exiting an app, changing levels in a game, stopping, or trying to alter an app’s sections.
The most often used sizes of interstitials ads are 320*480 and 480*320 for smartphones.
As compared to banner AdMob ads, interstitial AdMob ads format has 2-3x higher CTR , which means a better result.
In terms of use cases, interstitial AdMob advertising is the most alluring format for brand marketers across almost all industries.
In terms of use cases, interstitial AdMob advertising is the most alluring format for brand marketers across almost all industries.
Pros:
- More ad space for a broader message
- Visually appealing and unforgettable
- High CTR and impressions
- Interactive
Native Ads
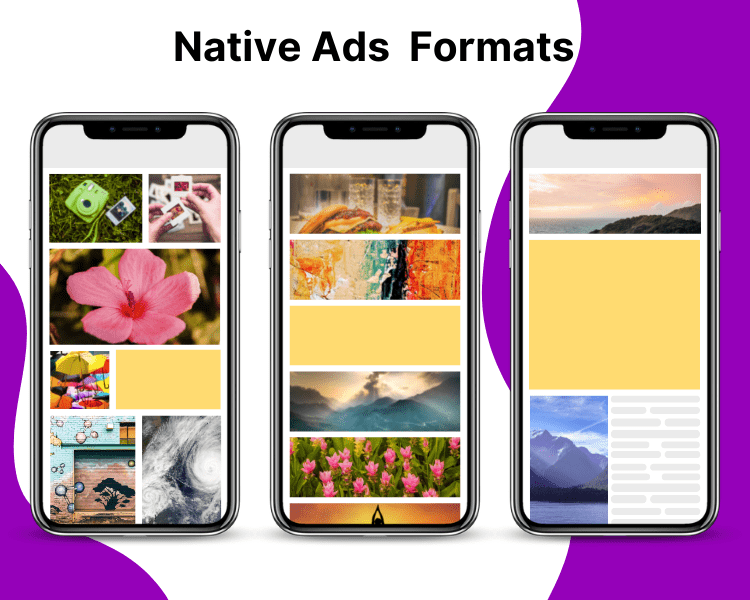
AdMob Ads that may be customised to fit the style and feel of your app. The layout is more in line with the style of your app as you determine how and where they should be positioned.
The adverts might be shown as an icon, a feed, or in-stream content to provide a fantastic user experience and seem seamless. When each format should be used, they are as follows:
- News apps and entertainment apps with multi-tile layouts can easily display icon ads
- The combination of feed ads and user-generated content works well in a chat list.
- Mobile advertising campaigns in social networking apps can benefit from rich in-stream ads that mimic the app’s content feed.
Ads of this kind will display contextually relevant content, such as a cosmetics advertisement in the middle of an article on a beauty site. Native advertising is extremely successful thanks to its seamless placement, which produces an outstanding CTR.
Using native advertising offers a special chance to tell your brand’s narrative. The combination of an image, a headline, and a description enables advertisers to communicate their message succinctly and persuasively while also providing further details about the features, principles, and background of the product or service.
Pros:
- Contextually relevant and unobtrusive
- Higher CTR
- Better ad engagement rate
- Advanced user experience
Rewarded Ads
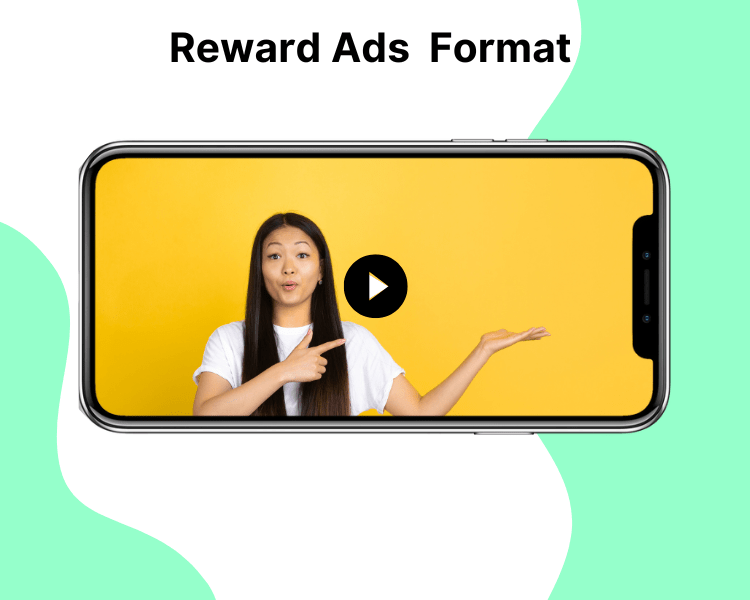
AdMob advertisements that provide visitors rewards for watching short films and taking part in playable commercials and surveys. It is used monetize to free-to-play applications.
Videos that emerge smoothly before, during, or after the video serve as an example of this style. For smartphones, it should be 320×480 or 480×320 sizes.
When the user taps to play, a conventional video ad plays for 15 or 30 seconds. Video commercials have developed to include both horizontal and vertical alternatives as vertical video filming have grown in popularity (mostly for social media).
Placement of mobile video advertising correctly helps increase audience engagement levels. It is best practise to put it at a natural break in the user’s app experience. Additionally, while introducing a video to consumers, advertising should employ creativity since a captivating preview screen motivates viewers to watch the full video. It’s usual practise to deliver Autoplay video with muted sound and allow users to toggle it on and off in order to reduce the danger of annoying viewers.
Pros:
- Users rate video ads positively.
- Attention-grabbing
- Ideal for advertisers
Also, read about How To Make Money With Your Free App?
CREATE NO-CODE APP WITH SWING2APP AND EARN WITH ADMOB PLUGIN
It is simple to monetize your app with the swing2app AdMob plugin!

Swing2App is the one-stop solution for folks who want to create apps. It is a perfect app creator website that offers a wide range of services in addition to producing mobile apps for Android and iOS.
Utilizing Swing2App offers several benefits, one of which is the availability of plug-in products with AdMob integration. After that, you may add AdMob ads to the app.
If you have an AdMob account, all you have to do is include the required Swing2App details, and the AdMob ads are added automatically to your app. All of the advertising revenue is distributed to the users via Swing2App. Swing2App only charges the installation price in order to include AdMob in the app.
Google created the amazing advertising solution AdMob to deliver optimised earnings. It makes sure the banner space is used effectively and contains relevant material the viewers would find interesting.
For app developers, using in-app advertising revenue techniques is a common practise. This serves as a fantastic source of income from free programmes that provide developers the opportunity to make money. In order to avoid degrading the user interface, banner placement is strategically planned.
The amount of money you can make with this AdMob integration plug-in may now be on your mind.
As much as we would like to provide a more accurate estimate using AdMob for the value you may obtain from in-app advertisements, such an answer is already available. As was already said, the success and reputation of your app determines how much money you will get from these adverts. So, if you want to profit greatly from the in-app monetization approach using AdMob, make sure that your app does well in terms of user growth.
Tutorial for AdMob integration in your app
CONCLUSION
Now that you know how to set up your Google AdMob account, we believe you are well prepared. Additionally, we have outlined the differences between different ad formats, and which one should be used based on your requirements.
Furthermore, the Swing2App no-code platform makes it easy to create and publish apps, as well as use the AdMob app integration for easy monetization.
]]>Nowadays you will find everyone is using one or another kind of app in their smartphones. We have an app for everything be it entertainment, communication, food, music, sports, calendar and much more.
So, app developers are increasing day by day, the competition is increasing, so you need to make a top-quality app, otherwise you might lose your customers.
However creating even a basic app can cost you a lot if you hire a software development company or even a freelancer.
An app builder like Swing2app App Maker makes your life easier and reduces app development cost by providing you with a variety of free features, design templates, and other free app options. In addition to that it is a codeless app developer. You just need to add your required features to build an app. You can also analyse the statistics of your app using the analytics tool, all these features will definitely save your cost of developing an app.
So, if you want to create a cost as well as quality efficient app , just go to Swing2app. Swing2app is surely a free app developer, that means all features to create your app are free, but to publish your app you need to switch to paid version.
Swing2app provides lots of paid plans, for different developers requirement, by which they can create their dream app without incurring huge costs.
Let’s explore the various plans.
1.FREE VERSION
Swing2App is free for both app production and app operation. Therefore, users can use all the features for free without any restrictions.
The free version of the app created with Swing2App can only be downloaded and installed only on Android phones.
2.FREE COMMERCIAL VERSION
Best for: Those who want create and upload a basic app on Play store for free.
The free commercial version of Swing2App is the service that allows you to release a free app on the Play Store without having to pay for vouchers. It can be released on the Play Store but not in App Store.
So, if you want to release the app to the Play Store but are burdened by cost issues, you can apply for a free version app and use it freely. Apps created with the free commercial version can be used without restrictions, and Swing2App’s own ads will be displayed.
MAJOR DIFFERENCES BETWEEN PAID & FREE VERSION
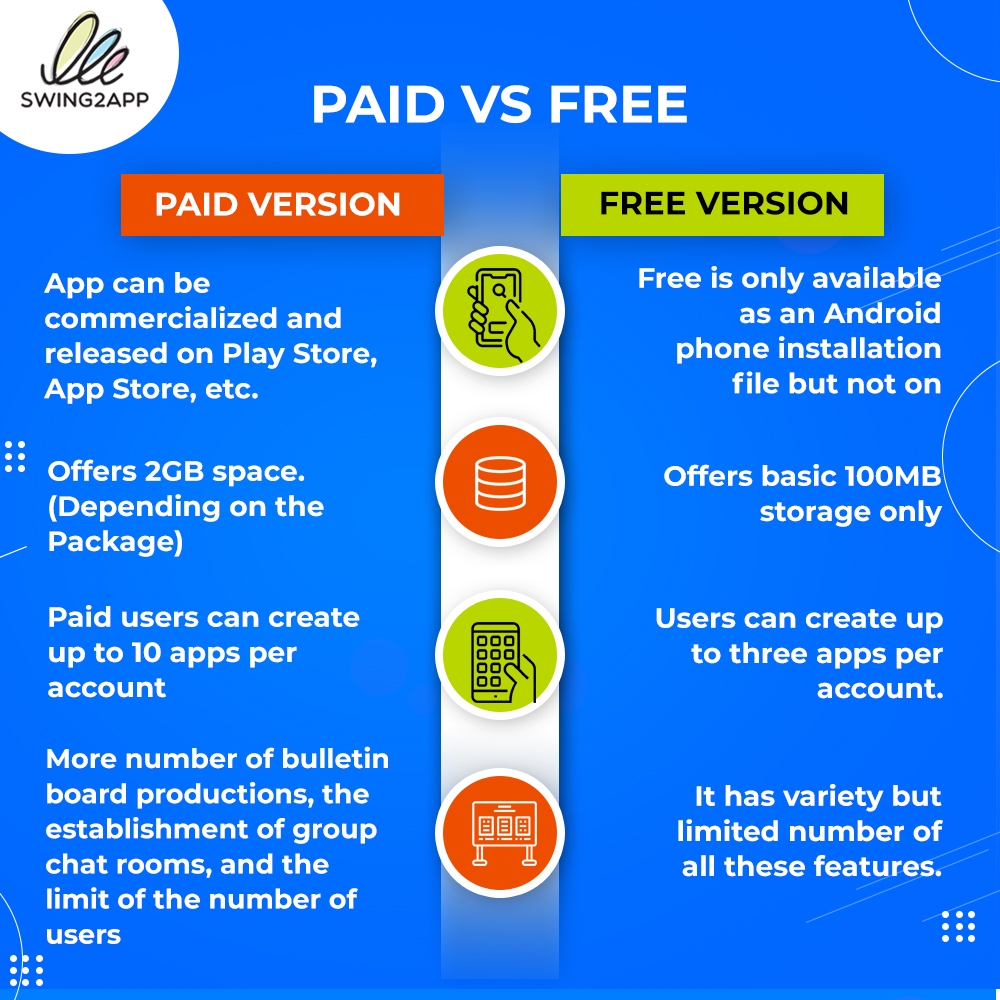
Swing2app provides paid packages under 4 categories on their online store:
- Voucher & Plans
- Tickets
- Swing2app plugins
- Swing2app packages
Let’s explore these paid packages.
1.Voucher & Plans
Users need to buy Vouchers when they want to upload the app on the app store/google play store, that they created using swing2app. Vouchers prices vary according to the duration.
Basic($33/month), Expandable($55/month) & Premium($100/month) packages may be chosen for 1 month, 6 months or 12 month as per the users need.
When you pay for any of the package, you get certain additional features, depending upon the package you choose along with the app commercialization.
It also includes a Budget Package which is specially made for long term users, it has all the features of Basic plan and you don’t need to purchase store upload ticket separately. It is for $330/24 months, which saves 50% of the users money if he opts for Basic plan for the same duration.
If you want to purchase additional storage for your app, you can buy Add Storage voucher from 2GB to 100GB per month, depending upon your need.
| ADDITIONAL STORAGE | PRICE/MONTH |
| 2GB | $11 |
| 5GB | $22 |
| 10GB | $44 |
| 30GB | $66 |
| 50GB | $88 |
| 100GB | $110 |
All the vouchers are applicable for only 1 application.
2.Swing2app Ticket
Swing2app Tickets are one time product, that means you have to purchase them only once for a single app. These are mainly for those users who want to upload their app to the app store & play store, without creating a developers account. Users can also purchase additional storage ticket if they need more storage than the voucher provides.
To upload your app on store purchasing other vouchers, either you need to create Appstore Developer Account ($99/year) for app store and Google Developer Account($25 one time) for google Playstore.
If you buy Swing2app App Store upload Ticket, you don’t need to create the Apple Developer Account. However, the same is not the case for Google Playstore upload ticket, where you still need to create a developer account worth $25(one time).Swing2app provides only Appstore developer account and not the Google Playstore developer account.
But if you don’t want to spend &99 annually on appstore developer account, due to any reason like you are creating only one app and don’t want to spend much. Swing2app provides store upload tickets for such users, it is quite cost efficient, for uploading 1 app:
1. On Playstore: buy Playstore upload ticket $5 only
2. On Appstore: buy Appsore upload ticket $20 only
Mobile web registration ticket ($20/month) for those who want to register their app as a website & they do not have a website. But you need to purchase either Expandable or Premium Package first as well as a domain separately and Swing2app will register your app as a website.
Swing2app also provides a package for those who want to send SMS texts to their users namely 1000 SMS Messages Package. This ticket can be used to send phone number verification and text messages to app members. We offer 1,000 SMS for $20. If you need to purchase more SMS, you can increase the number of SMS you want at checkout. These SMS can be used to Sign Up: Set up your phone number ID and send text messages to app members.
3.Swing2app Plugins
Swing2App plug-in products are optional products that include custom development by the development team, not regular paid products. They have certain additional features like monetizing your app using google AdMob which are not provided in other vouchers.
These are the lifetime deals, you need to buy these only once and just enjoy the benefits.
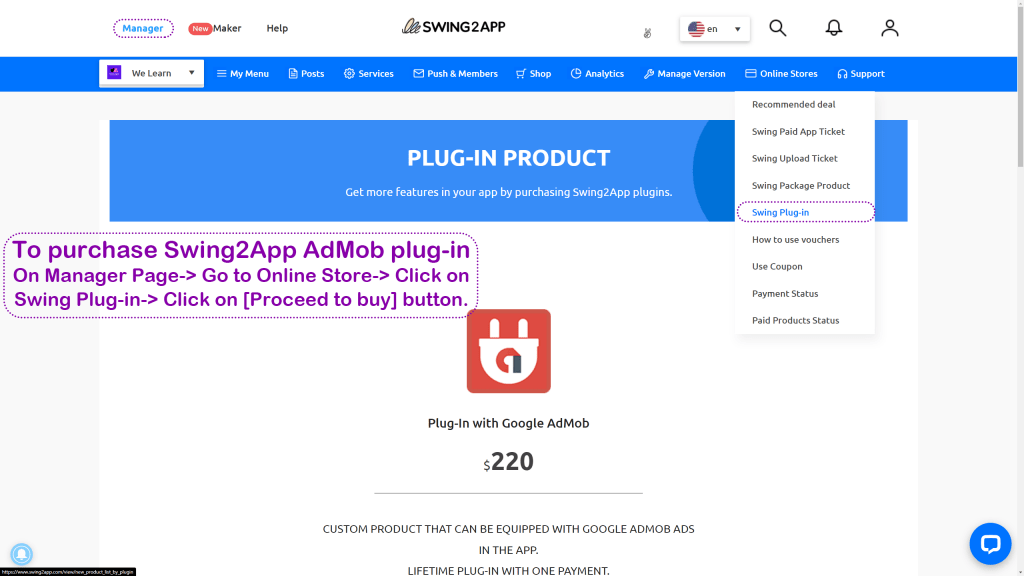
Plug-In with Google AdMob ($220): This product allows you to set AdMob ads on an app produced by Swing2app.This product is best for those who want to monetize their apps by allowing google ads on their app & getting direct 100% revenue.
WebView Lifetime Paid App: It is for those who already have a website & want to convert it to an app. Unlimited web view paid apps are available only for apps created in the Swing2app using WebView prototype.
You can use the app for unlimited without paying monthly fees.You can also apply the iPhone and Android integrated application, and if you use only the platform you want. You can also release your app on the Play Store and App Store.This plug-in is beneficial if you are planning a long term app use.
The prices vary according to the availability of iphone, android or both in-app integration:
WebView Lifetime Paid App(Android+iPhone) $300
WebView Lifetime Paid App(iPhone) $230
WebView Lifetime Paid App(Android) $99
Push-only Lifetime (Android + iPhone)($550): This plug-in is only for those who want to create a push only web app.
Push app is a web app prototype, provided by Swing2app, in this your website is converted to an app looking exactly same as your website, and can send push messages to users who have installed the app.It is an integrated application for Android + iPhone, and you can use the app without paying monthly fees.
Push can be sent an unlimited number of times without any restrictions on the number of members or sending. You can also release your app on the Play Store and App Store after purchasing the store upload ticket. This plug-in is beneficial if you are planning a long term app use.
3.Swing2app Packages
Swing2app Packages are specially designed for the users who are planning to use their app for long term & also want the additional feature like additional storage, Admob plug-ins, etc.
These packages provide huge discount to the user as compared to buying all them separately for shorter duration.
Admob power Package($580/2 years): Admob Power Package is a product that consists of a Swing2App Basic Package for 2 years + Admob ad plugin setting product as a package, along with store upload tickets of both appstore & Playstore and is a product that can be used in a package at a lower cost than purchasing separately.
It is recommended if you are planning to use the app for a long time along with the Admob advertisements.
Large Package($500/1 year): Large Package is a product that consists of a Swing2App Basic Package for 1 year + 30GB additional storage, along with store upload tickets of both appstore & Playstore and is a product that can be used in a package at a lower cost than purchasing separately.
Large package products are recommended when you need to use a lot of app storage.
Let’s look in detail.
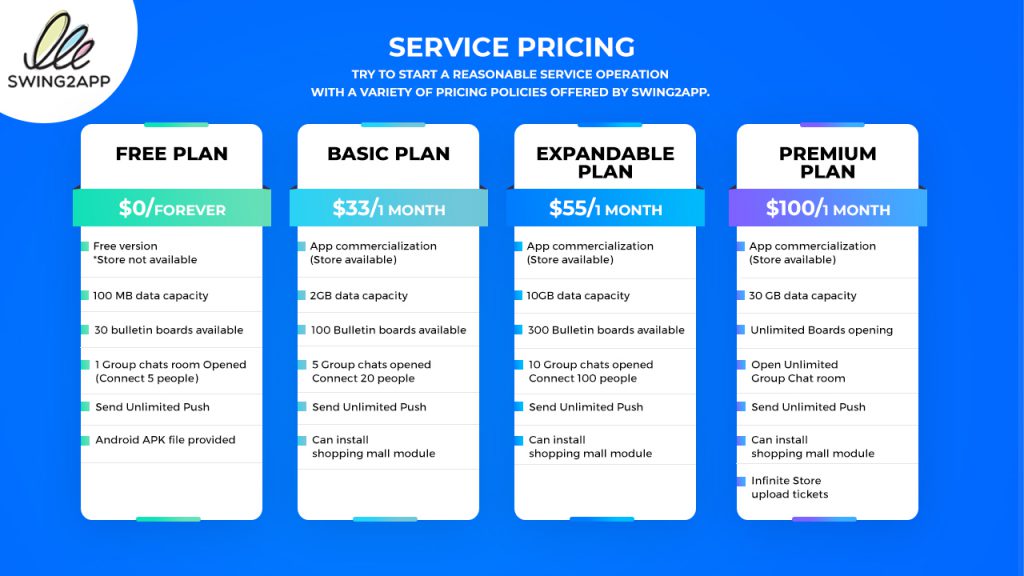
1.BASIC PLAN
$33/MONTH
You get:
- Unlimited traffic – It allows unlimited new monthly user. New user means a new device on which your app is installed & every device has different id, to keep a check on traffic.
- App commercialization (Store available)-You can upload your app on the appstore and playstore.
- Send Unlimited Push-you can send unlimited push notifications to your mobile app users.
- 2GB storage capacity
- Unlimited posts-You can create unlimited posts, in which you can write, insert images, videos and links as well
- 100 Bulletin Boards (5 Chat rooms) -These 5 chat rooms help you in connecting 20 people.
- You can install shopping mall module- It’s a shop feature if someone wants to make e-commerce app, so adding items, payment, delivery details, schedules, etc are done in that
- In your app you can link 1 PAYMENT GATEWAY Company
2.EXPANDABLE
$55/MONTH
In addition to the Basic Plan you get:
- 10GB storage capacity
- 300 Bulletin Boards (10 Chat rooms) connecting 100 people
- Link with multiple PAYMENT GATEWAY
- Paid customization applicable
3.PREMIUM
$100/MONTH
In addition to the Basic Plan you get:
- 50GB storage capacity
- Unlimited Bulletin Boards
- Free Store Registration Agency
- Infinite Store upload tickets
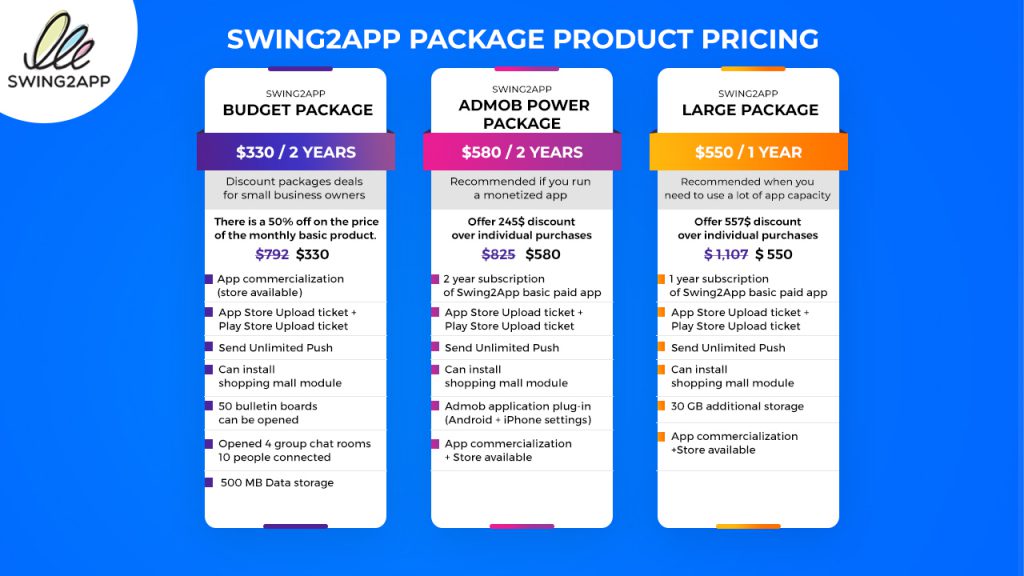
SWING2APP PACKAGE PRODUCT PRICING
1.SWING2APP BUDGET PACKAGE
$330/2 YEARS
Best for: small business owners who want to create an app but don’t have much capital to invest.
- There is a 58% off on the price of the monthly basic product. Basic plan is $33 per month, which is $792/2years, but in this budget pack you get all the basic plan features at a much-reduced price.
- App commercialization (store available) – You can publish your app & commercialize it.
- App Store Upload ticket + Play Store Upload ticket – You don’t need to buy store upload tickets separately.
- Send Unlimited Push
- You can install shopping mall module -It’s a shop feature if someone wants to make e-commerce app, so adding items, payment, delivery details, schedules, etc are done in that
- 50 bulletin boards can be opened-Bulletin boards provide various features like: chat, map board, surveys, calendar, 1:1 chat and much more.
- You can open 4 group chat rooms & get 10 people connected.
- 500 MB Data storage
2.ADMOB POWER PACKAGE
$580/2YEARS
Best for: the developers who run a monetized app, like game apps monetize their app by allowing in-app advertising.
- Offer 245$ discount over individual purchases $825 →$580
- 2-year subscription of Swing2App basic paid app
- App Store Upload ticket + Play Store Upload ticket
- Send Unlimited Push
- Can install shopping mall module
- AdMob application plug-in (Android + iPhone settings)- You can add google ads to monetize your apps.
- App commercialization + Store available
3. LARGE PACKAGE
$550/YEAR
Best for: when you need to use a lot of app capacity
- Offer 557$ discount over individual purchases $1,107 → $550
- 1-year subscription of Swing2App basic paid app
- App Store Upload ticket + Play Store Upload ticket
- Send Unlimited Push
- Can install shopping mall module
- 30 GB additional storage
- App commercialization+Store available
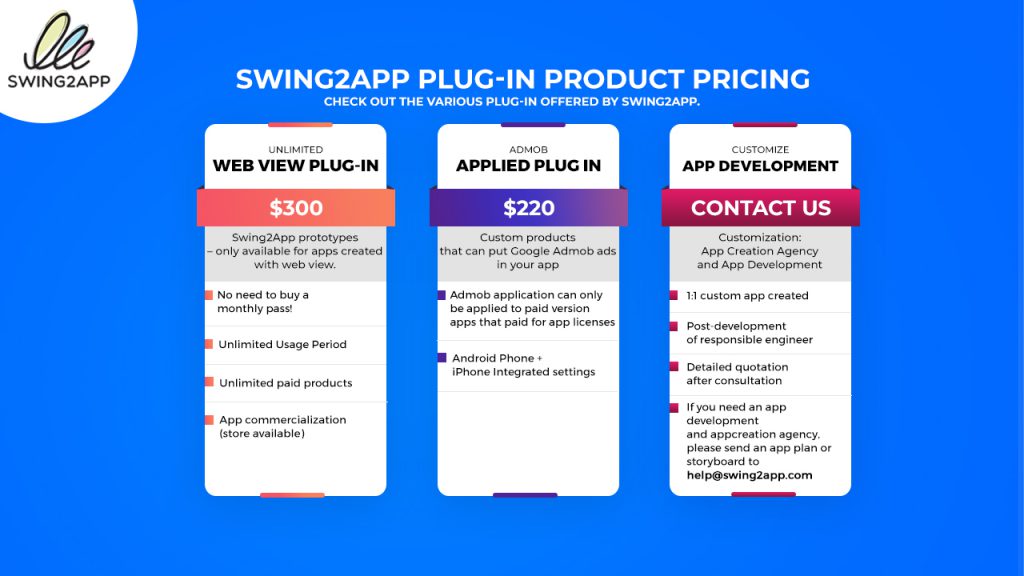
SWING2APP PLUG-IN PRODUCT PRICING (LIFETIME PLANS)
The main advantage of lifetime plan is that you don’t need to buy monthly vouchers.
1. UNLIMITED WEB VIEW PLUG-IN
$300
Best for: developers/businesses who want to create web view app only from their pre-existing website & intend to use it for a long time.
- No need to buy a monthly ticket
- Unlimited Usage Period
- Unlimited paid products
- App commercialization (store available)
2.ADMOB APPLIED PLUGIN
$220
Best for: the developers who run a monetized app. Swing2app Provides Custom product that can put Google Admob ads in your app & intend to use it for a long time.
- Admob application can only be applied to paid version apps that paid for app licenses
- Android Phone + iPhone Integrated settings
3.PUSHONLY LIFETIME PAID APP ( Android + iPhone )
$550
Best for: the developers who want to make Push only web app & also want to send unlimited push notifications to their users.
The Push Only app is a web app style created by attaching a website to the app, and push sending is unlimited. This is only applicable for Push Only prototype of Swing2app.
4. CUSTOMIZE APP DEVELOPMENT
Best for: Developers who are interested in further details & want to create their app with the help of App Creation Agency and App Development & intend to use it for a long time.
- 1:1 custom app created
- Post-development of responsible engineer
- Detailed quotation after consultation
If you need an app development and app customization, you can send your app plan to help@swing2app.com
Different price packages for different time duration:
| SWING2APP PLANS & PACKAGES | 1 MONTH | 6 MONTHS | 12 MONTHS | 24 MONTHS |
| BASIC PAID APP | $33 | $160 ( ↓ 19% $38 saving ) | $290 ( ↓ 26% $106 saving ) | |
| EXPANDABLE PAID APP | $55 | $260 ( ↓ 21% $70 saving ) | $460 ( ↓ 30% $200 saving ) | |
| PREMIUM PAID APP | $100 | $480 ( ↓ 20% $120 saving ) | $840 ( ↓ 30% $360 saving ) | |
| BUDGET PACKAGE | $330 ( ↓ 58% $462 saving ) | |||
| ADMOB POWER PACKAGE | $580 ( ↓ 30% $245 saving ) | |||
| LARGE STORAGE PACKAGES | $550 ( ↓ 50% $557 saving ) |
Different price packages for different Lifetime Plans $ Tickets:
| LIFETIME PLANS / TICKETS | PRICE |
| PLUG-IN WITH GOOGLE ADMOB | $220 |
| WEBVIEW LIFETIME PAID APP (Android +iPhone) | $300 |
| WEBVIEW LIFETIME PAID APP (Android) | $99 |
| WEBVIEW LIFETIME PAID APP (iPhone) | $230 |
| PUSH ONLY LIFETIME PAID APP (Android +iPhone) | $550 |
| PLAYSTORE UPLOAD TICKET | $5 |
| APPSTORE UPLOAD TICKET | $20 |
| MOBILE WEB REGISTERATION TICKET | $20 |
| 1000 SMS PACK | $20/month |
HOW TO PURCHASE THESE PACKAGES?
You can purchase any plan as per your choice, after creating your app, on Manager page, Go to the Online Store & then choose, Vouchers & Tickets or Swing2app Plugins or Swing2app Packages, according to the plan you want to purchase.
You will be taken to that page where you can select the package and duration and simply buy it.
To know more about how to buy & use Swing2app paid packages refer these links:
Wondering which one should you choose?
Swing2app ensures to meet the demand of each type of developer with its variety of prices.
Let’s see what you should choose, depending upon your case.
Pricing Examples:
Swing2app paid products fall under two categories either the payment is paid on basis of duration(1 month, 6 months, 1 year, 2 years) or the payment is just for once as in lifetime products.
Following are some pricing examples, while reading keep in mind that some prices are term based and some are to be paid only once.
| Pricing Example 1 – User wants to create an app that requires 8GB storage, 208 bulletin board, 6 chat rooms and wants to upload app on app store only. |
| EXPANDABLE PLAN ($55*12=$660 – 30% discount (12 month/360 days)= $460) |
| To upload on Appstore: buy APPSTORE UPLOAD TICKET $20 only |
| First Year Total = $480/YEAR ($20/onetime, $460/year) Next Year & Onwards Total = $460/YEAR |
| Pricing Example 2 – User wants to create an app that needs 3.5GB space, 80 bulletin board, 2 chat rooms and wants to upload on app store and play store. |
| BASIC PACKAGE ($290/year) |
| PLAYSTORE UPLOAD TICKET $5 only |
| GOOGLE DEVELOPER ACCOUNT $25 lifetime |
| APPSTORE UPLOAD TICKET $20 only |
| ADD 2GB STORAGE ($11/month -> 1 year = $11*12 = $132) |
| First Year Total = $472/YEAR ($20+$5/onetime + $25 lifetime + $290/year + $11/month*12) Next Year & Onwards Total = $422/YEAR(290+132 ) |
| *Google charges a one-time $25 fee to get a developer account on Google Play, which lets you publish Android apps. Free apps are distributed at no cost, and Google takes 30% of the revenues of paid apps for “carriers and billing settlement fees”. |
Pricing Example 3 – User wants to create an app using web view prototype and already has a website, and is willing to use this app in lifetime. |
| WEBVIEW LIFETIME PAID APP (Android + iPhone) $300 |
| Total= $300 for lifetime (onetime) |
| Pricing Example 4 – If you want to make app without website (normal prototype),with 1GB storage only & is also looking for discount. |
| BASIC plan worth $33/MONTH or SWING2APP BUDGET PACKAGE $330/2 YEARS, by which you can save $330 for 2 years. |
| Total = $33/MONTH or $330/2YEARS |
| Pricing Example 5 – User wants to upload on Google Playstore only by spending minimum. |
| BASIC plan worth $33/MONTH |
| PLAYSTORE TICKET $5 |
| GOOGLE DEVELOPER ACCOUNT $25 lifetime |
| First Month Total = $63/MONTH ($5 one time + $33/month + $25 lifetime) Next Month & Onwards Total = $33/MONTH |
| *Google charges a one-time $25 fee to get a developer account on Google Play, which lets you publish Android apps. Free apps are distributed at no cost, and Google takes 30% of the revenues of paid apps for “carriers and billing settlement fees”. |
| Pricing Example 6 – User wants to upload on Appstore only by spending minimum. |
| BASIC plan worth $33/MONTH |
| APPLE STORE TICKET $20 |
| First Month Total = $33/MONTH ($20 one time + $33/month) Next Month & Onwards Total = $33/MONTH |
| Pricing Example 7 – Users want to upload on both Appstore & Playstore, but wants to invest monthly. |
| BASIC PACKAGE worth $33/MONTH |
| PLAYSTORE TICKET $5 |
| GOOGLE PLAYSTORE DEVELOPER ACCOUNT $25 |
| APPLE STORE TICKET $20 |
| First Month Total = $83/MONTH ($5 one time + $20 onetime + $33/month + $25 lifetime) Next Month & Onwards Total = $33/MONTH |
| *Google charges a one-time $25 fee to get a developer account on Google Play, which lets you publish Android apps. Free apps are distributed at no cost, and Google takes 30% of the revenues of paid apps for “carriers and billing settlement fees”. |
For how many days of a 1 month pass is valid?
You may wonder if the total number of days spent on a paid app ticket per month is 30 days, 31 days, or if the payment date varies from month to month.
The total number of days varies from month to month (there are 28 days, 30 days, 31 days) so the number of days per month set by the swing is 30 days. Therefore, 180 days of use for 6 months, and 360 days for 12 months.
You may also think, if it is 365 days or not just for a year payment, but it applies to the number of days calculated as 30 days per month.
*Each plan is applicable on only 1 app, while purchasing choose carefully the app for which you want to purchase for.
Creating app is made so affordable for all types of developers.
There is no unreasonable price nor separate production cost to pay for the variety of features you get to use.
Create your own app and get started right away at a small cost.
]]>There was a time when even the idea of earning money with a free app seemed preposterous, just like AI devices, touchscreen Smartphones, to name a few.
With time, many app monetization strategies came to existence and changed the way free apps were considered by businesses and developers.
Sans doubt, in-app advertising is one of the celebrated monetization models used by the majority of apps like Spotify, YouTube, and a million more. Now, what is that one thing that comes to mind when we talk about in-app ads?
You guessed it right – AdMob.
For some, who are not quite familiar with this tool, let’s take it from the top.
What is AdMob?
In brief, AdMob can be summed up as an incredible advertisement tool developers by Google. It is a holy grail for ad developers since it renders a streamlined revenue. It makes sure that the banner space is utilized with proper and appropriate content for the audience to view.
It is a common practice for app makers to incorporate in-app advertising monetization models. This serves as an ideal revenue source from apps that are free and allow developers to earn revenue. Banner ads placement is strategized in a way so it does not ruin the user experience. Ads by AdMob are quite responsive, something that attracts more users.
How does the AdMob tool work?
In order to reap the benefits from this amazing tool, it is crucial for you to know how it all works and manages to offer the services that it does. Therefore, let’s understand the working process of AdMob first.
Let’s see how AdMob works in simple terms:
1.Make space for your ad in the app
Start with curating ad spaces in your mobile application in the places where you want to place your ads. Once decided, you can add ad units to your app code.
2.The highest performing ads reach a wider pool of users
AdMob operates on its own network along with some other third-party networks. This is to analyze and ensure that the highest performing ads get the most exposure.
3.Make your app a money-magnet
Everything from billing advertisers to identifying networks for the ads in your app, AdMob takes care of it all. In the end, all you have to do is receive the profits and revenue. Nevertheless, the payments are unanticipated in compliance with AdMob policies.
How can you make money with AdMob from your app?
We have a few easy-peasy tips under our belt that can guide you on how you can earn those extra bucks with your app. These tips work as an added advantage or a fuel to the fodder of AdMob’s potential. If you perform all these actions well, you will be able to utilize the benefits AdMob has to offer.
1.Scout the most in-demand topics
If you randomly pick a topic and start advertising on it, it will do you more harm than good. Thus, you need to research and identify the topics that users are interested in at the time and then develop your ads on them. It is absolutely necessary for this monetization strategy to work since if the ads are not relevant, the users will not entertain them and your future Impression RPM will get affected.
2.Ad-filter AdMob feature
The ad filter on AdMob is an incredible feature to use in order to get the most out of it. You are in absolute control of what ads show up into your app, where and when to show it. Hence, you can use this filter to choose the most appropriate advertisement categories in relevance to your mobile app.
3.Increasing optimization and positive branding of the app
There are a few factors that implicitly affect the profits made via AdMob. This tool is not a one man’s army, thus there are a few things it needs from your app to work its magic.
The revenue generated from the apps will depend on a few factors such as your app’s ratings and reviews, and how your app fares on the app stores. To that end, you need to make sure that you are imparting and creating a positive image of your app by promoting more positive reviews. This will help attract more users and increase the time spent on your app. This is something that translates into more downloads on your app and hence more impressions on the in-app ads.
How to apply for AdMob?
Now that you know the basics of AdMobs, it is time for you to know how you can apply for the AdMob and reap the benefits for good.
Without any further ado, let’s go.
Step 1 – Once you have successfully created your app using Swing2App, you need to Sign up on the official website of AdMob.
Step 2 – Now, you are required to add your app on the platform and register the ad unit ID.
Step 3 – Here you need to provide the payment information.
Step 4– The last thing to do is to make sure to review your ads before making it all live.
Learn How to Develop Mobile App Using Swing2App
How can Swing2App help you to make money from AdMob?
Swing2App is the go-to destination of people for app development. It is an impeccable app builder platform that offers a myriad of services besides developing mobile apps for Android and iOS.
One of the great benefits of using Swing2App is that you can buy an AdMob plug-in product. After that, you can install AdMob ads in the app.
Nevertheless, there is one catch. The Admob ads are not to be installed by users. This is where Swing2App can help you. You can buy and apply for plug-ins provided by the platform.
- If you have an AdMob account, you only need to provide the relevant information in Swing2App and the AdMob ads will be automatically applied to your app.
- With Swing2App, all of the revenue generated from ads is shared with the users.
- Swing2App only charges the setting fee (installation) in order to integrate AdMob into your app.
How much can you earn with AdMob?
As much as we would like to give a ballpark figure for how much profit you can bag via in-app advertisement with the help of AdMob, there is such an answer available. As mentioned above, your profit percentage from these ads also depends on your app’s performance and image.
So, in order to bag big from in-app monetization strategy via AdMob, make sure your app is doing well in bringing new users to the platform.
Learn how to upload Mobile App on Apple App Store
]]>