Step wise guide to submit your app.
If you are here, then it is a given you know how remarkable and unprecedented Apple as a company is and so is its App Store.
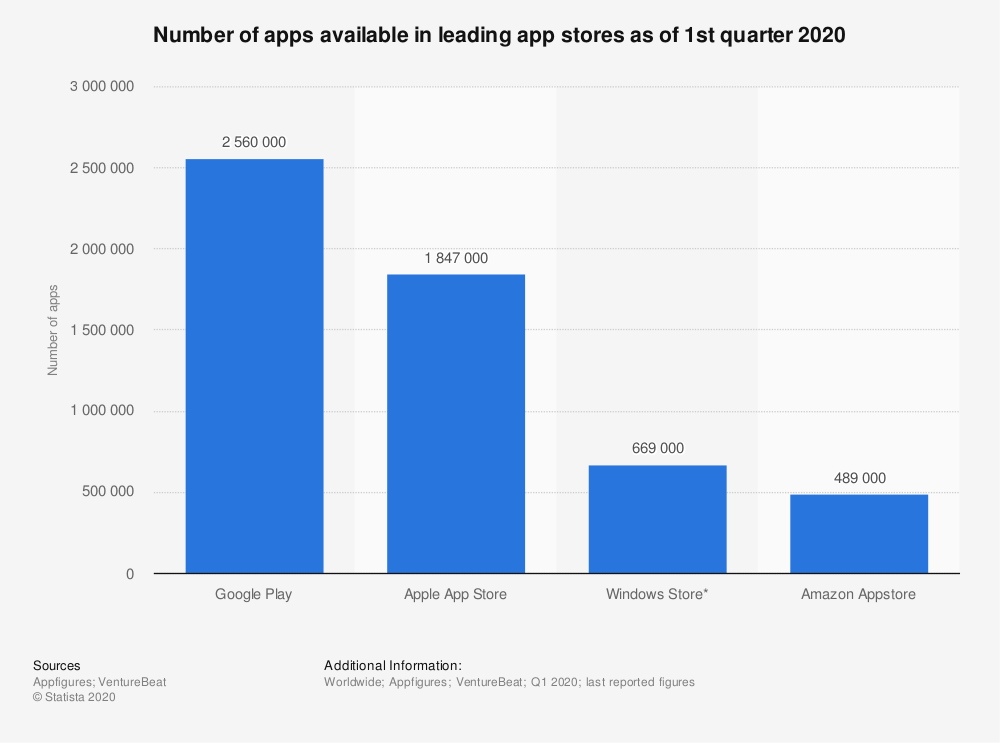
Apple’s App Store is the only destination where iOS apps can be published and downloaded from. To be quite precise, as of Q1 of 2020, there are approximately 1847000 apps available on the App Store, as per Statista.
Enough with the praises, we know what you are here for – how to publish an app to the Apple store for free. So, that is precisely what we will cover in detail in this article along with what you can do once you publish your app on the App Store.
Before we start with the steps for the submission process, let’s look at the things you should take care of before it.
Prerequisites
Test your app thoroughly
It is a given that before you submit an app to Apple Store or any platform for that matter, it has to be flawless. Hence, thorough testing is a must in this checklist.
Go through Apple guidelines
In order to avoid the fate of your app being ditched like a hot potato by the App Store, you have to go through the official Apple Store submission guidelines. This way, you will be able to make sure that your app passes all the necessary checks in the last and finally makes it live to the platform.
Enroll in Apple Developer Program Account
Before starting, you need to create an Apple Developer Account. That is the first thing you will need when you start.
Gather all the necessary information related to your app
Once you start with the process, you don’t want yourself searching for little pieces of information that you need to provide in order to submit your app to the Apple store. This is why it is better to prepare all the information related to your app.
Now, that the basics are out of the way, let’s move on to see the steps to publish your app to the Apple Store.
Steps to submit the app on the App Store
Step 1: Make an iOS distribution provisioning profile and certificate
For creating an iOS distribution provisioning certificate and profile, you can easily do it through XCode. With the automatic signing in enabled, you won’t have to worry about this step. However, for a manual signing in, follow these steps:
- Enter your Apple Developer Account to XCode. Now, select the ‘XCode’ from the top menu, and then select ‘Preferences’.
- Choose ‘Accounts’ and then in the bottom left corner, click on the ‘+’ sign followed by entering your Apple ID and password you used for Apple Developer Program.
- To enable the automatic signing, choose a target, and select ‘General’ from the ‘Project Editor’.
- Now, click on the triangle icon you will find while scrolling down to the ‘Signing’ section.
- From the expanded settings, click on Automatically manage signing and choose your team.
Once you connect a new device to the Mac device, XCode will now automatically find and register it to your team provisioning profile.
Note: To launch your app on any device, it requires to be registered on the team provisioning profile.
Step 2: Create an App Store Connect account (for free apps)
- Choose ‘My Apps’ on the App Store Connect dashboard
- Now, select the ‘+’ placed in the upper-left corner followed by ‘New App’.
- Now, you need to enter information to create a new App Store Connect record.
- You need to enter Platform, App Name, SKU, Default language, and Bundle ID.
Note: try using keywords in your app’s name for optimization. Also, the Bundle ID has to be similar to your bundle identifier in your XCode ‘Info.plist’ file.
Step 3: Use XCode to archive and upload the app
In this stage, you will have to upload your app’s build via XCode. Follow these steps for the same –
- Choose the option ‘Generic iOS Device’
- Navigate to the top menu and select ‘Product’.
- Now, click on ‘Archive’. XCode Organizer will now launch.
- Click on ‘Upload to App Store’ while making sure the current build is selected.
- Choose the credentials for the account you want to upload the build.
- In the next window, click on ‘Upload’
- When the success pop-up appears, select ‘Done’.
Step 4: Compose app metadata in App Store Connect record
Tips: In the ‘App Information’ page under the App Store tab, you can select additional languages, app’s privacy policy URL, and categories for the app.
Additionally, in the ‘features’ tab add configurations to any App Store technologies like Game Center, in-app purchases, etc. Also, do not forget to optimize the app’s description.
- When your app is marked with a yellow dot and the status reads as ‘prepare for Submission’, you need to select the build you want to configure.
- Now, upload the screenshots of your app (preferably in JPEG and PNG format) and select ‘Save’.
- Now, scroll down and enter the app’s description, keywords, preferred support URL with marketing URL.
- Now, in the “General App Information”, upload the app icon (should be 1024px x 1024px), mention the version number (same as the one in XCode), also the copyright and contact information.
- Select ‘Edit’ which is next to ‘Ratings’ and choose the preferred options.
- Now, you need to enter the contact information along with any notes you have prepared for the reviewer under ‘App Review Information’.
- Now, you can select the version release date.
- Click on the ‘Save’ option followed by ‘Submit for Review’.
Note: Leave the version release date to automatic for your first release. Also, notes for the reviewer can include data related to specific tools they might need for your app or user account information to access the app.
Step 5: App submission for review
- Here you need to navigate to the ‘Build’ section in your Apple Store Connect record.
- Choose ‘Select a build before you submit your app’ and select the one you uploaded with XCode previously.
- Hit ‘Done’ in the bottom-right corner followed by ‘Save’ in the top-right corner.
- Now, choose the ‘Submit for review’ option.
- Here you will be asked about ‘Export Compliance’, ‘Advertising Identifier questions’, and ‘Content Rights’.
- Click ‘Submit’ and the status will turn ‘Waiting For Review’.
Step 6: Check on the status of your app
- You need to choose ‘Activity’ in the Apple Store Connect on the horizontal menu.
Now, click on ‘App Store versions’ in the left-hand panel and Voila! You are done. You will be able to see the status of the app.
How to submit your iOS app with Swing2app?
Now, if you are someone who took the wise decision to create your business app on Swing2app app creation platform to reduce time-to-market to a few minutes, it becomes all the more easy for you to submit your app on Apple Store. Follow these remarkably simple steps –
- To submit upload your app on the App Store, you must select the ‘App Store Upload application’ once your app has been approved.
- Then, click the ‘OK’ dialogue box that will appear.
- You will be navigated to the payment page, there you can select ‘Basic Paid App’ plan for $33.
- Choose ‘App Store Upload Tickets’ under ‘Select options’ which will amount to $20.
- You can select your payment method and simply pay.
- You will also be required to verify identity by entering your mobile phone number.
Then, enter the code sent to the registered number and voila! Swing2app will take care of everything from there.
‘To-do’ after App Store submission
1.Start with the app promotion
Once your app is successfully live on the Apple Store, it is time for some marketing. One of the most popular and most common ways to promote your app is using social media.
Since more than 3.8 billion people already use social media, it only makes sense for you to promote your app on such platforms, right? To that end, you can start by promoting your on platforms like Facebook, Instagram, Pinterest, Reddit, etc. and then target other platforms.
2.App Store Optimization
ASO is a known practice that almost every business invests in at the moment. The strategy focuses on the keywords and features of your app that are more popular among users and have the potential to attract more eyes in a short time.
It increases the conversion rate of impressions into actual downloads on your app. This is an on-going process, but it is worth the efforts because the results derived are what you aim to achieve ultimately.
3.Keep updating your app
Once you have developed a mobile application for your business via a mobile app development agency or an app creation platform, the work is not done there.
You need to make sure to keep introducing new features and relevant updates to your iOS app so that it can provide what the users are demanding.
4.Press-Release
Another great way to put your app on the map and attract more eyes right after your app has been published is initiating a press release. This way, you can market your brand image, the USPs of your app, etc.
It is an effective strategy to target the audience and tell them that what they are being offered is indeed good and caters to their needs.
So, that’s a wrap.
With you knowing everything from the necessary steps on ‘how to publish an app to the Apple Store for free’ to what to do afterward, we hope your app will do wonders for you.
Do you want to know how to develop Free Mobile APP without code?