Learn how to create a professional health and wellness app using Swing2app no-code app maker.
It’s never been easier to start building apps with Swing2App no-code app builder. Using our visual programming tool available as ‘Preview window’, it’s simple to programme and intuitively create attractive, dynamic and efficient apps.
We’re passionate about making app development accessible to app developers of all backgrounds. Swing2App can be used to build marketplaces, directories, and even community forums.
Throughout this post, we’ll uncover the process behind building a health and wellness app using Swing2app no-code app builder. This tutorial blog will explain how to actually build the foundational workflow processes, functionalities, and features for your MVP app and how to publish your app on Appstore & Play store.
Steps to build a health and wellness app using Swing2app no-code app builder:
1. REGISTER WITH SWING2APP NO-CODE APP BUILDER:
You must first create your free Swing2App account before you can go ahead. Click the button below to get started, then you can follow along as we create our health and wellness app.
Register your account on Swing2App.
2. START BUILDING YOUR APP: 3 STEP PROCESS
STEP1 BASIC:
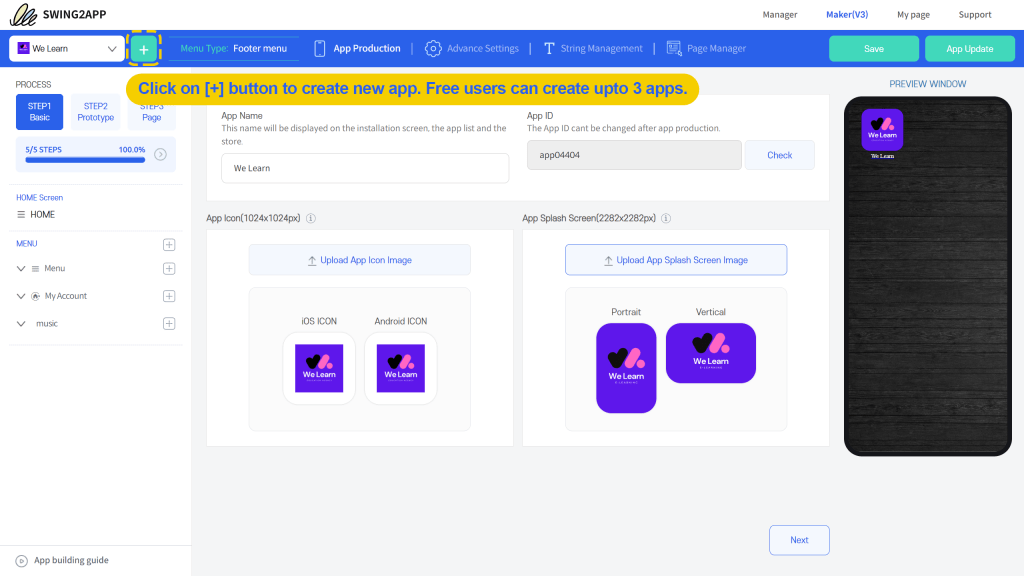
Let’s start building a Gym App. Click on the “+” icon to create a new application.
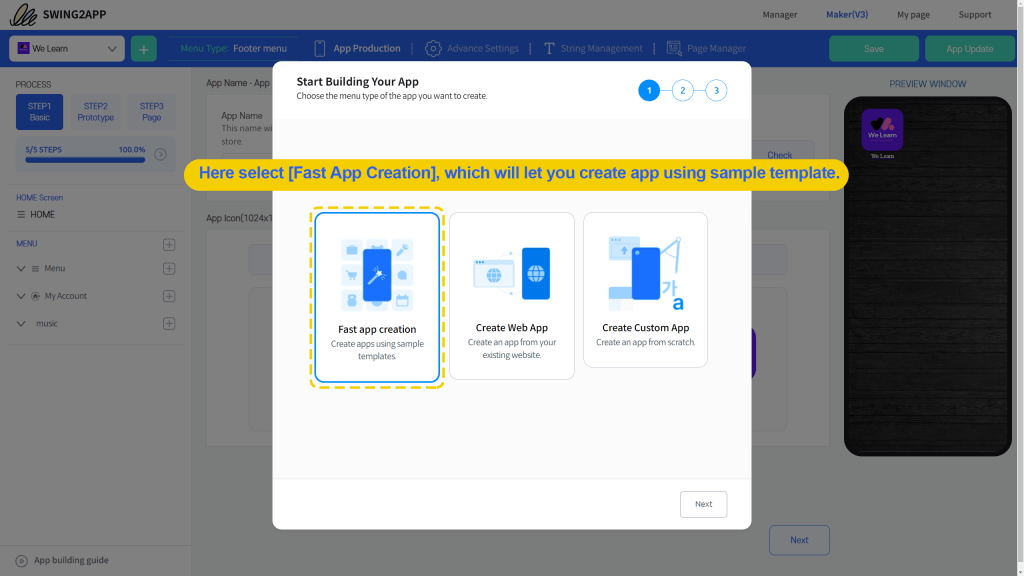
A dialogue box will pop up where you need to select “Create Custom App” where you can create an app from scratch. Then click next.
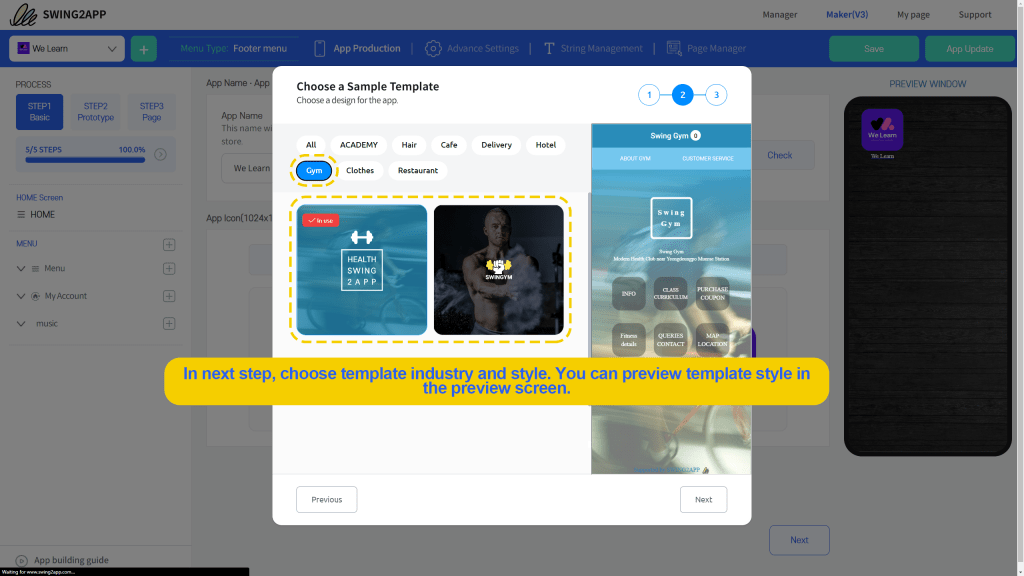
Then select industry you want to create an app for, you get to choose from: Academy, Hair, Café, Delivery, Hotel, Gym, Clothes, and Restaurant.
As here you want to create a health & wellness app, you can select ‘Gym’
The advantage of selecting an industry specific template is that you get prebuilt menus with added features, you just have to edit or rearrange them as per your needs.
Then click on ‘Next’ and name your app, upload app icon and splash screen. After this just click on ‘Finish’.
Read how to create a perfect app icon.
Also, know all about splash screens and how to create one.
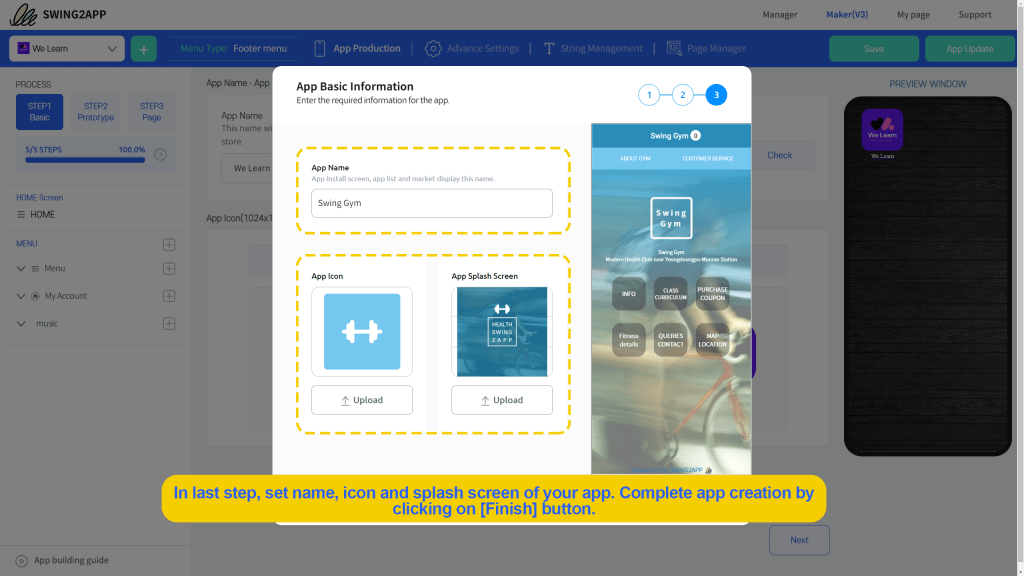
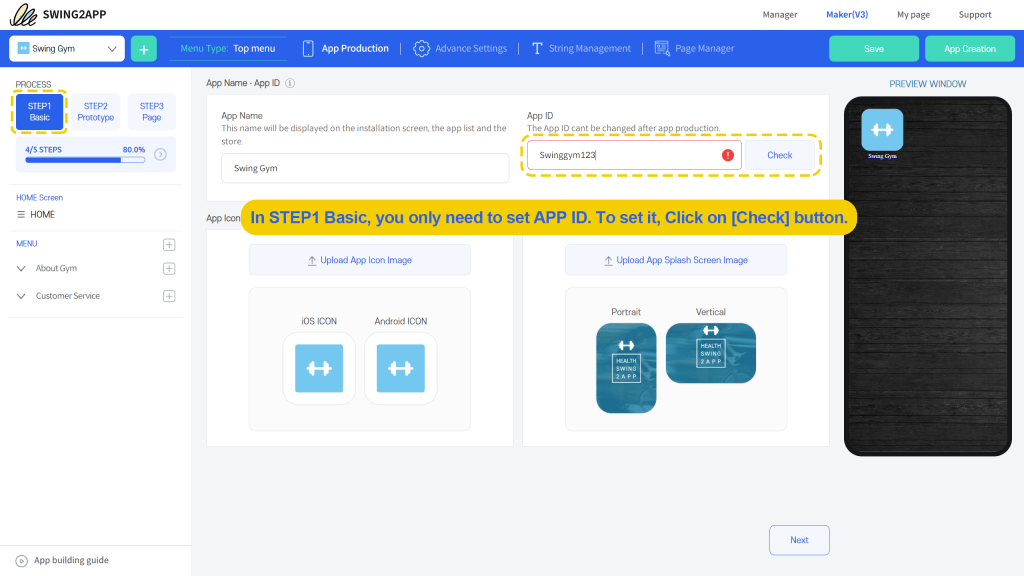
Next you have to set you unique app id, it must be 6 characters alphanumeric. Don’t forget to check your app id is available or not.
Then you will be taken to step 2.
STEP 2: PROTOTYPE
The default prototype here is ‘Top’, however, you can change it to any other type if you want, it changes the display of your menu in the app. Swing2App provides 5 types of prototypes: Slide, Top, Footer, Drop-down list, and Drop-down Box.
It totally depends upon your app and your preferred UI (User Interface) that you want for your app.
Read about 5 Types of UI provided by Swing2App no-code app builder and which is best for your app.
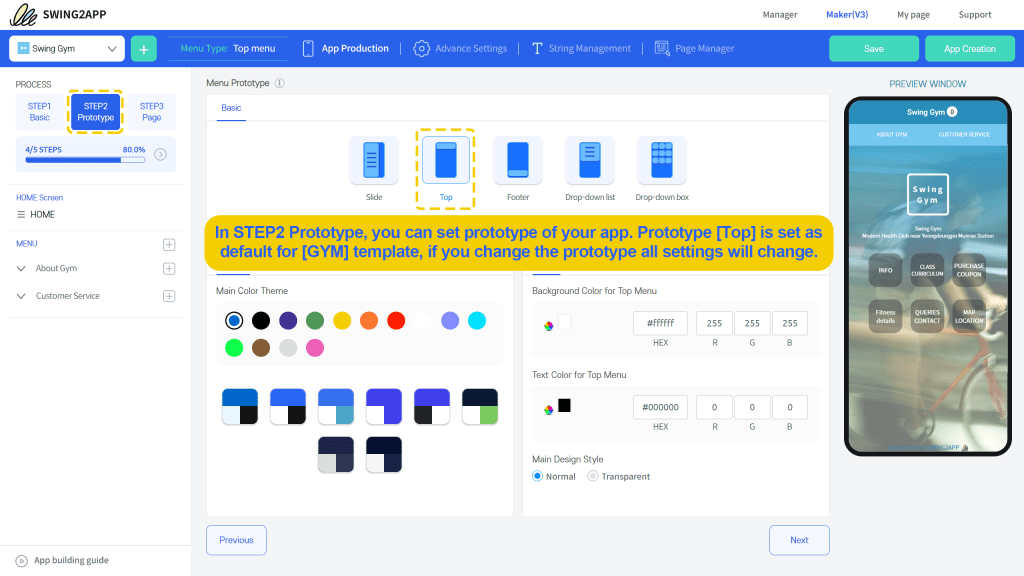
Then you can change the app theme and font color in the Basic and Advanced style options as per the Gym app requirements.
You can either choose from the presets provided on Swing2App no-code app builder platform or go to custom settings and select colors for Main Background, Text, and Theme.
In the advanced settings you can set menu text color and background color as well, moreover you can also set the menu style as transparent. Transparent menu style will look like below, here the menu will not be having a distinct background and will merge with the main app screen.

With this you are all done with Step 2, let’s go to the Step 3.
STEP 3 PAGE:
Here you can edit your Home & Menu items.
Home: You can select from a variety of prebuilt templates and set it as your Home screen of your app. Before actually applying you can preview different options before selecting the best one for your app.
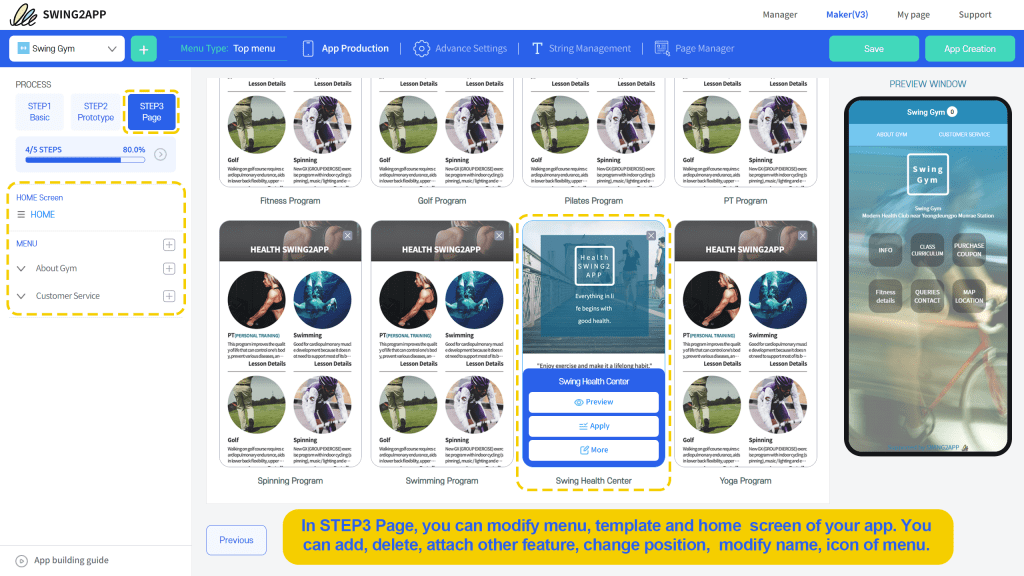
After this you can add, delete or modify the present menu options. In this pre-set you have 2 Menu options: About Gym & Customer Service.
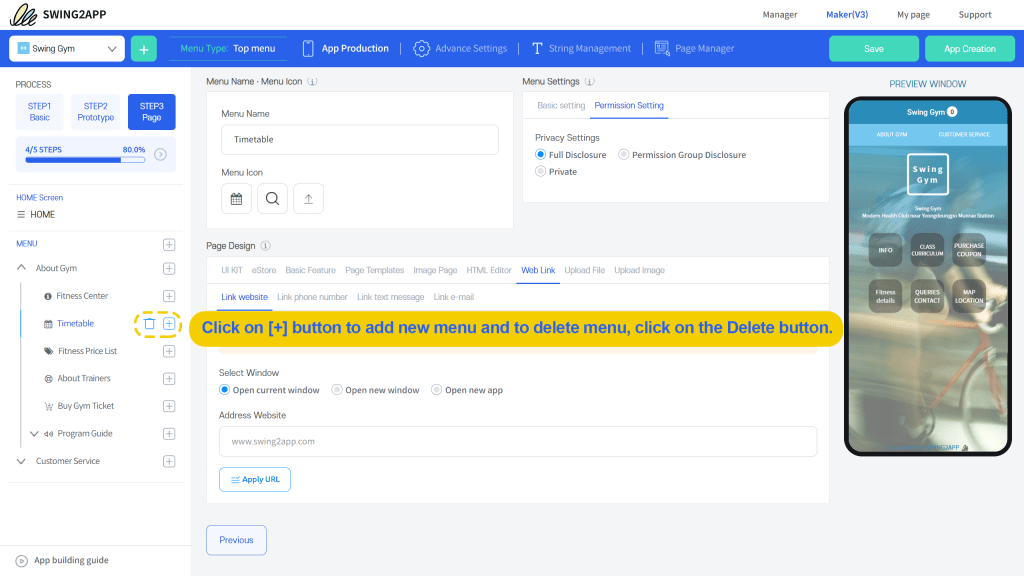
Add new menu:
Click on (+) icon on right of Menu to add another menu, here you can set the name of your Newly created menu, add menu icon.
Menu activation and deactivation functions:
This is quite helpful when you are testing new menus and categories and want to ensure that everything fits properly before actually publishing it to your users.
Administrators can only check the app creation dashboard that is being worked on. When all tasks are completed, please change to enable visibility again.
Once all the menus are enabled, they will be automatically reflected in your app!
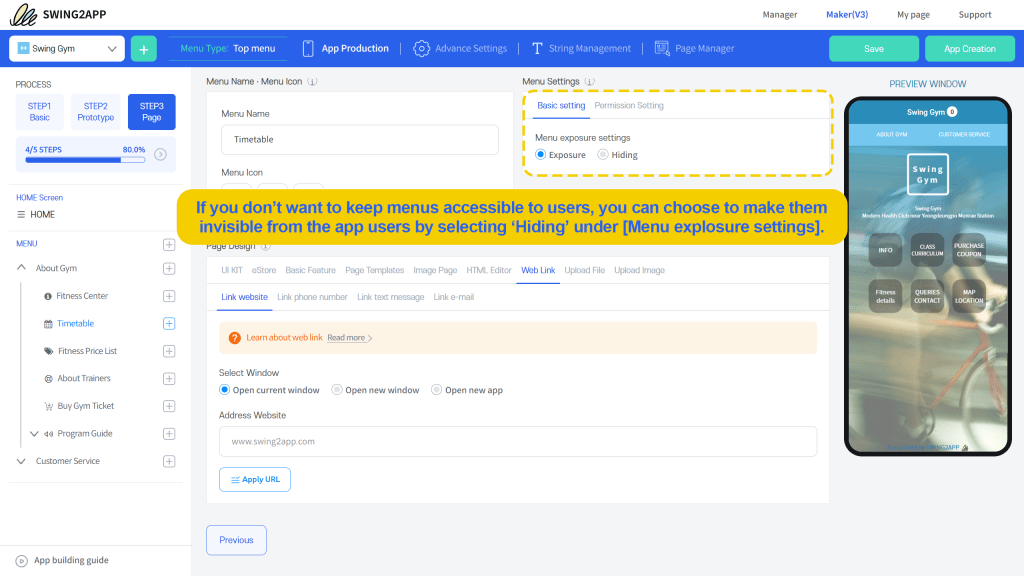
Menu authorization:
The functionality to set permissions to certain users to access the menu is also added.
You can choose whether to allow all users to view the menu applied to the app, only to members who have signed up for the app, or for them to view only specified permitted menus.
If you select Permissions, you can choose which groups you want the menus to be accessible to.
(Specified permission is a permission group, which refers to a group set by the administrator between 1 and 9 levels of permission allowance)
Delete menu:
Hover your mouse icon over the Menu that you want to delete, and you can see the bin icon, click it and your menu will be deleted.
Now each menu has a list other menu option within it, which are linked to certain page or provide some feature. In this pre-set you get the following menu options with features attached to it.
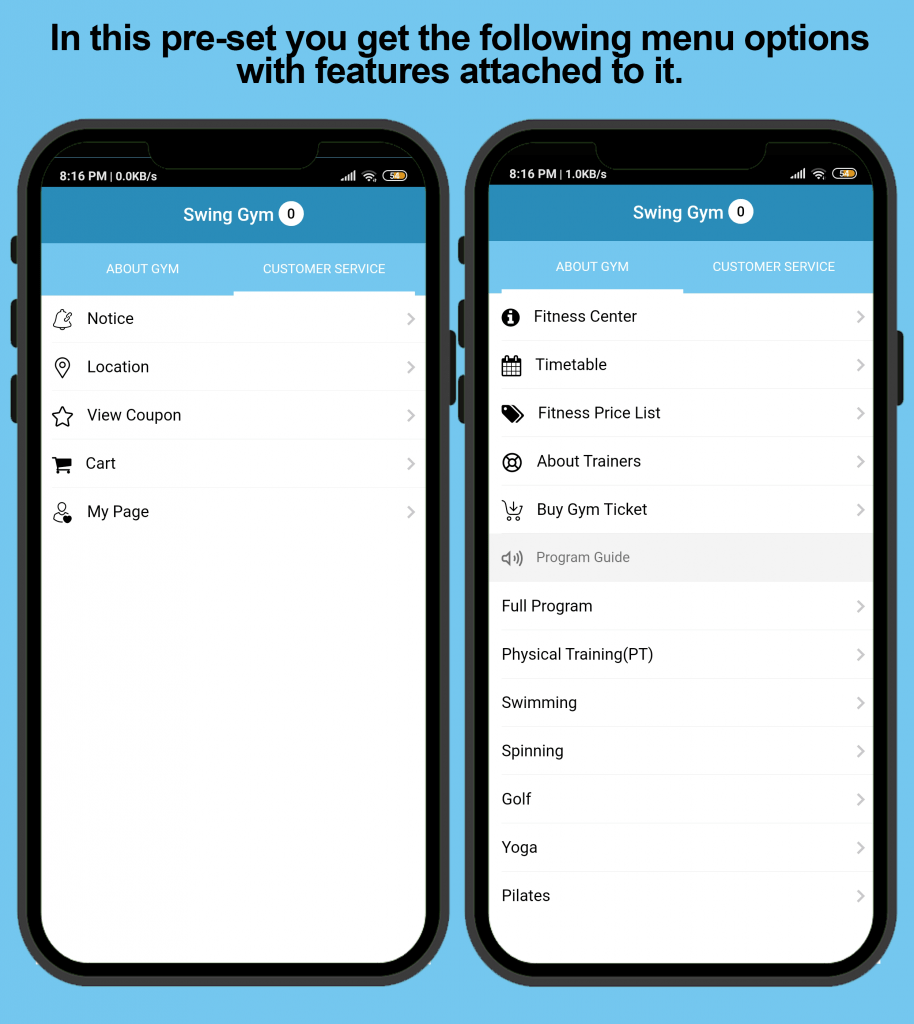
You can edit, delete or add more depending on your needs.
In the left panel click on the down arrow button of menu About Gym.
Here you can view the entire list of menu options under the head “About Gym”.
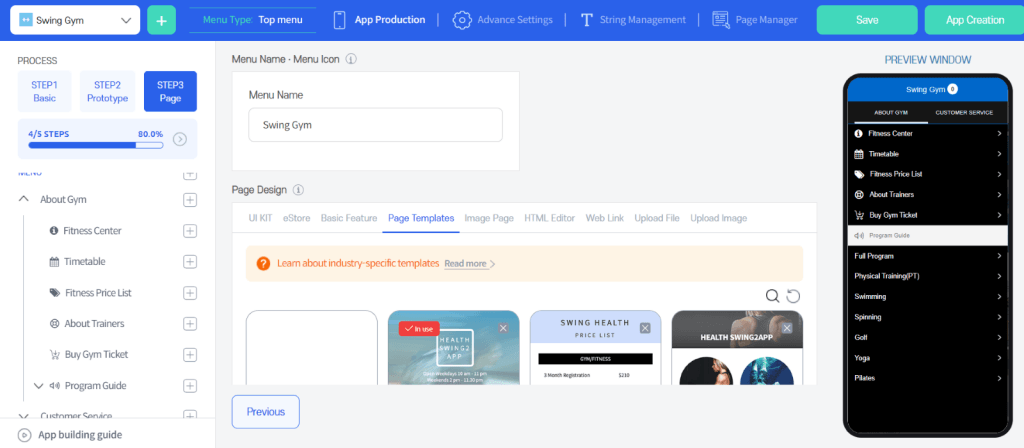
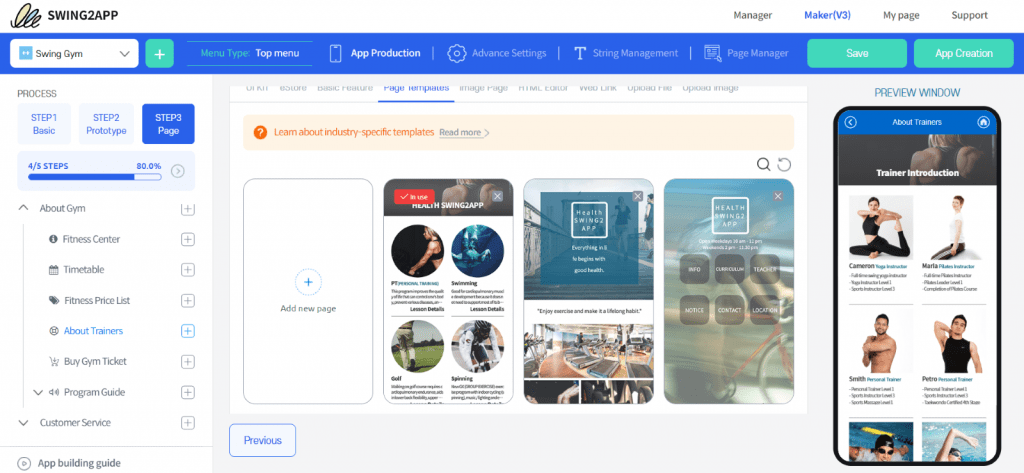
If you select any menu, for example, “About trainers”, you can see a page template attached to it, which is set as default. If you wish you can select another page template by previewing them before applying it to the particular menu.
Note: Always remember to “Apply”, just selecting won’t apply the template automatically to your menu option.
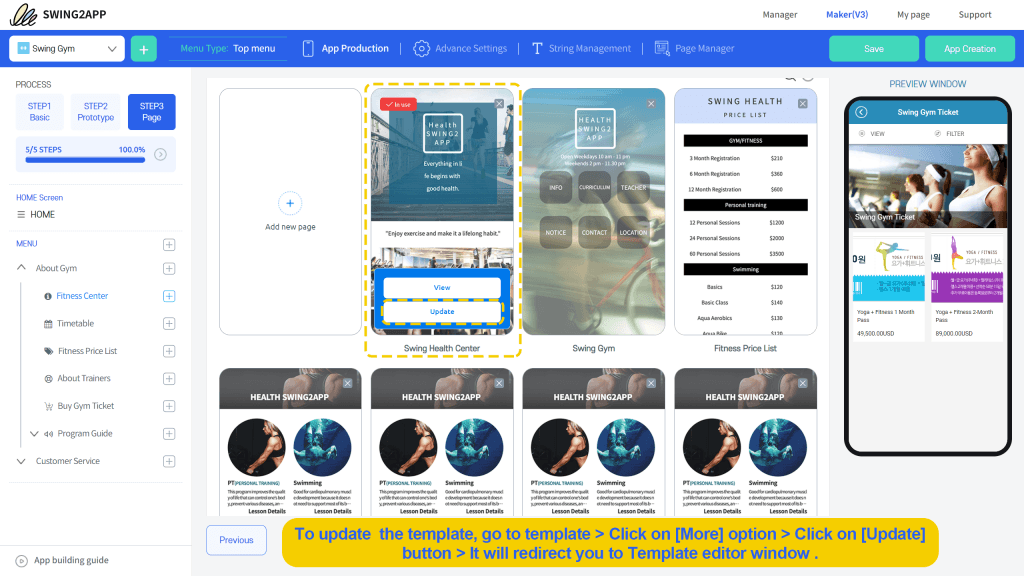
EDITING TEMPLATE
You can also edit the templates, to add your Gym instructors and their details in the selected template within this Gym App template. To do this you have to select “More” by clicking on the selected template and then on “Update”.
A new window will open where you can edit the template easily.
BULLETIN BOARD
Bulletin board provides a variety of features like: chat, map, Calander and much more. To add or edit any of these in your menu options you need to do some extra work.
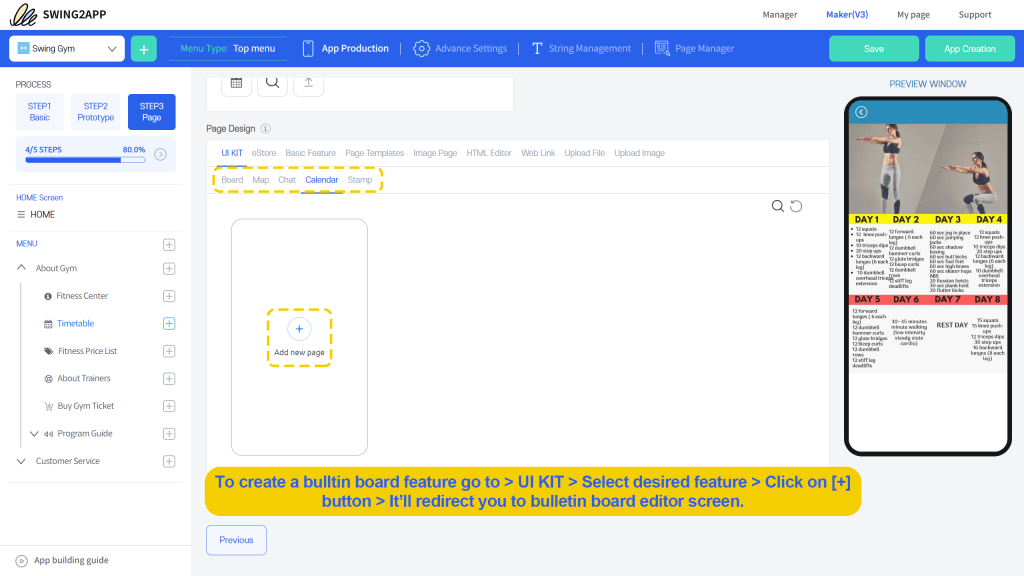
For example, here you can see in the option “Time-Table” that an image is uploaded displaying a weekly timetable in the Gym App. However, if you want to add a Calander here to add a daily Timetable and enable other features like: booking, setting event dates, and much more, you will have to use the Calander bulletin board.
In the page design select UI Kit and then select Clander. Click on Add new page. Then will lead you to a new tab.
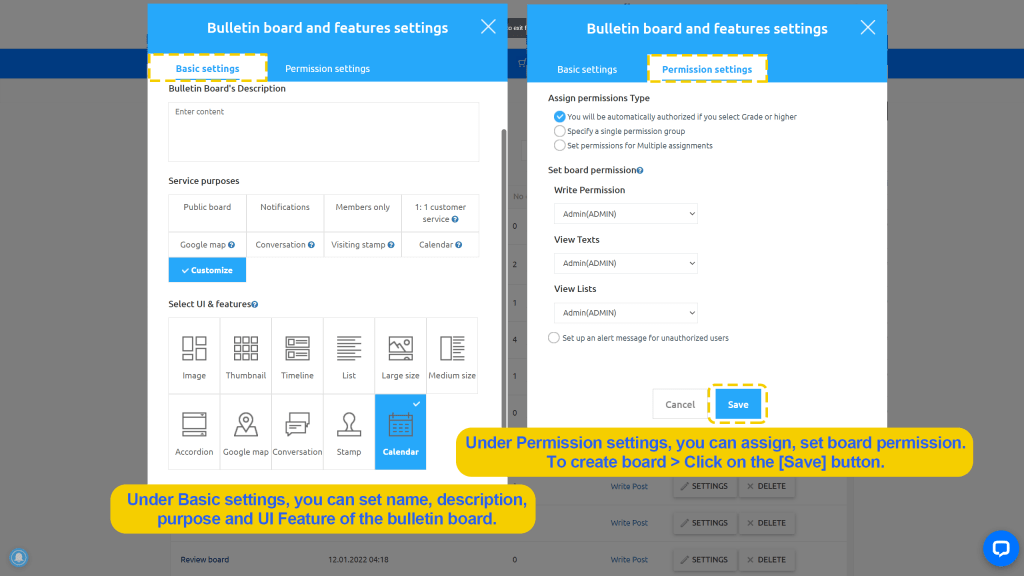
In Basic Setting write down the Bulletin board name: “Time-Table”, then select Service purposes as “Calendar” and Click Save.
In permission settings you can restrict or permit a group or individual to access the bulletin board.
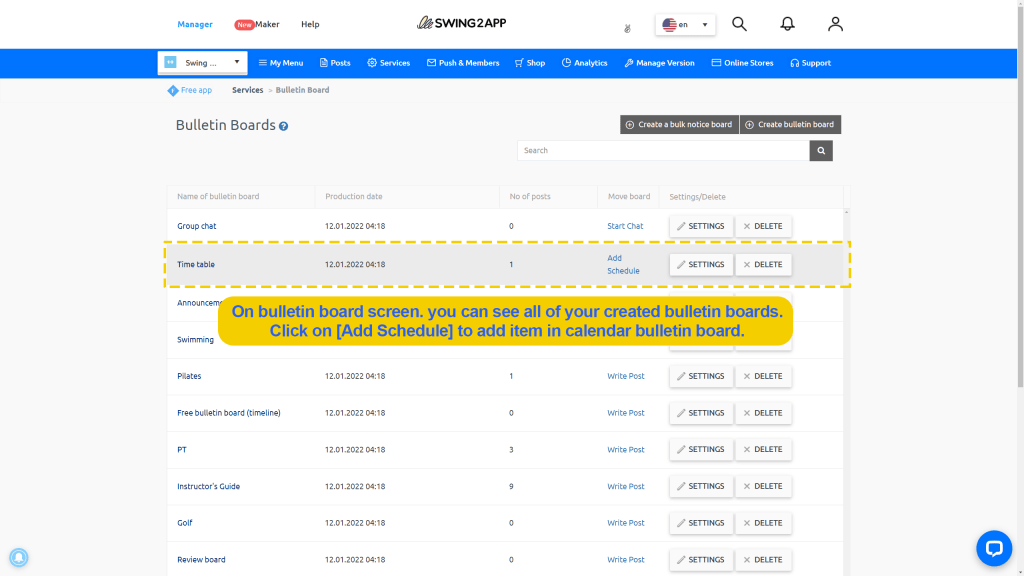
Then you can see your newly create bulletin board on the top. Click on “Add Schedule”.
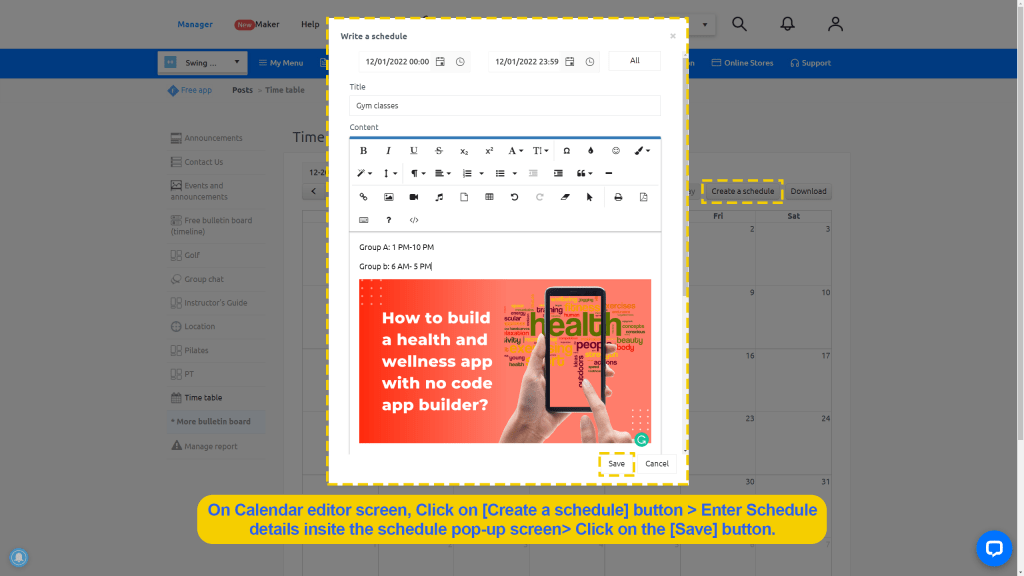
The Calander page will open, there click on “Create a Schedule”. A pop-up box will be displayed where you must fill in the necessary details. Click “Save” to create the schedule.
You can also add image, video, music or other features as per your need. For example, you can upload workout videos in your Gym App to motivate your customers.
This was the entire process of creating a Calander bulletin board in your Gym App, similarly you can create other bulletin boards.
After this go back to UI KIT, select “Calander” & refresh it. Then you will see your newly created bulletin board.
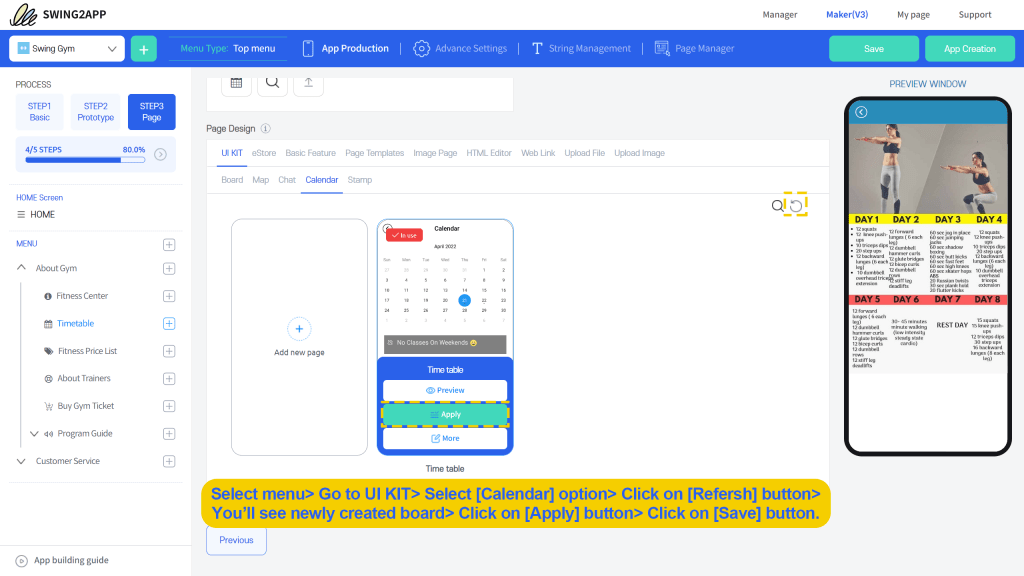
Click on “apply” by selecting the Calander bulletin board, in the preview window you will see instantly the Calander applied.
You can edit other menu options too in a similar way, all this can be done without any coding, only with Swing2App no-code app builder.
3. APP CREATION AND UPDATE
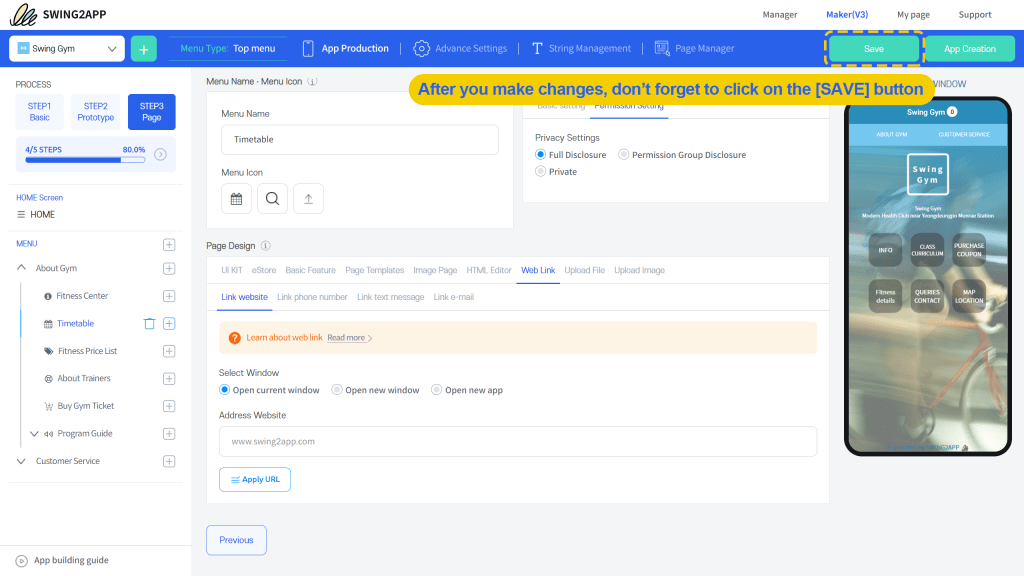
Once you have edited the menus or added the new menus, click on “save” to save your work.
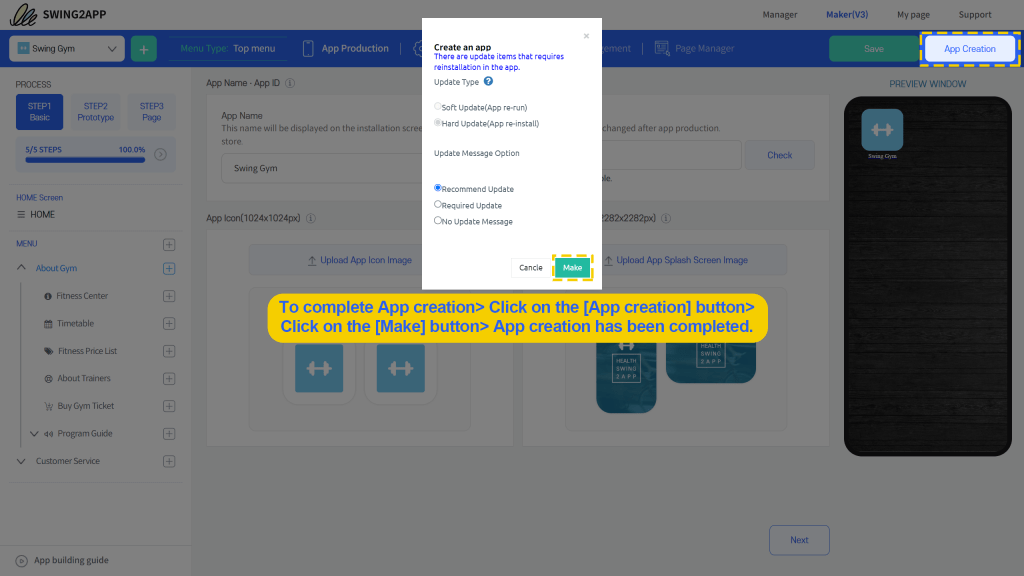
The date and time of saving the app creation will be displayed. Then click on “App Creation” to create your Gym App. With this the 3rd and final step is complete.
A pop-up will display: Recommend Update and click on Make. Your app production request has been completed message will pop up.
And you will be automatically taken to the Production history page. Here you can preview your Gym app online by clicking on “App Preview”
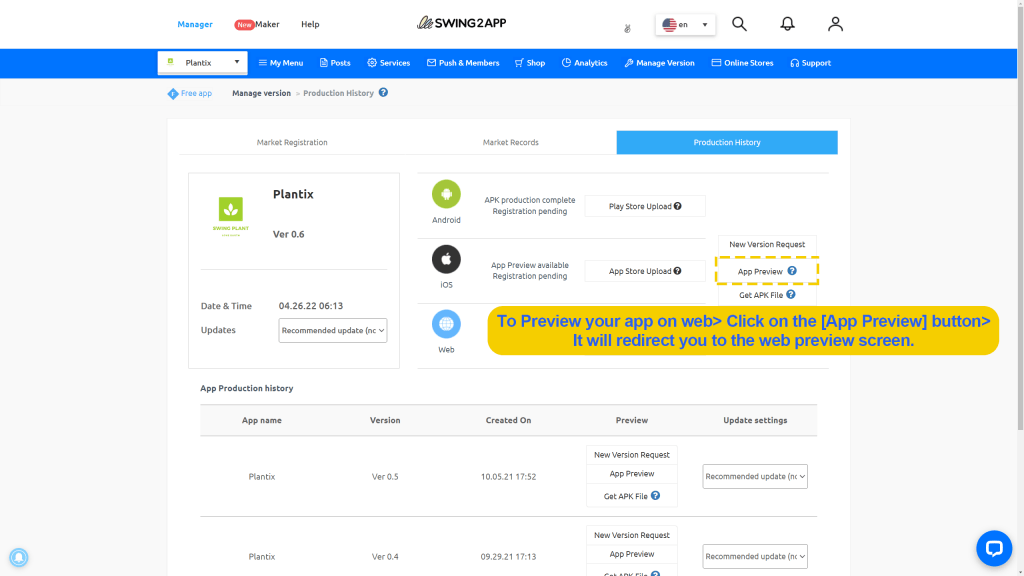
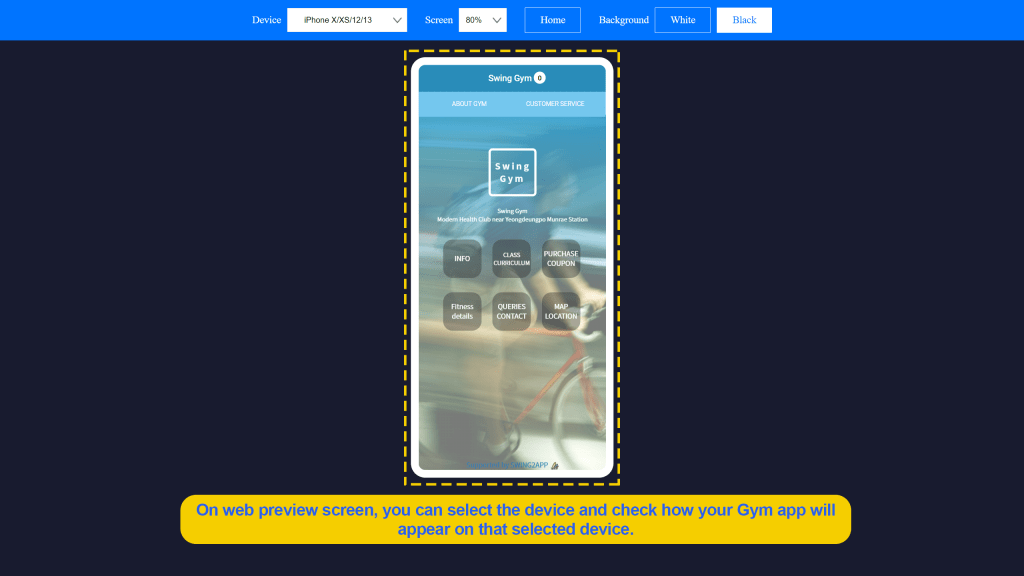
The app preview window will open in a new tab,
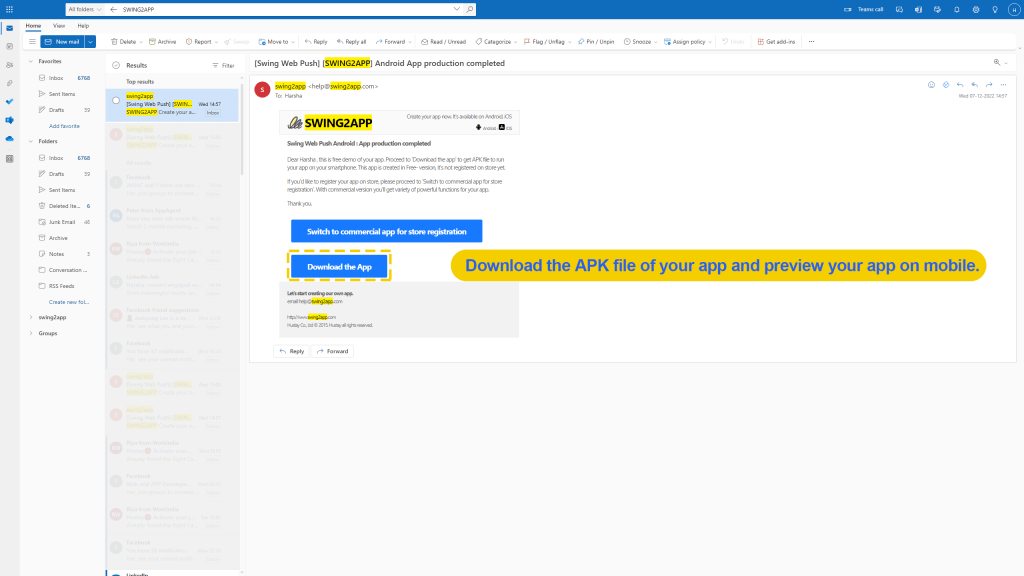
4. Download APK and test App
The app can be downloaded and checked directly ONLY on Android devices but not on iOS devices.
As soon as your app production is completed you will receive an email regarding your newly created Gym App on your registered mailing address, where you can simply click on “Download the App” and preview it on your Android device.
5. Publish your App
The cost of hiring a developer or development team to build this app would be thousands, if not tens of thousands. It’s time to sit back and relax since Swing2App is a free no-code app builder.
In the future, you’ll be able to host the app on your own custom domain with paid plans starting at $33 per month. Plugins and templates may cost more, but you can build all the features of a social network for free.
Swing2App no-code app builder is not just limited to creating apps from prebuilt templates converting but beyond that. It also includes converting website to app, creating an app from scratch, App publishing on Appstore and Google Play store and much more.
Though the entire process of creating no-code apps is totally free, however, you need to pay when you are ready to publish your app.
Swing2App no code app builder is not only time efficient but also cost efficient too. We provide of variety of paid app plans: monthly, half-yearly and annual packages. With Annual packages you get more discount as compared to monthly plans.
The Swing2App no-code app builder provides three major plans: Basic, Expandable and Premium; checkout the additional features you get with each plan below.
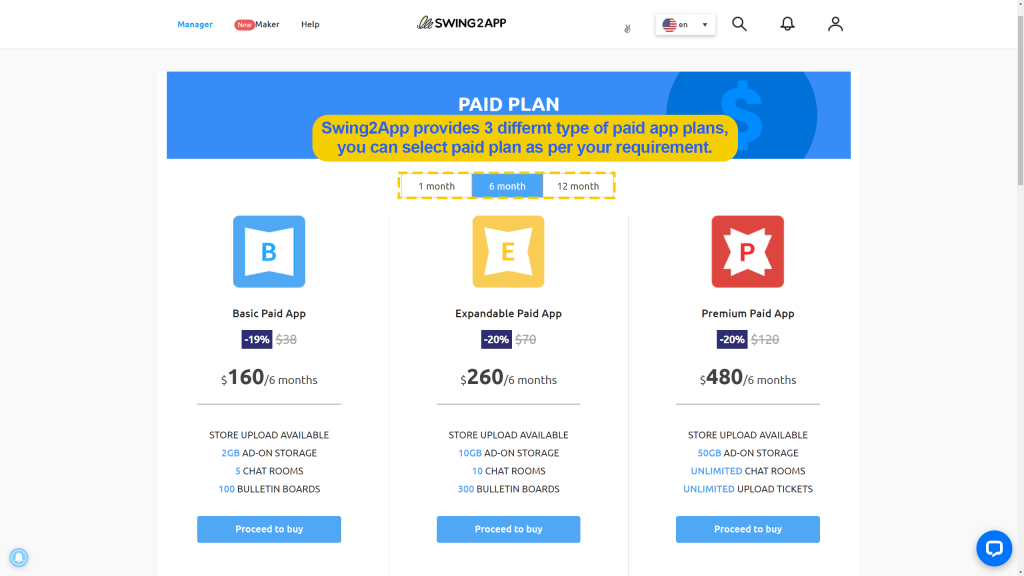
If you want Swing2App no-code app builder to upload your app to the App store rather than doing it yourself, you need to purchase store upload ticked separately for Play store and Appstore.

START BUILDING
With the Swing2App no-code app builder, you can easily build a gym app, as shown in the tutorial, or any other product you like! The ability to build something incredible without knowing a word of code has never been easier.
To get started for free, sign up here.