Discover the booming world of online learning with a fresh perspective! 
Edtech apps like Skillshare, Coursera, and Khan Academy are famous worldwide. Even big players like Google and LinkedIn have joined the edtech trend by launching their own learning and classroom apps. 
If you’re looking to be a part of this educational revolution by building your ed-tech app, you’re in the right place. Swing2App’s no-code app builder is here to empower creators of all backgrounds to craft stunning apps without the fuss of coding. 
Whether you’re envisioning building an edtech app like the existing ones or turning your own idea into an app, Swing2App no-code app builder will help you bring your ideas to life. 
In this post, we’ll unravel the art of building an ed-tech app using Swing2App’s no-code platform. 
So, stick around as we guide you through the exciting journey of creating your own learning and ed-tech app, whether you’re inspired by Skillshare or Coursera, or you have a unique concept ready to shine. 
ONLINE EDUCATION & LEARNING INDUSTRY STATISTICS
The global EdTech industry is a rapidly growing sector that is Revolutionizing the way students learn and get knowledge.
Education is one of the world’s single largest industries, making up more than 6% of GDP. We expect total global expenditure from governments, companies, and consumers together to reach $7.3T by 2025.

Moreover, education is the third most popular category on the Apple App Store, after Games and Business, and the second most popular on Google Play after Gaming Apps.
Did you know that students and learners are embracing educational technology? In fact, 43% of college students in the US have found digital study tools incredibly helpful, according to Statista.
However, here’s the challenge: education often doesn’t get as much funding as other sectors. Innovation, which is vital for progress, requires investment. While governments are grappling with limited budgets for education, schools and institutions are trying to cut costs while also embracing digital transformation.
Here’s where the solution lies: Education needs more private capital to drive the innovation it desperately needs. The key to this lies in Public-Private Partnerships, which can play a pivotal role in fueling growth, fostering innovation, and making education more accessible.
By harnessing the power of Swing2App’s no-code app builder to create innovative ed-tech apps affordably, you can be part of the solution. Your app can contribute to the future of education by providing innovative tools that enhance learning and accessibility.
BENEFITS OF ED TECH APPS
EdTech apps have taken the world of education by storm, and it’s no wonder why. The increasing popularity of EdTech apps can be attributed to the many benefits they offer, such as:
Personalized Learning:
EdTech apps tailor the learning experience to each student’s unique needs. Ed-tech apps understand your strengths and weaknesses and guide you through lessons at your own pace.
Learning on the Go:
You no longer need to be present in a classroom or library to learn something new. With EdTech apps, educational resources are available whenever and wherever you are. Whether you’re on a bus, at home, or in a café, knowledge is at your fingertips.
Interactive Engagement:
Learning becomes exciting with interactive content. From immersive simulations to gamified lessons, EdTech apps make the journey enjoyable. Say goodbye to boring textbooks!
Collaborative Learning:
The EdTech app fosters collaboration among students and teachers. Imagine a virtual classroom where you can discuss, share, and learn from peers and instructors, transcending physical boundaries.
Effortless Progress Tracking:
These apps provide real-time feedback and performance analysis. You can see your strengths, identify areas for improvement, and track your educational journey with ease.
With EdTech apps, learning is no longer confined to the traditional classroom. It’s an exciting adventure filled with opportunities for growth and exploration.
KEY FEATURES OF A SUCCESSFUL ED-TECH APP
For an EdTech app to truly shine, it needs to be a beacon of user-friendly excellence, addressing the unique demands of learners and educators. Here are the features that elevate an Ed-Tech app:
User-Friendly Interface:
Imagine an app that feels like second nature, where every tap and swipe is intuitive. A user-friendly interface is the gateway to seamless learning.
High-Quality, Engaging Content:
Learning should never be a bore, and with an Ed-Tech app, it doesn’t have to be. It’s all about top-notch content that keeps you hooked, and eager to explore every lesson.
Customization and Personalization:
We’re all unique learners, and an Ed-Tech app should honor that. The ability to tailor your learning journey, whether you’re a budding mathematician or a language enthusiast, is invaluable.
Effective Communication and Collaboration:
Learning is often a shared experience. Ed-Tech apps that enable communication and collaboration between students and teachers create a vibrant learning community.
Robust Data Security and Privacy:
Trust is paramount, especially when it comes to educational materials. Users want to know their data is safe. A reliable Ed-Tech app ensures robust data security and privacy measures are in place.
In the world of education, Ed-Tech apps are revolutionizing how we learn and teach. The key to their success lies in these features, shaping the future of education one user-friendly interface, engaging lessons, and personalized experience at a time.
Discover Swing2App no-code app builder, where Ed-Tech app development dreams come true:
No-Code Magic: Build apps effortlessly.
Engaging Content: Curate quality, personalized content.
Seamless Interaction: Foster student-teacher collaboration.
Data Security: Trust our robust privacy measures.
Cost-Efficient: It’s free, no-code, and wallet-friendly.
Long-Term Support: We’re here for your Ed-Tech journey.
Elevate education with Swing2App no-code app builder!
HOW TO BUILD AN ED-TECH WITH SWING2APP?
Ed-tech apps generally sell digital products (PDFs, video courses, coupons) on their apps. So, let’s see how to register digital products on the Swing2App no-code app builder.
Click here to learn how to create an ed-tech app from the beginning using Swing2App no-code app builder.
Swing2App ed-tech app demo:
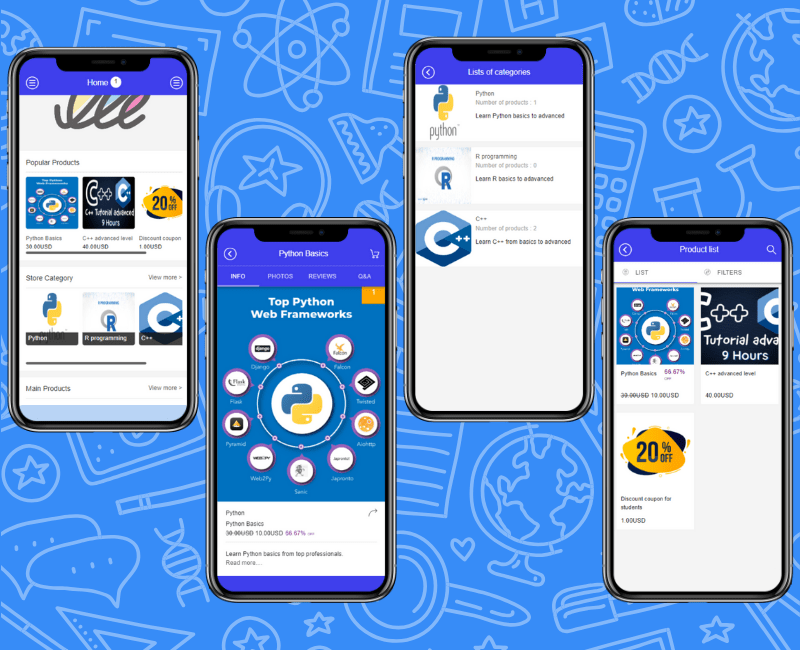
If you want to build an app like this, keep reading!
To create a physical or digital product-selling app you must first register your store details on the Swing store. Swing Store is a shopping mall service provided by the no-code app maker Swing2App.
Swing Store can be registered by selecting a variety of product types – Original Products, reservations products, digital products, etc.
Digital products are the type of product that sells intangible content. Swing2App no-code app builder provides 3 types of digital product registration: Video & file, PDF, and coupons. Let’s learn how to register each type one by one.
However, to register and apply these digital products in your ed-tech app you first need to set up Swing Store. Learn how to apply Swing store menu in your ed-tech app.
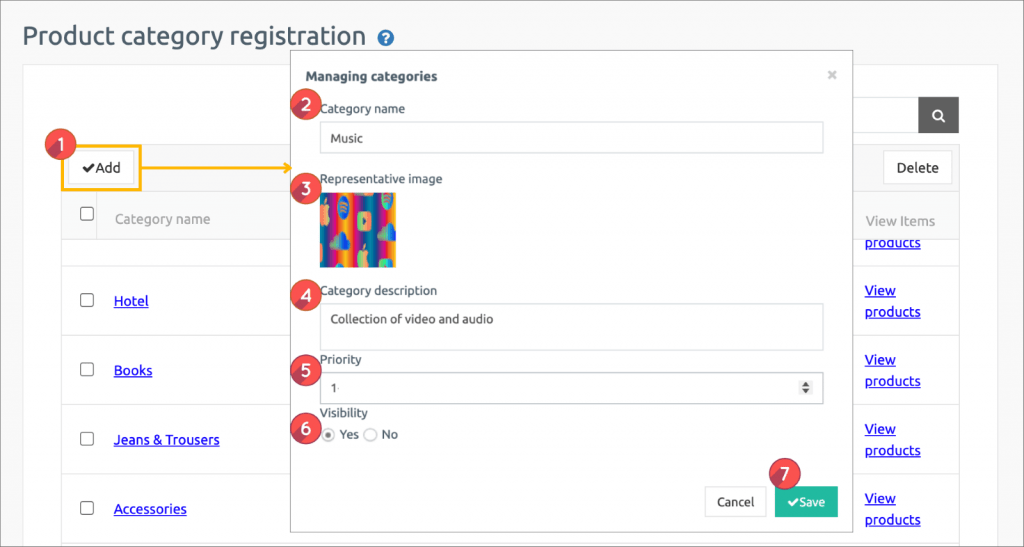
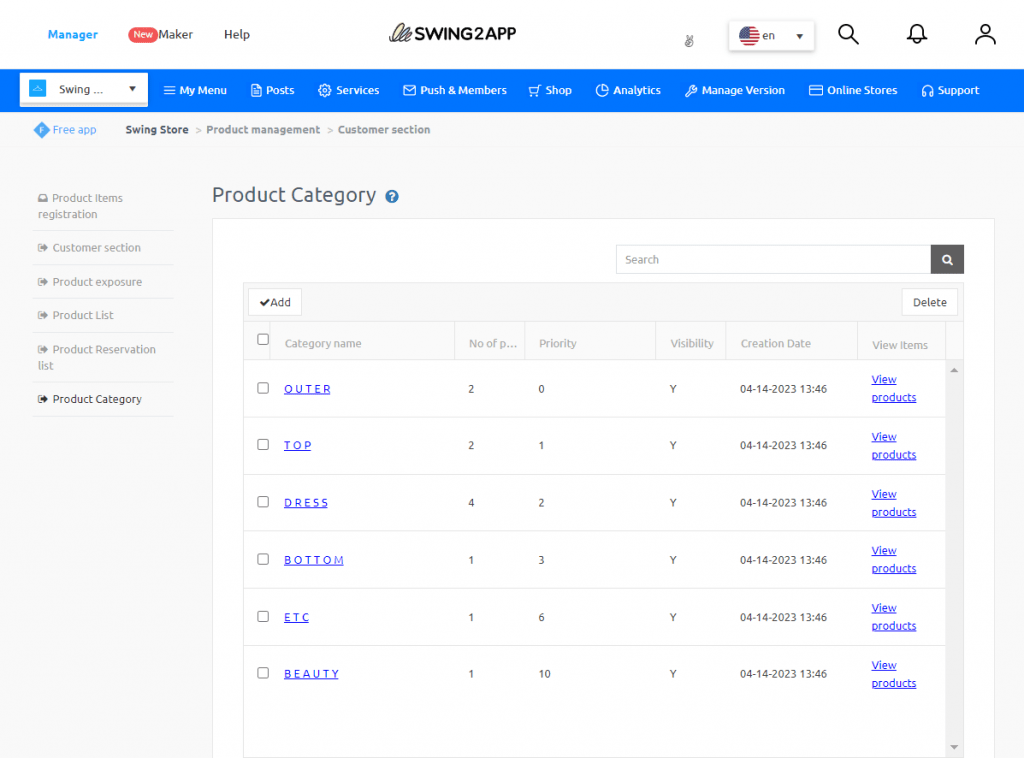
Then you must register product categories, only after that you can register products under different product categories. For example, if you create a product category named Python in your ed-tech app, you may create different products under it like Python for beginners, professionals, etc.
Move to Swing Store → Product Management → Product Category Registration Management menu.
Now, let’s learn digital product registration in your ed-tech app using Swing2App no-code app builder.
1) Select Digital Products [Video and File]

Let’s explore how to register digital products within your Ed-Tech app using the user-friendly Swing2App no-code app builder. This process is designed to make it simple for both educators and learners to access valuable digital resources. Follow these straightforward steps to seamlessly integrate digital products into your educational platform:
1. Select Product Type and Category:
Begin by choosing ‘Digital’ as your product type, ensuring that your app aligns with the needs of your users. Determine the specific category [Video and File] for your digital product, which helps organize and streamline content.
2. Upload Digital Content:
With Swing2App, you can easily upload videos, files, or other digital materials you want to make available within your app. This step allows educators to provide students with convenient access to valuable resources.
3. Define Sharing Preferences:
Decide whether you want to permit external sharing and interlocking of your digital content. If you prefer to limit sharing to within the app, check the ‘Do not share or sync externally’ option.


4. Set Product Details:
Fill up the details: Product Name, Product Image, Registration Status, Product Price, Batch Order and Payment Method.
5. Offer Discounts (Optional):
You have the option to apply discounts to your digital products. If you choose to offer discounts, you can specify the amount and duration.
6. Manage Inventory (Optional):
Determine whether you want to keep track of product inventory. This feature ensures efficient management of product availability.
7. Add Optional Items:
Enhance your digital product with additional optional items that may enhance the learning experience.
8. Provide Product Descriptions:
Brief Description: Craft a concise one-line introduction for your digital product.
Product Description: Offer detailed information, including product images, descriptions, and essential product details.
9. Upload Product Images:
Include multiple images related to your digital product. These images can be reordered as needed to create an engaging visual experience.
10. Customize Order Form:
If your digital product requires specific information from users, customize the order form accordingly.
11. Personalize Ordered Messages (Optional):
Add personalized messages if needed to enhance the user experience.
12. Save and Complete Registration:
Once you’ve filled in all the necessary details, click the ‘Save’ button to complete the registration process.
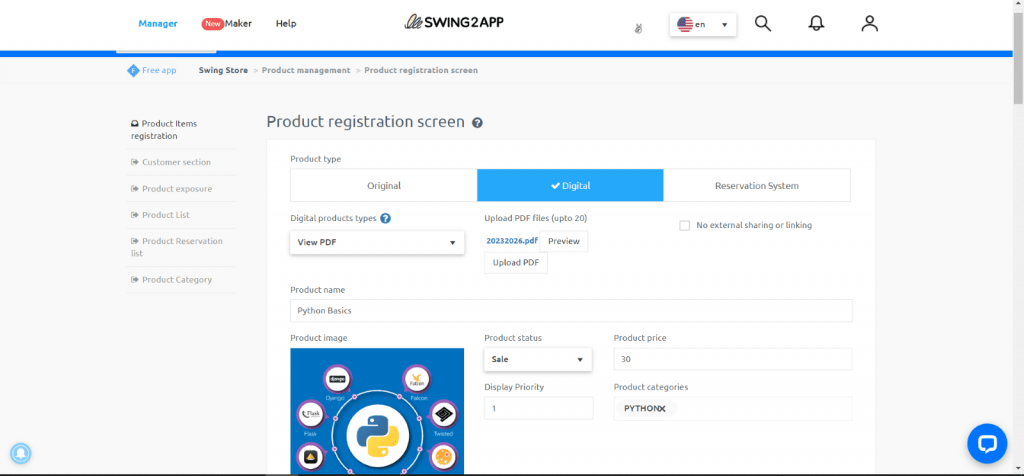
2) Register digital products –PDF
Please go to Swing Store → Product Management → Product Registration.
1. Product type: Select ‘Digital’.
2. Select Digital Product Type: [change permissions, PDF view, video and file sales, coupons] can be selected. This is the only difference; the rest is the same as above.
Select ‘View PDF’ for the post you need.
You can sell coupons to users of the swing store digital products by registering the coupon.
You can use the coupon shipping function and swing store payment service provided by Swing2App.
For example, 1-month membership of ed-tech app course, nail shop gel nail coupon, haircut 30% discount coupon, etc.
You can create these coupons, apply them to the Swing Store feature app, and purchase the coupons you want.
Existing swing2app coupon issuing service and + swing store coupons made by combining the way to the actual purchase.
Let’s see how to register your offer in the swing store and apply it to the app.
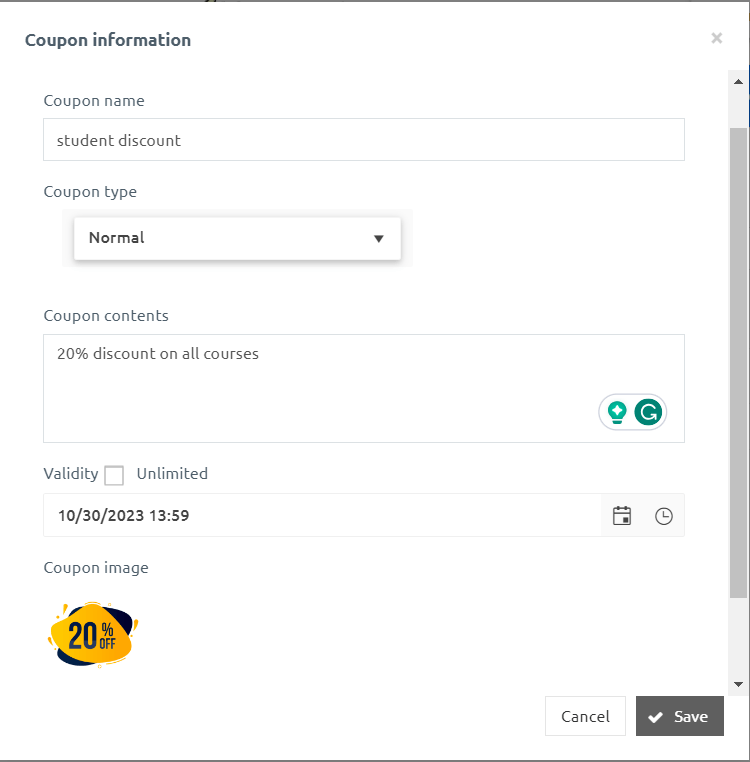
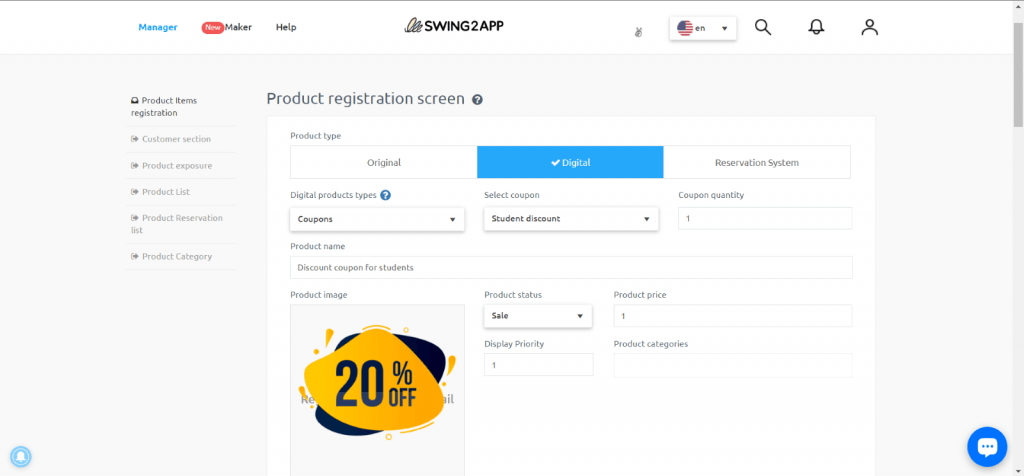
Register a coupon
Move to Swing2App Manager Page → Services → Coupons menu.
On the Coupons screen, click Add Coupons. A Coupon information window will open and enter the information.
Enter the Coupon name, content, and validity of the coupon either by selecting the date and time or checking Unlimited and the image for the coupon.
Once the category has been created, we’ll register and apply the coupon among digital products.
Go to Swing Store → Product Management → Product Registration screen.
1. Product Type: Select ‘Digital’.
2. Digital Product Type: Select from [Change permissions, PDF view, video and file sales, coupon].
In this manual, you will select and register a ‘coupon’!
3. Select Coupon: Select the coupon you want have created.
4. Coupon quantity: Enter the quantity sold.
The default quantity is 1. (One coupon is issued at the time of payment). If you need to issue multiple coupons at the time of purchase, you can enter the desired number in quantity.
For example, student discount coupons for $10 can be used for the ed-tech apps.
The next steps are similar to the one shown in registering video digital products in your ed-tech app, as shown above.
Moreover, with Swing2App no-code app builder you can also restrict users from using/viewing certain features by using the permission group settings.
What is a digital product ‘permission change’?
It is a type of shopping mall that allows users to view the content by buying the rating provided by the app.
For example, VIP customers, premium customers, and top customers are divided into ratings to create products for each level.
Apply content that can be viewed by each grade!
When buying VIP permission -> All bulletin boards can be read
When buying a premium right -> General bulletin boards can be read except VIP board
When buying the right authority -> Only the basic information board can be read
Learn more about the Swing2App no-code app builder permission change option here.
START BUILDING YOUR ED-TECH APP WITH THE SWING2APP NO-CODE APP BUILDER
Unlock the limitless potential of Ed-Tech apps with Swing2App’s revolutionary no-code app builder. Whether you aspire to create a Coursera or Udemy clone or have a unique vision, it’s never been simpler to turn your dream into reality, without the need for coding expertise.
Join the no-code movement today! Sign up for your free Swing2App no-code app builder account and embark on your Ed-Tech app development journey. Our intuitive education app creator streamlines the process, taking mere minutes to craft your vision. Plus, it’s budget-friendly, ensuring your financial peace of mind.
Once your Ed-Tech app is live, the possibilities are endless. Optimize it for app stores, launch marketing campaigns, and spread the word far and wide. Swing2App no-code app builder empowers you to make a significant impact in the world of education, one no-code creation at a time. Don’t wait; start your Ed-Tech revolution today!
In a world where every minute counts, calendars have become our trusty companions for managing time effectively. From work deadlines to social gatherings, these digital timekeepers help us stay organized. While many apps offer basic in-app calendars, building a tailored calendar app can be an exciting endeavor. Fortunately, technology has evolved to offer us in-app calendar solutions that simplify our lives.
While many apps incorporate basic in-app calendars, creating a customized and seamless in-app calendar app can appear as a complex undertaking. This journey is all about exploring the realm of calendar app development. We’ll navigate through the process of crafting your very own feature-rich and visually appealing calendar app. We’ll guide you through the process of crafting your very own beautiful and functional calendar app.
Throughout this journey, we’ll uncover essential tools, cutting-edge technologies, and must-have features that can transform your calendar app vision into reality. Whether you’re an aspiring app developer or a business owner looking to enhance user experiences, this discussion will provide invaluable insights into the world of calendar apps.
So, let’s dive into the world of calendars, where we’ll unravel the secrets to crafting a fantastic in-app calendar app that simplifies and enhances time management.
UNLOCKING THE POWER OF IN-APP CALENDARS ACROSS INDUSTRIES
In today’s fast-paced world, the humble in-app calendar has evolved into a digital powerhouse that enhances our daily lives. In-app calendars, in particular, have taken center stage, elevating the functionality and user experience of various applications.
These digital calendars aren’t just about marking dates; they offer sleek designs, intuitive interfaces, and seamless user experiences. While the applications may vary, the goal remains the same: empowering users to efficiently manage their time and schedules. Let’s explore a multitude of industries that have harnessed the potential of in-app calendars:
1. Logistics:
Efficiency is the name of the game in logistics, where precise timing is crucial for tasks like loading, shipping, and delivery. Take Uber Freight, for instance; it seamlessly integrates an in-app calendar, allowing carriers and shippers to plan and track their shipments with ease.
2. Education:
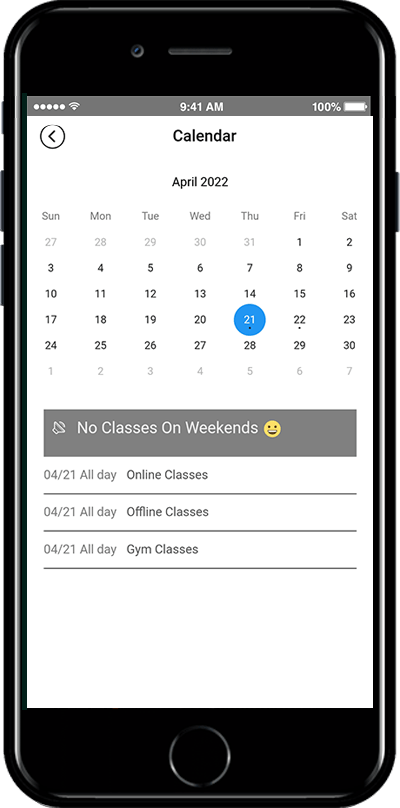
With the rise of online education, calendars have become invaluable tools. They assist in scheduling lectures, assignments, and Q&A sessions. In-app calendars ensure students never miss an online class or assignment deadline, sending timely reminders.
3. Parking and Transportation:
In the world of parking apps and scheduled rides, in-app calendars are indispensable. Users can effortlessly book parking slots or schedule rides, receiving reminders when it’s time to hit the road.
4. Healthcare:
The healthcare sector relies on in-app calendars for medication schedules, doctor appointments, and fitness tracking. Users can monitor their physical activities, ensuring they reach their health goals.
5. Streaming Applications:
Streaming platforms leverage in-app calendars to promote live shows, interviews, and scheduled broadcasts. Services like Amazon Prime and Netflix allow users to register for premieres, ensuring they catch their favorite content on time.
6. Travel and Hospitality:
From flight reservations to hotel bookings, travel and hospitality platforms utilize in-app calendars to display availability and booked dates, simplifying the planning process.
7. Social Media Platforms:
Social platforms like Facebook and Telegram keep users informed about upcoming events, group meetings, and conferences. Users can also schedule messages, enhancing their communication experience.
For businesses looking to integrate in-app calendars, two paths await: building a custom app from scratch or utilizing existing solutions. Creating a tailored in-app calendar app involves careful consideration of technology stacks, synchronization capabilities, and app design. To guide you on this journey, we’ll shed light on how to construct an in-app calendar seamlessly using Swing2App’s no-code app builder. Stay tuned to transform your app into a time-management powerhouse!
REVOLUTIONIZING YOUR APP DEVELOPMENT JOURNEY WITH SWING2APP NO-CODE BUILDER
The world of app development has undergone a remarkable transformation, thanks to the emergence of no-code mobile app builders. Building an app for your business has transitioned from a complex endeavor to a user-friendly, efficient process. With a plethora of impressive features and tools at your disposal, it’s no wonder that startups are increasingly favoring rapid app development over traditional methods.
Among the indispensable features, the in-app calendar stands out as a practical gem. If you’re creating an enterprise app geared towards streamlining communication between employees and processes, incorporating a calendar with reservation capabilities is a no-brainer. It serves as the central hub for logging meetings and related activities, ensuring seamless coordination.
Enter Swing2App no-code app builder, a trusted app builder platform that empowers users with a diverse array of features, including the coveted in-app calendar and reservation system. But that’s not all; you can also schedule events and broadcast announcements, enhancing your app’s functionality and user engagement.
If you’re intrigued and eager to explore how to integrate this remarkable feature into your app, you’ve come to the right place. This article will guide you through the process, shedding light on practical use cases and real-world applications.
Moreover, it’s essential to recognize that the in-app calendar isn’t exclusive to enterprise apps; its versatility extends to various app types, such as salon apps, gym apps, and beyond. We’ll illustrate this versatility by showcasing the steps to seamlessly integrate the calendar feature into your app, providing you with valuable insights and a clear path to enhancing your app’s functionality. Stay tuned for a journey into the world of no-code app development and the limitless possibilities of in-app calendars.
HOW TO USE THE IN-APP CALENDAR FUNCTION IN VARIOUS CASES IN SWING2APP NO-CODE APP BUILDER
Mastering the in-app Calendar Function with Swing2App’s No-Code App Builder!
The power of an in-app calendar cannot be underestimated. It streamlines event registration, and reservation management, and even serves as a platform for important announcements. Whether you’re running a university, managing a salon, or operating in various other industries, the in-app calendar function proves invaluable in enhancing your app’s capabilities and user experience.
The in-app calendar can be used in various ways depending on the purpose of the app. Using Swing2App no-code app builder only administrators can fill in the schedule, users can use the schedule for notification.
Swing2App no-code app builder, a leading no-code app builder, simplifies the integration of this essential feature into your app. To embark on this journey, follow these steps:
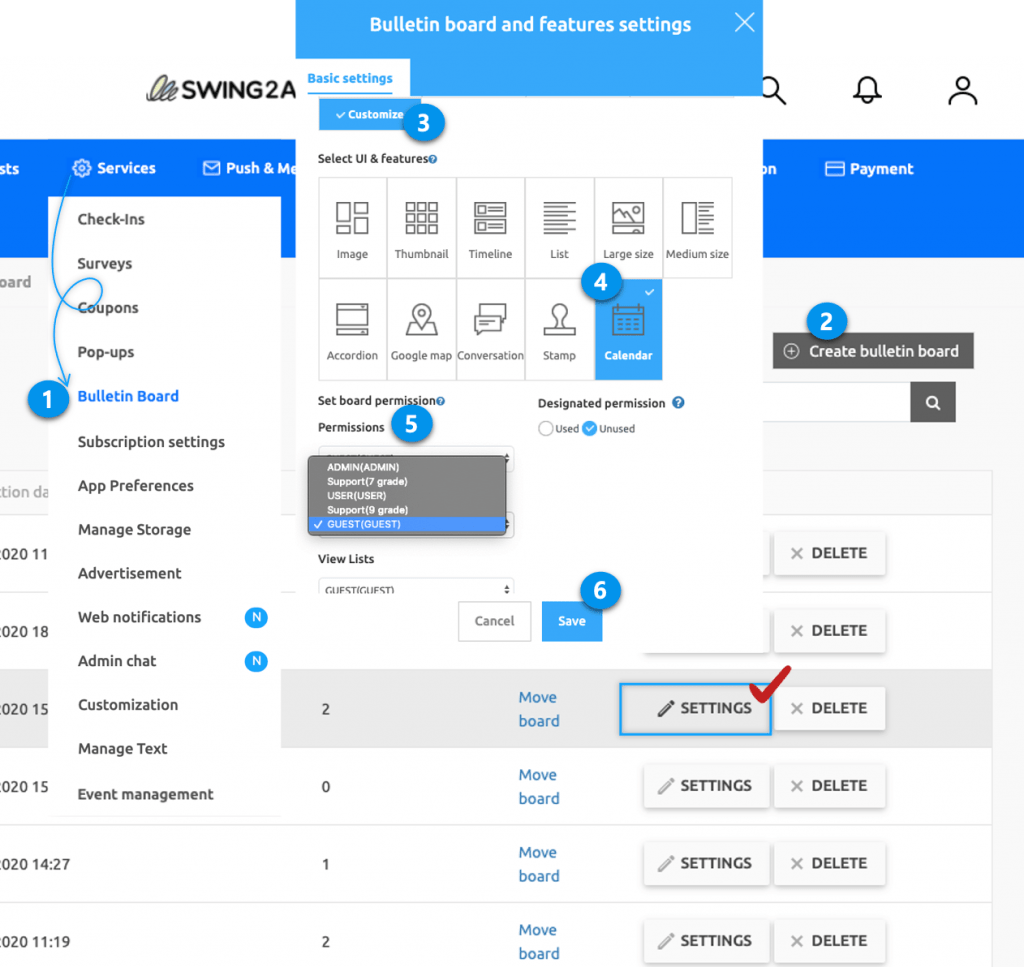
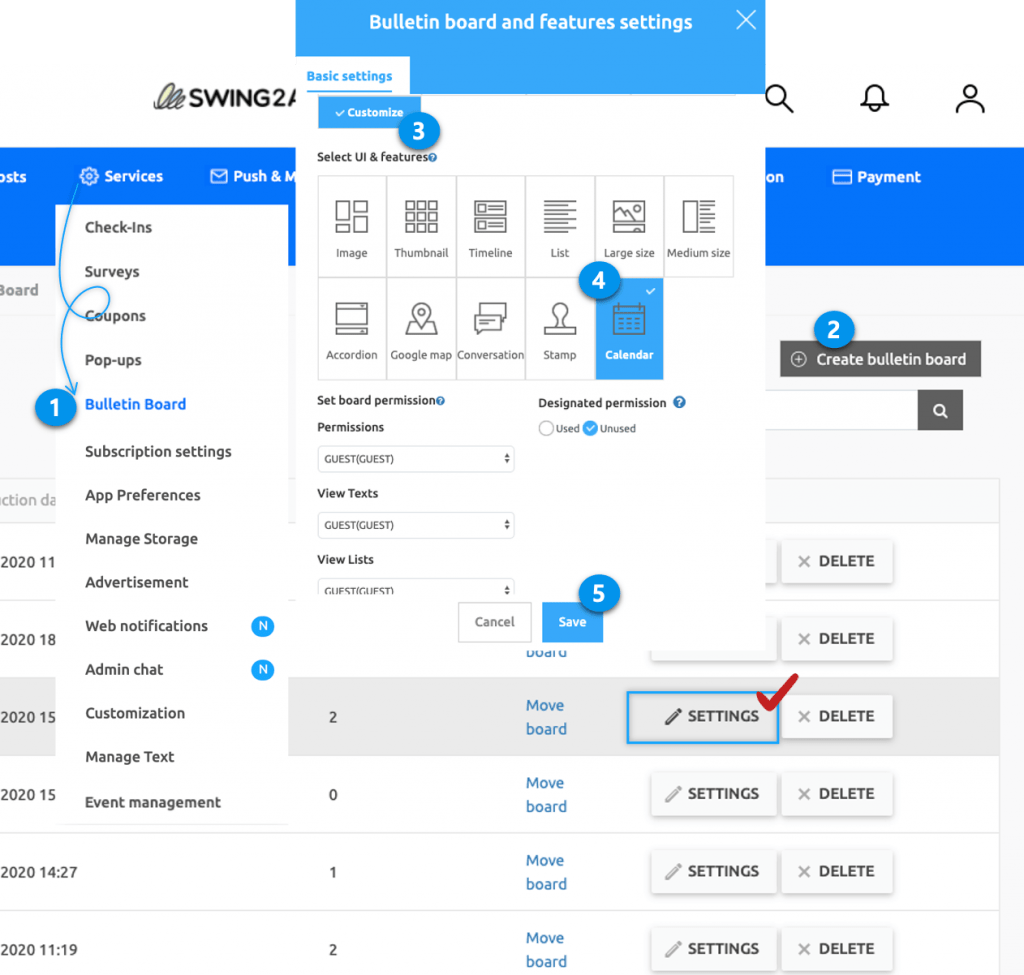
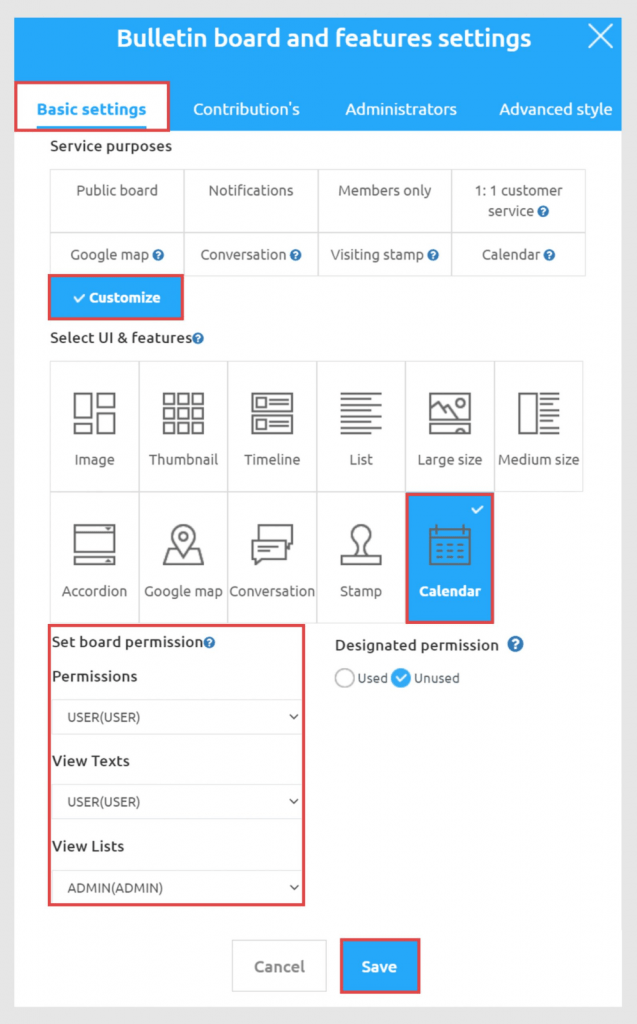
Step1: Create a calendar
Go to Manager. Select Services and click on Bulletin Board from the list.
Either click on Create Bulletin Board to create a new board or click on Settings to edit the existing board.
Select Customize.
Select Calendar.
Set the permission for the board.
Click on Save.
Step.2 Apply the Calendar Bulletin Board to the App
Apply the calendar to the app.
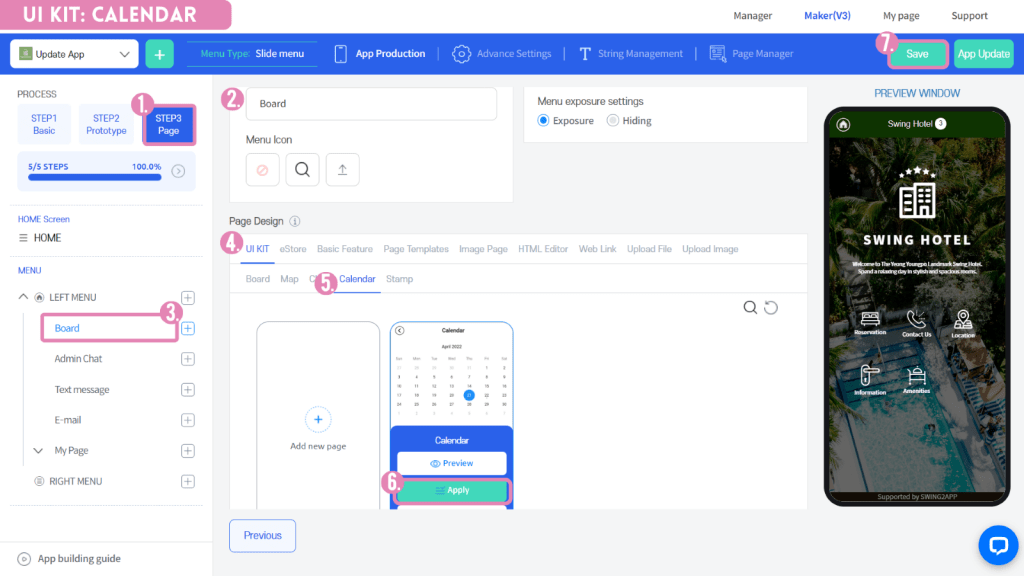
1)App Maker v3 screen – Select STEP3 page
2)Select Menu *If you haven’t created a menu yet, you can add a menu by selecting the + shape button.
3)Enter a menu name.
4)Select [UI KIT] from the page design.
5)Select [Calendar].
6) Check the calendar you created, and then select the [Apply] button. (Hover over the mouse cursor on the page to open the Apply button)
*Please create an app calendar board first.
If you don’t have a calendar created, it won’t appear on the screen and can’t be applied to the app.
*You can select the [New] button on the UI KIT screen, or create a board in App Operation-Service Management-Board Management.
7) Press the [Save] button at the top of the screen to apply it to the app.
*Icons are optional, please select only when applying an icon in front of the menu.
Step3. How to use the calendar application
We will show you how to use various calendar applications in earnest.
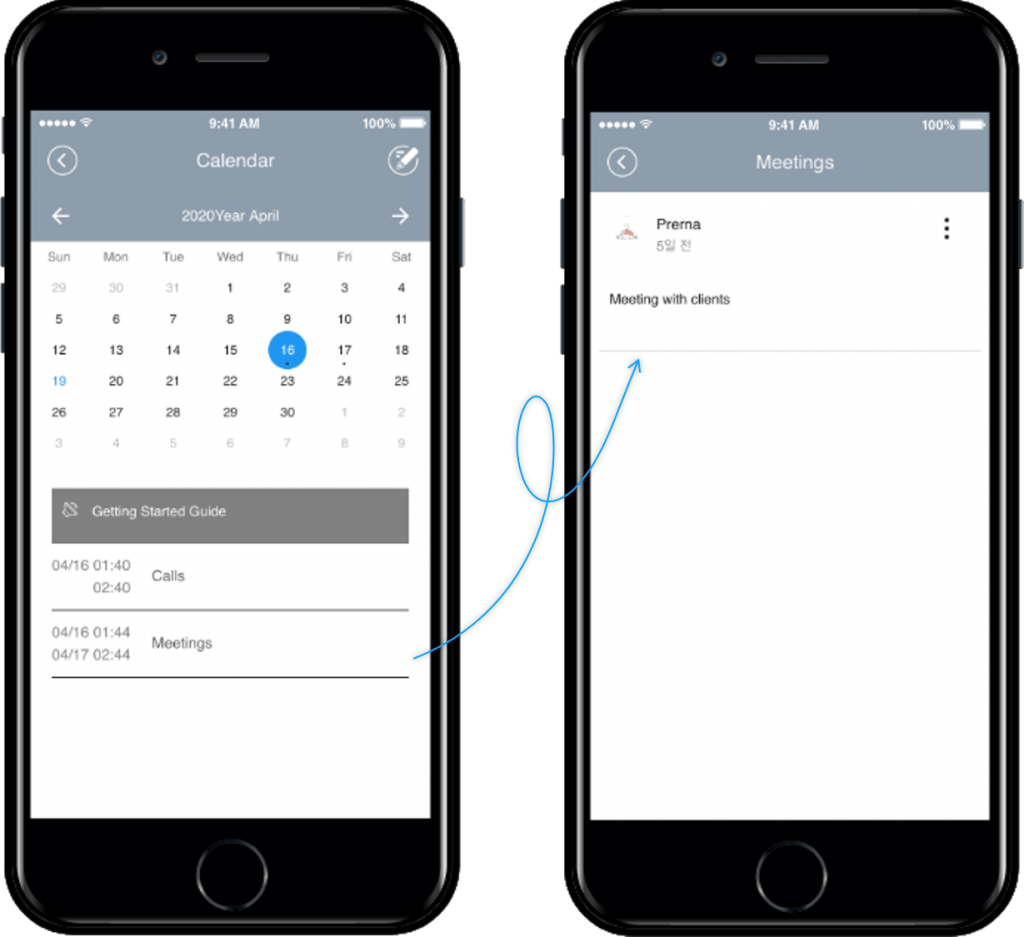
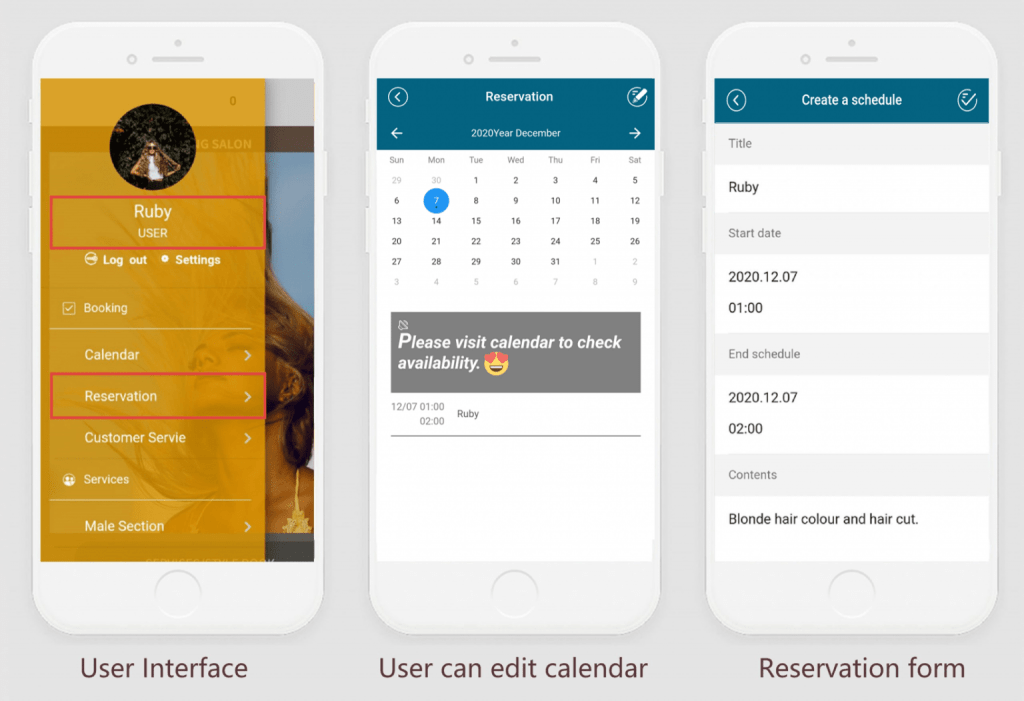
Case 1: User-Generated Events: Everyone can create an event
Imagine an app designed for community use, where members can effortlessly create and share their schedules. This use case benefits universities, clubs, and similar organizations. Users gain the ability to create events, access event lists, and dive into detailed event information. This collaborative environment fosters seamless scheduling and interaction.
Use case example: For community use (university assignments, clubs, etc.) app members can create their schedules to share each other’s schedules.
Anyone can create events in the app, view event lists, and detailed event posts.
As you can see from the above app launch screen, you can check the schedules created by other users on the calendar screen when you access the app.
Because the app can create a calendar, if you look at the top right corner of the calendar screen, there is a button with the Write button.
You can create a schedule by selecting the corresponding button.
How to create a User-Generated Events Calendar Application?
Go to the Manager page of the Swing2App no-code app builder. Select Services and click on Bulletin Board from the list.
Either click on Create Bulletin Board to create a new board or click on Settings to edit the existing board.
Select Customize.
Select Calendar. Set the permission for the board.
–Write permission: user
–View detail permissions: User
–View List Permissions: User
Click on Save.
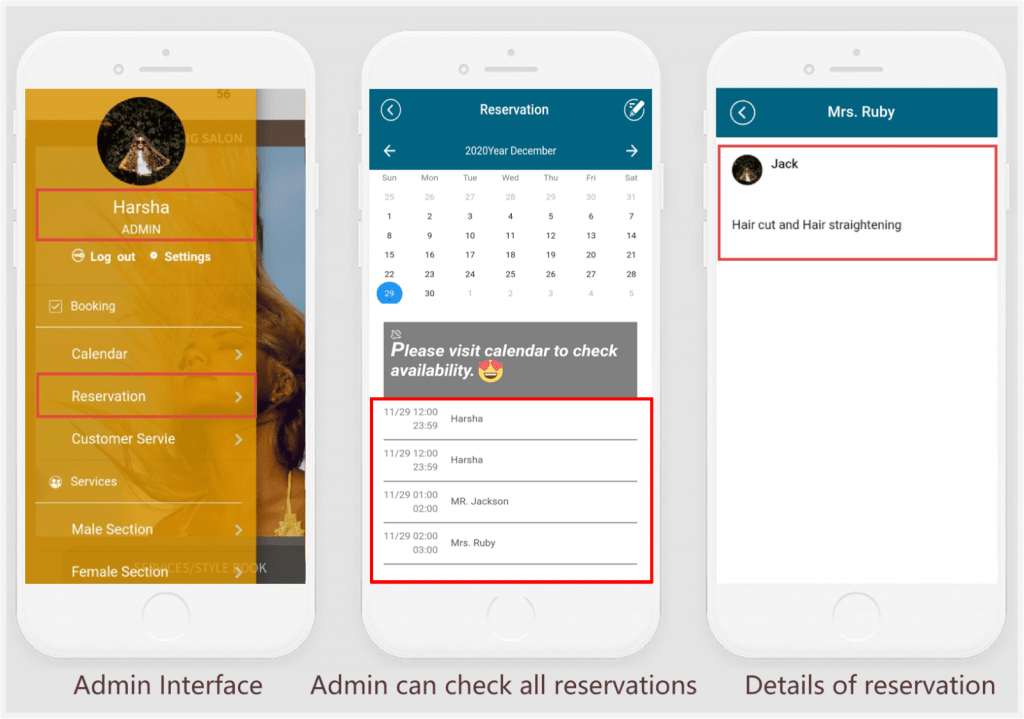
Case 2. Administrator-Controlled Events
In educational settings, administrators wield the calendar’s power to announce timetables and academic schedules to students. Here, only administrators can create events, while users can view event lists and detailed posts. Students log in to check the schedule created by administrators, ensuring everyone stays informed.
Use case example: In Schools and educational facilities in the application, administrators can use the in-app calendar to announce the timetable and academic schedule to students.
Only administrators can create events, and app users can view calendars – the event lists and detailed event posts.
When you log in as an app member, you can check the schedule created by the administrator on the calendar list screen.

If you select the event (title) shown in the calendar list screen, you will be taken to the event details page.
If you go to the detail page in the schedule list, you can see the details of the schedule.
*Unlike [Application 1] above, the writing button is not visible on the calendar screen because users do not have permission to create an event!
*Administrator can create a schedule in the app, Swing2App no-code app builder homepage) app operation page – post-management can also be written on the web.
How to create an Administrator-Controlled Events Calendar Application?
Go to Manager. Select Services and click on Bulletin Board from the list.
Either click on Create Bulletin Board to create a new board or click on Settings to edit the existing board.
Select Customize.
Select Calendar. Set the permission for the board.
–Write permission: administrator
–View detail permissions: User
–View List Permissions: User
Click on Save.

Case 3. Advanced Administrator Control
Further extending administrative control, this case caters to scenarios like healthcare clinics. Administrators exclusively create events, while users can view the calendar, reservation status, and important announcements. Users gain insight into the availability of appointments and crucial updates.
Only administrators can create events

When you log in as an app member, you can check the schedule created by the administrator on the in-app calendar list screen.
You can check the reservation status of the day.
You can check the shop notice and the day when the reservation is possible and the day when it is impossible.
*Users cannot create schedules, so unlike [Application 1] above, the writing button is not visible on the in-app calendar screen.
*The administrator can create a schedule in the app, Swing2App no-code app builder homepage) App operation page-post management can be written on the web.
How to create an Advanced Administrator Control calendar Application?
Go to Manager. Select Services and click on Bulletin Board from the list.
Either click on Create Bulletin Board to create a new board or click on Settings to edit the existing board.
Select Customize.
Select Calendar. Set the permission for the board.
–Write permission: administrator
–View detail permissions: User
–View List Permissions: User
Click on Save.

We’ve learned how to use the in-app calendar to apply it on a variety of case basis.
Please use the in-app calendar freely to suit the operation of the app.
APP TYPE: SALON APP
Use case:
Use the in-app calendar as a reservation feature. Admin can create 2 calendars, make the first calendar as reservation board by giving users access to edit in-app calendar and set reservation. Later, the admin can check these reservations and upload the final reservation schedule on the second calendar (which can be edited by the admin only, users can only view it.)
To create an in-app calendar reservations feature:
Now you’ve attached the reservation in-app calendar feature with your app.
For the second Calendar, the process is almost the same. While creating a calendar, keep the ‘Service purpose’ settings as ‘Calendar’ and save your second calendar.
Now also integrate this in-app calendar with your app.
Note:
1. For this use case, you need to create two different calendars, the first is for the reservation feature and the second for the in-app calendar feature.
2. The reservation calendar is for users to set reservations; it acts like a 1:1 reservation where only the admin and user can see the set reservation.
3. The Second Calendar is for the admin to set the final daily/weekly reservation after checking the Reservation calendar. Only the admin can modify this calendar, users can only view it. By checking this, users get information if their reservation got accepted or rejected.
Let’s see how the reservation feature will work on the user interface (1st reservation calendar)
Here users can edit the Reservation in-app calendar and set their booking details that only the admin can check.
Let’s see how the reservation feature works on the admin interface (1st reservation calendar)
Here on the Reservation calendar, the admin can check the booking details of all users.
Let’s see how the in-app calendar feature works on the admin & user interface
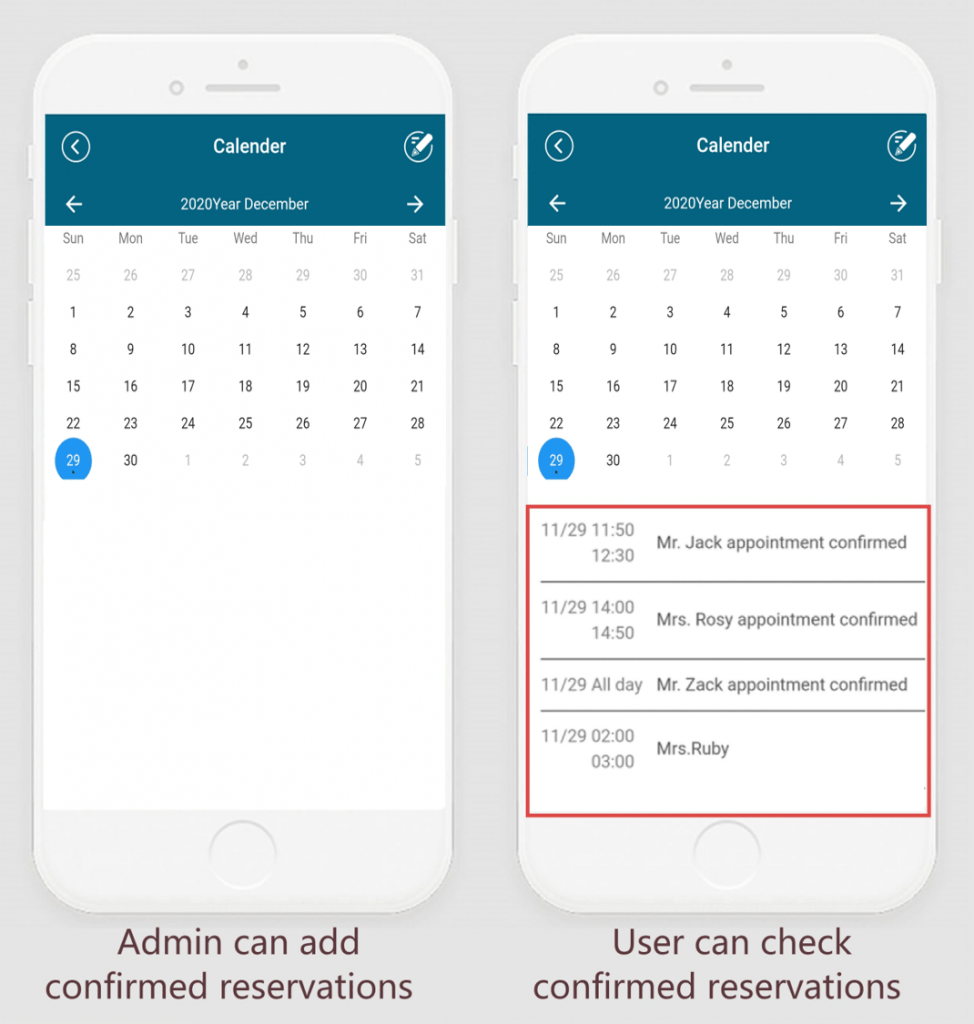
On the calendar admin can set final reservations after checking the ‘reservation calendar’. Users can only check all reservations but can’t edit this in-app calendar only the admin has access to edit this calendar.
Further read: How to Integrate In-App Calendar Feature in No-Code Mobile Apps?
FINAL THOUGHTS
Integrating an in-app calendar into your app may seem straightforward for simple functionality. But if you’re envisioning advanced features or a unique calendar app, the journey may require some extra effort. The good news is, that by following tried-and-true in-app calendar services and best practices, seamlessly integrating an in-app calendar with your app becomes an achievable goal.
Swing2App no-code builders empower you to embrace the full potential of in-app calendars. Whether you’re enhancing reservation systems, coordinating schedules, or pioneering innovative in-app calendar apps, Swing2App no-code app builder provides the tools and capabilities to bring your vision to life.
In conclusion, calendars are more than just date trackers – they’re dynamic tools that enhance user engagement and streamline processes. Swing2App’s no-code app builder’s user-friendly platform and in-app calendar features make complex integration a breeze, ensuring your app stands out with its functional elegance. So, don’t just follow the calendar; lead with Swing2App no-code app builder and create a remarkable app experience that users will love.
In today’s fast-paced digital landscape, a mobile app’s home screen serves as its front door—the very first impression users encounter. It’s where the magic begins, where your app’s essence is captured, and where user journeys commence. Designing an engaging, user-friendly, and aesthetically pleasing home screen is paramount to ensuring your app’s success.
Welcome to our guide on “How to Design the Home Screen of Your App on Swing2App.” Swing2App no-code app builder is your ticket to crafting remarkable apps, and the home screen is your canvas to make that all-important first impression. This guide is your roadmap to creating a captivating home screen, suitable for both novice and experienced developers. From template selection to customization, functionality integration, and branding infusion, we’ll cover it all. We’ll provide practical tips to ensure your home screen engages users, enhances their experience, and leaves a lasting impression.
Let’s embark on a journey to unveil the secrets of crafting a remarkable app home screen with Swing2App.
WHAT IS HOME SCREEN ?
Think of a home screen in an app like the main hub of a building. It’s where you start your journey and where you see important information. For example, in a smart home app, it shows things like the various controls (TV, Lights) and security status.
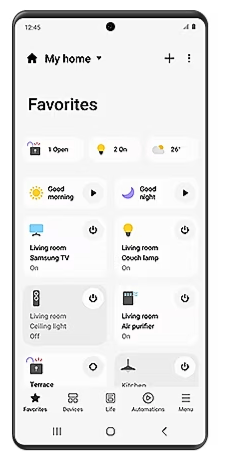
Home screens are super important because they connect everything in the app. They need to be easy to use, even if they have lots of info. They also help you move around the app. You can usually find everything you need from the home screen, often with a search bar.
Home screens are like a map for your app. They’re crucial if your app has lots of stuff, so you don’t get lost. For example, the Headspace meditation app gives you daily meditation tasks based on your goals. It makes things easy to find and even lets you pick your favorites.
So, home screens are like the guiding star of your app. They should make sure you never get lost and help you find what you want quickly.
CREATING THE APP BEFORE TO DESIGN THE HOME SCREEN
First, it’s important to design the app on Swing2App no-code app maker only then you can create a home screen page or other pages within it.
The app’s home screen lets users get the most important pages within your app quickly. Swing2App home screen consists of one slideshow and one or more button rows for e-commerce apps, others can also use Swing2App pre-built templates to design their home screen. When creating the home screen, it’s important to bear in mind this framework to make sure that the structure aligns with the functionality of the actual buttons.
Slideshow is a great choice for sale promotions. You are allowed to create a slideshow of as many slides/images as you wish and disable the slideshow if you no longer want it.
To create an app with Swing2App no-code app builder is as simple as walking in the park, with the user-friendly interface and prebuilt templates you can build an app in no time!
Let’s take a look at how to build an app with Swing2App no-code app.
To build a no-code app with Swing2App no-code app builder all you need a brilliant app idea and a creative mind! Without even a single line of code you can create professional looking and aesthetically pleasing apps in no time by yourself!
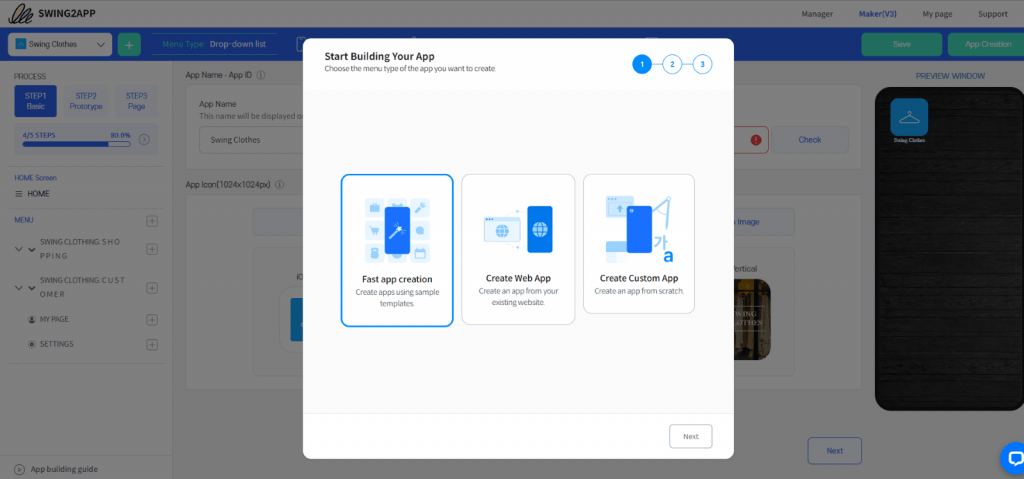
To start click on the “+” icon to create a new app, and then choose one of the three options;
1. Fast app creation: to build apps quickly using the pre-built template with added features, menus and pages; all you need to do is add your own products/ services and your app will be ready.
2. Create web apps: to convert your existing website into an app without any coding at all.
3. Create custom app: to create a no-code app from scratch by selecting g a prototype, template, color theme, and adding menus and app pages individually. This takes more time as compared to the fast app creation process however, you get more freedom to customize your app.
Let’s choose fast app creation to understand the further process.

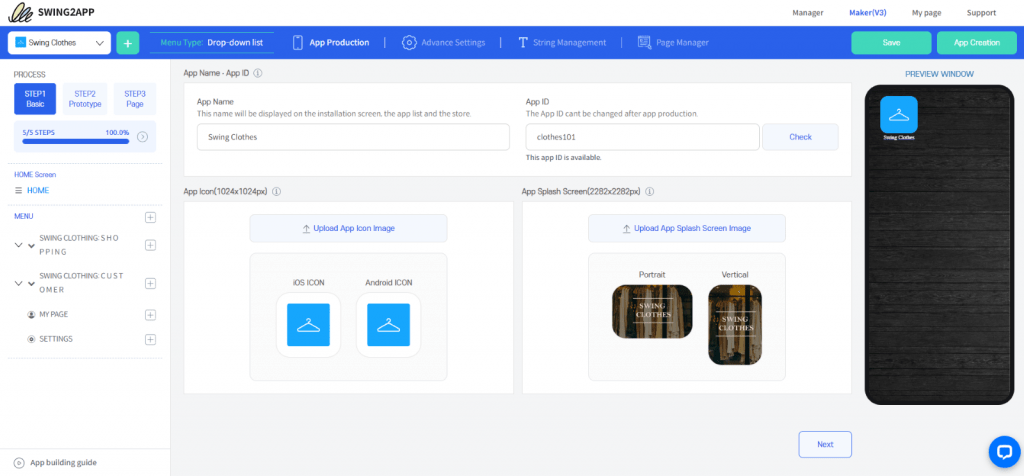
STEP 1: APP BASICS
Then you will be direct to the new Maker V3 screen where you can see further options, settings, and features. Here you also get a “Preview Window” where all your changes are displayed in real-time which means you can see how your customization affects your app while editing it.
Your app icon should be unique and attractive enough to catch the eye of potential customers among the variety of apps available on the app stores.
To complete Step 1 finally, you need to enter a unique “App ID” alphanumeric character, with this the Step 1 BACIS is completed.
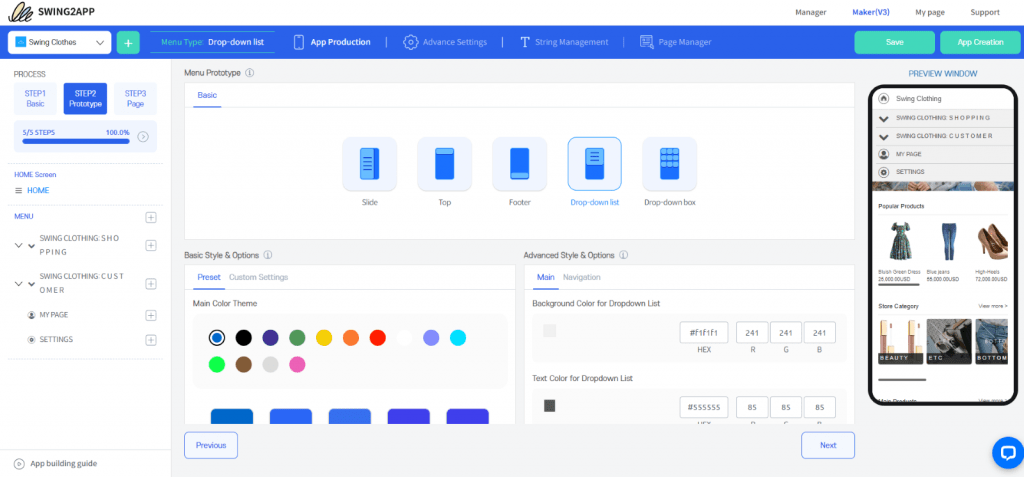
STEP2: PROTOYPE & COLOR THEME SELECTION
A prototype (Mobile UI) is the basic outline or design (like a wireframe) of your app, where the menu outlay and home screen are pre-set in a particular way that they will be displayed to the user.
The 5 Prototypes (Mobile UI) provided by Swing2App are: Slide, Top, Footer, drop-down list, and drop-down box. Here you need to choose one of these five Swing2App prototype that is, the menu type that you want for your application.
You can also choose a theme color from the pre-set list or create your own custom theme color.
However, you can change this later, so no need to worry about it.
In Advanced Style & Options: Here you can edit Background Color, Text Color, Main Design Style and navigation settings too.
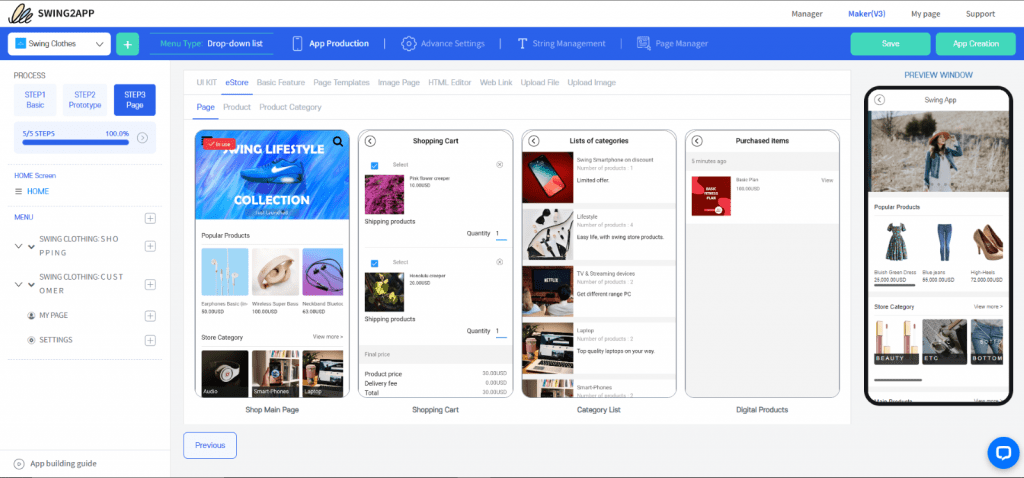
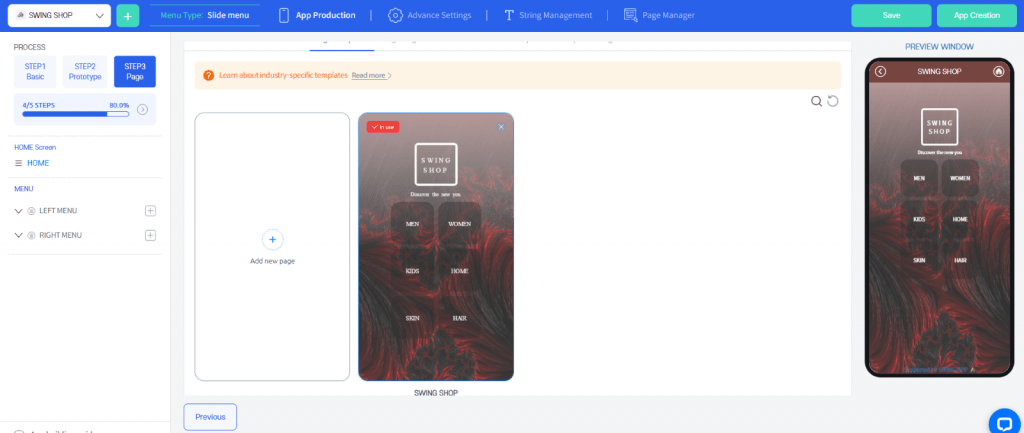
STEP 3: PAGE
Here you can build your home screen and add other pages to your no-code app.
HOME SCREEN: Here you can edit the menu name and page design.
The various page designs provided are UI Kit, E-store, Basic features, Page templates, Image Page, HTML Editor, Weblink, Upload file, and Upload image.
Now, let’s discuss in detail how to edit your home page on Swing2App no-code app builder platform
HOW TO CREATE HOME SCREEN OF YOUR APP USING SWING2APP NO-CODE APP BUILDER
1) QUICK APP CREATION
Once you have followed all the steps mentioned above, you can now create home screen of your app.
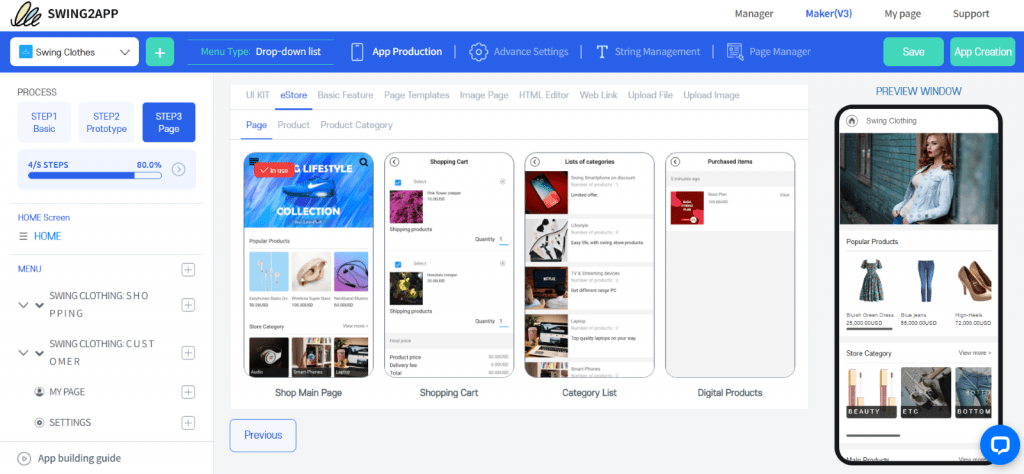
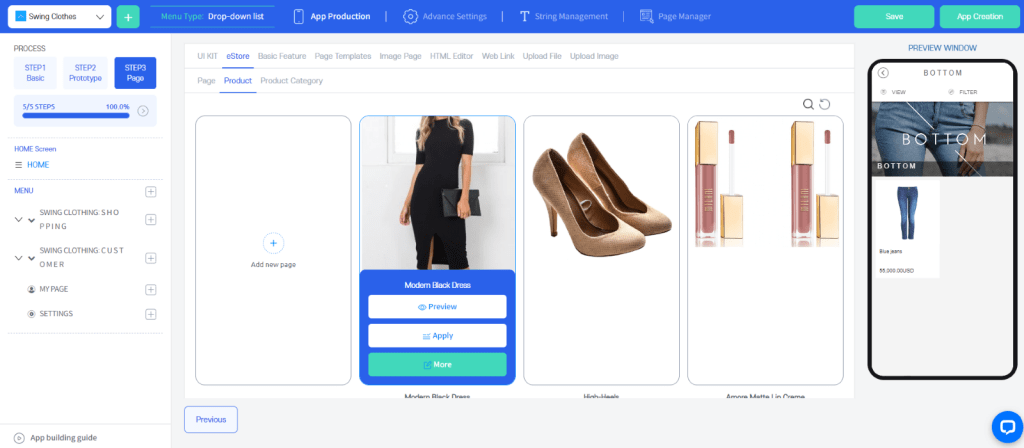
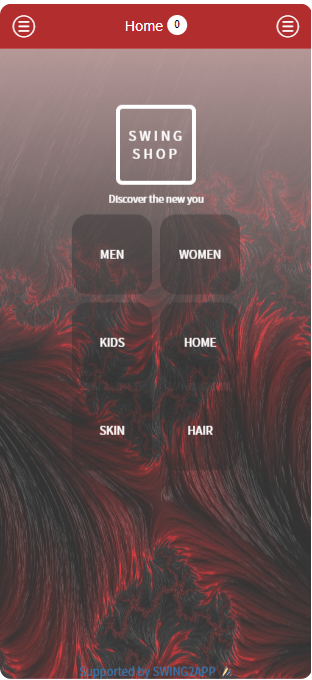
For example, if you want to build a shopping/ e-commerce app all you need to do it to choose “eStore” page design and then choose “Shop main page” as your home screen page.
With this page you get sliding images on the top of home screen to capture the attention of your app users and induce them to buy those products.
Guide to shopping mall Main Page Slide Image.
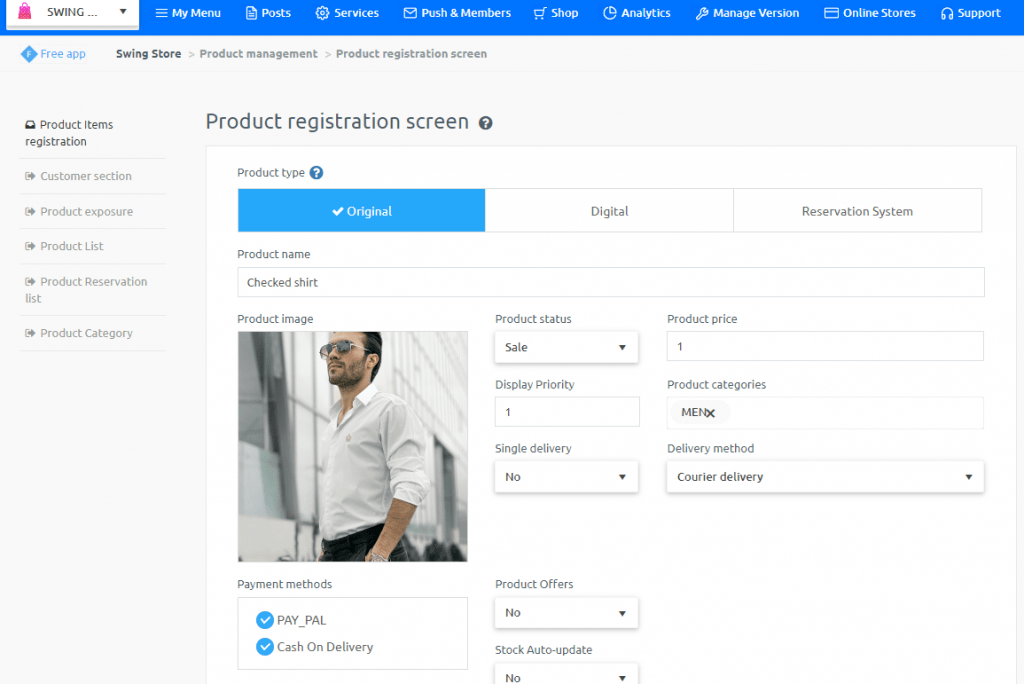
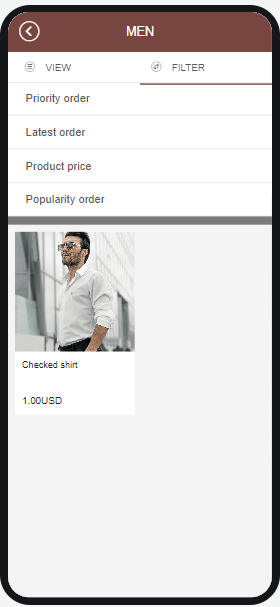
You can add new product category or even an individual product according to your business.
For example, if you want to add a new product category then go to “Product category” page design and click on the “+ Add new page”
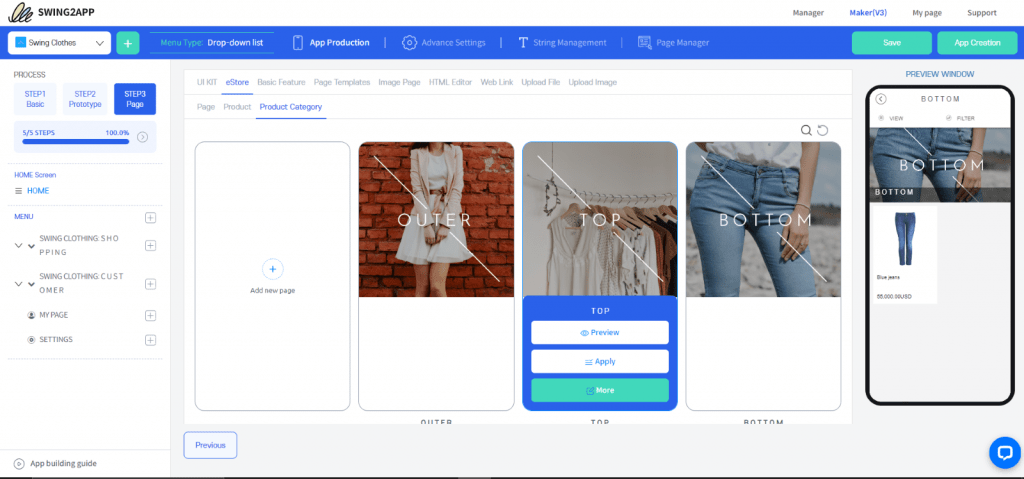
You will be redirected to Product category page, where you can easily add or delete product categories.
Similarly, you can also add or delete individual products registered under various product categories.
Guide for Product Category Registration and Physical Product registration.
2) APP FROM SCRATCH
When you choose to create your app from scratch that doesn’t mean you will have to code it. With Swing2App you can build no-code apps from scratch without any coding at all! This gives you more freedom to customize your app as per your business needs.
Here you will have to choose and each and every aspect of your app, there wouldn’t be anything pre-built. You will have access to all the template, but you will need to edit those choose the color palette add menu pages, etc.
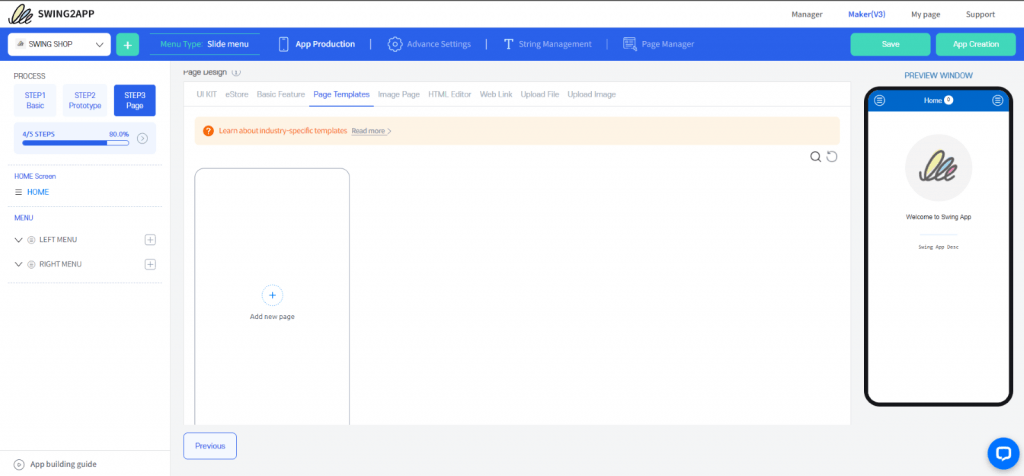
To add the home screen, go to “Page template” in the page design and the click on “+ Add new page”.
A new window will open where you can select industry-specific pre-built templates and edit them without any coding. On this new window click on “+” and following pop-up will display where you can select the page type as per your business industry.
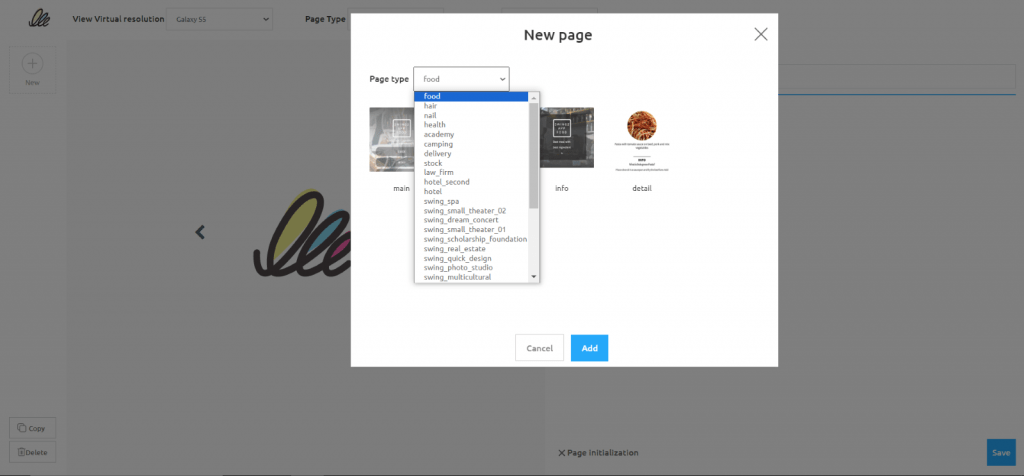
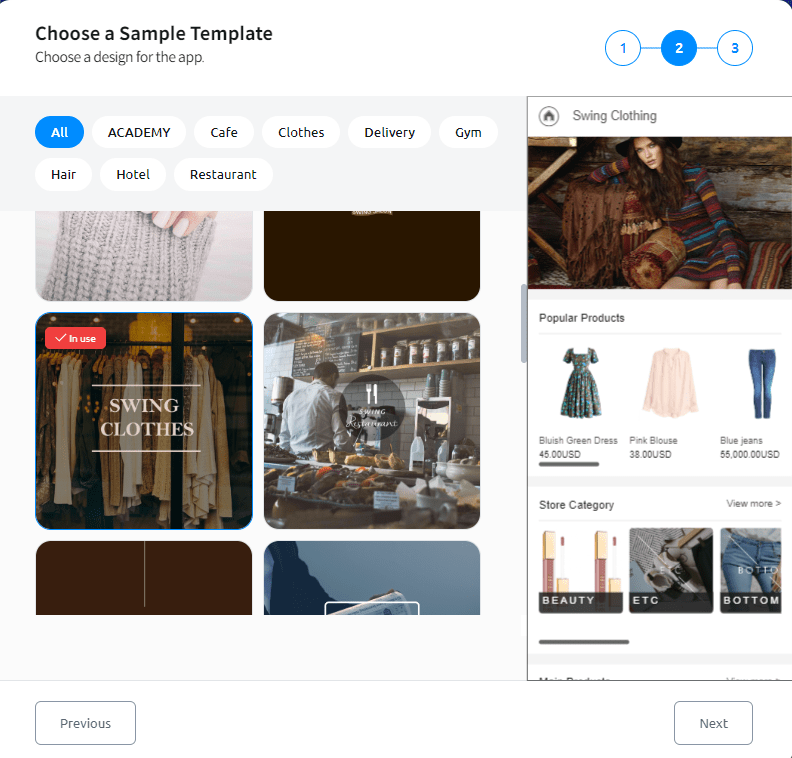
It’s up to you if you want to choose some different industry’s template for your business if it suits you better. For example, here we will choose nail to build a clothing store’s main page.
Everything highlighted in blue can be edited without any coding at all!
You can add or remove the buttons, rename them, change the colors, etc.
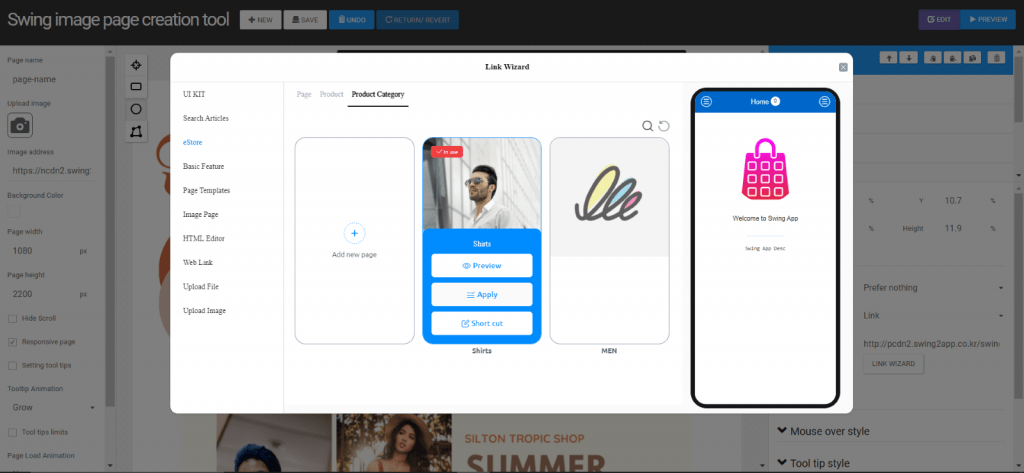
The best part is here you can also add link to your menu options (you can ink web page, feature, file, image, template, etc.)
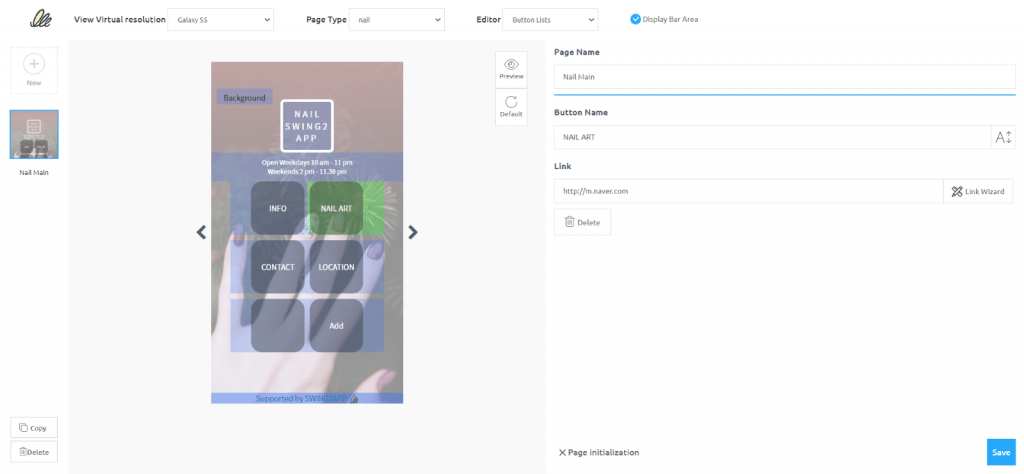
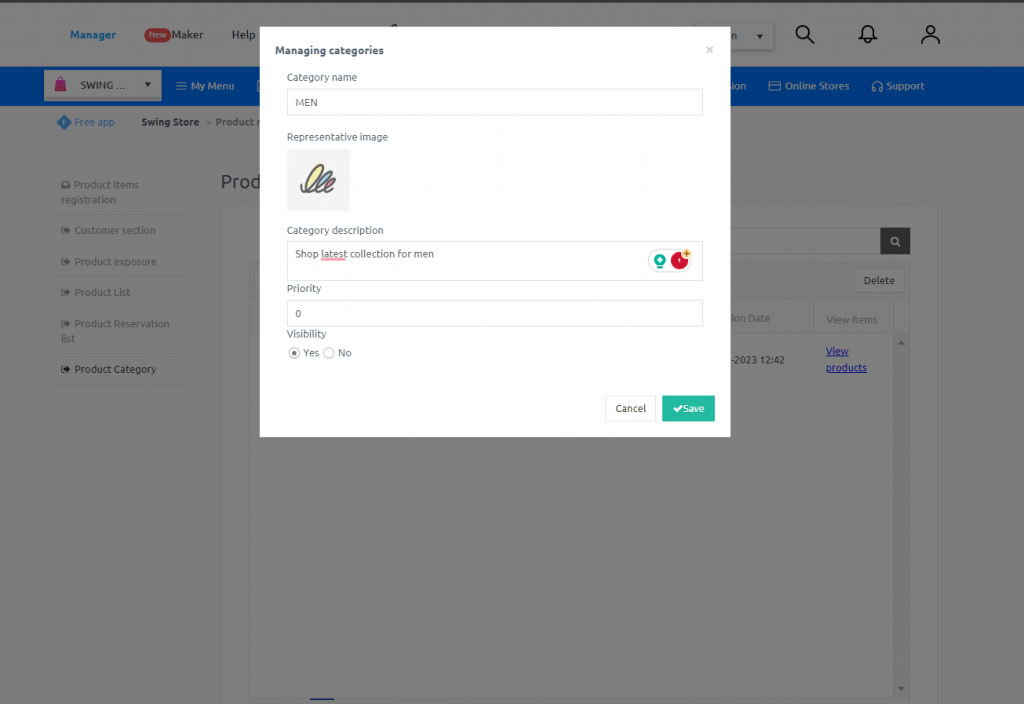
For example, in your clothing app you if want to add a product category named men and want to link it with your menu option. Then choose the menu option rename it to “Men” and click on the “Link wizard”, a pop-up will open where you can click on “+ add new page to add new product category”.
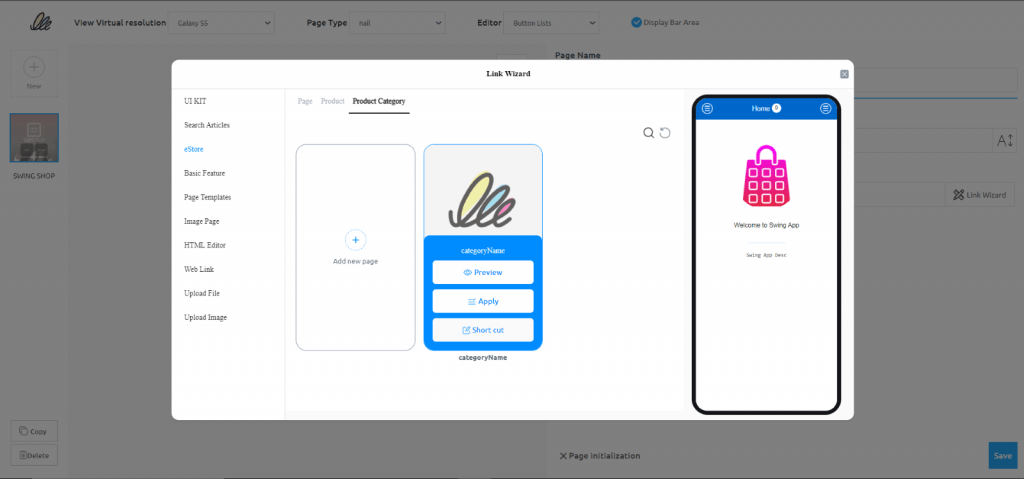
You will be taken to the “Manager” page where you can easily register a new product category, as shown below.
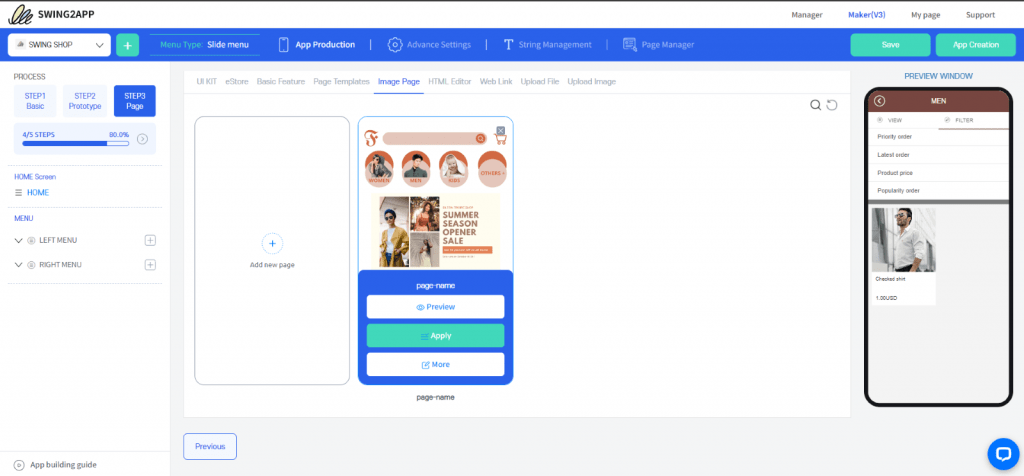
Finally, to apply this template to your home screen go back to the “Maker V3” window and in the “Page templates” refresh it, your newly created template will be reflected here, and you can apply it as the home screen of your app. Don’t forget to save you progress!
In the “preview window” you can see your app in real-time, and it would look something like this:
With your creativity you can do much more using the easily editable Swing2App templates.
3)IMAGE PAGE FOR HOME SCREEN
Here you can upload your own home screen design probably on Adobe XD / Photoshop (being the best tools) and then assign function to various images, icons, or buttons whatever you have used in your app home screen design.
To add an image as your app’s home screen, choose “Image page” in the page design and you will be redirected to this new window:
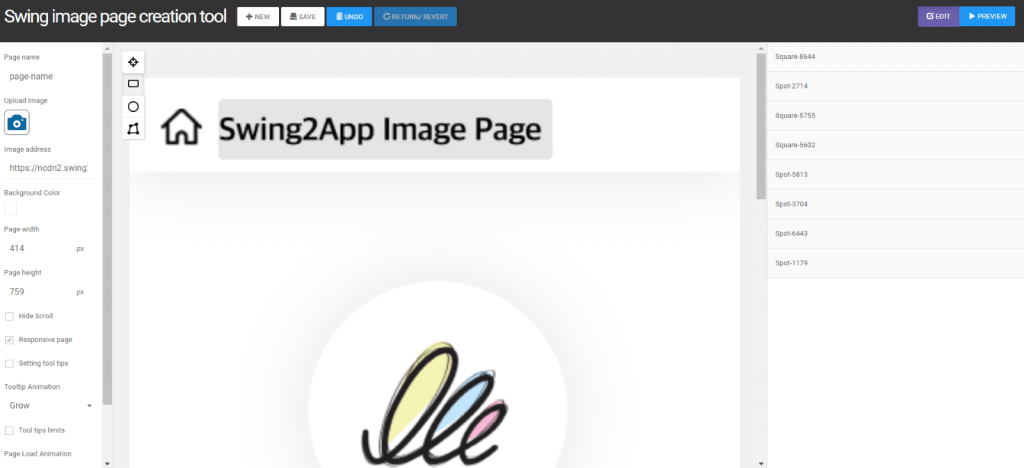
Click on the camera icon to add a new image.
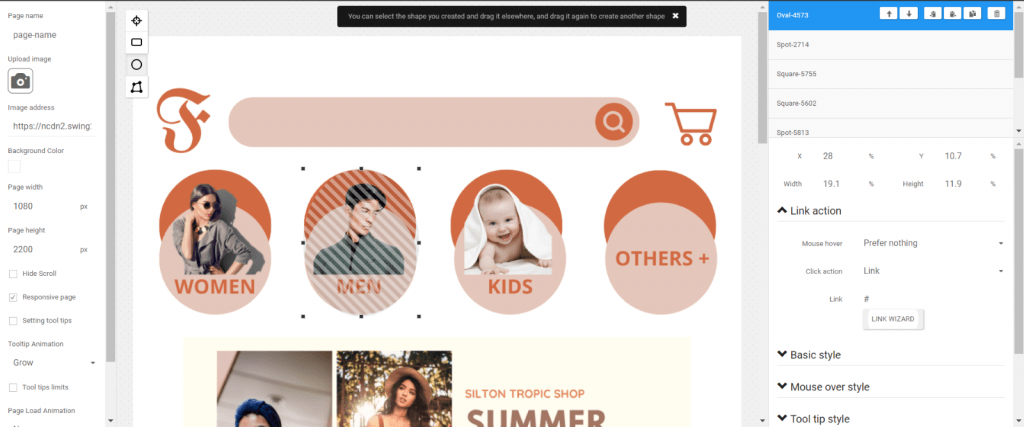
Once your image is uploaded, you must create an overlay of shapes over the images/ icons/ buttons where you want to link a page or feature, like I’ve done above for the men option. Don’t worry this won’t be displayed to the users, it is just to mark an area where if a user clicks some action will take place. To make your work organized, mane your clickable area shapes, for example here you can name it “Men”.
Then to add an action, click on “Link wizard” (on the right-hand side of screen) as done previously.
Similarly, add the product categories and save your Image page.
Finally, to apply this image page to your home screen go back to the “Maker V3” window and in the “Image page” refresh it, your newly created image page will be reflected here, and you can apply it as the home screen of your app. Don’t forget to save you progress!
In the “preview window” you can see your app in real-time, and it would look something like this:
In the “preview window” you can see your app in real-time, and it would look something like this:

Guide for creating Image page on Swing2App no-code app builder.
If you want even more customization, you can code your home screen (if you know coding) using the HTML Editor in the page design option.
To sum up you can create home screen for your app in 4 different ways using Swing2App no-code app builder. The choice depends upon your business needs and app complexity as well.
HOME SCREEN DESIGN BEST PRACTICES
Below are our top best practices that deliver successful apps:
Keep it short:
Your app’s home screen should not be longer than 2 – 3 pages as most users don’t scroll further.
Highlight promotions or actions:
Use the slideshow on the top of your home screen or button rows for promotions or call to action.
Optimize the user experience:
Apart from product catalogs, you have the option to design buttons for a range of functions, including blogs, newsletters, contact information, shopping assistance, and more. If you have a loyalty program, you can even incorporate a link within the app that provides an explanation of how the program operates. Without loyalty program integration, users can collect points in the app but won’t be able to redeem them.
Strengthen your brand:
Boost your brand presence by adding a footer with social media icons and trademarks. It’s convenient for app users to access your Facebook or Instagram fan page directly from the app.
Simplify the side menu:
To avoid overwhelming users your menu list must be simple. Group informational pages under sub-homepages for a cleaner and more organized navigation experience.
EXAMPLE OF GOOD HOME SCREEN
DUOLINGO
– unique and engaging HOME SCREEN
Surely, everyone who loves learning languages knows about Duolingo. I discovered this app on my own two years ago when I was learning. Each aspect of the app appears like a work of art, and when they blend, it creates an enchanting experience. This redesign ignited my motivation to rekindle my German language skills, something I hadn’t actively pursued in quite some time. I must give all the credit to that amazing redesign!
Duolingo does something else cool too. On the home screen page, they have a “visual adventure” or a game, you could say. I can see all the steps of this adventure, and it challenges me to improve my skills and “level up.” The home screen page makes learning a language (which can be pretty abstract) feel easier because I can see my progress. Not every app can do this, but making the home screen page interactive like this can really get users involved and motivated.
IN CONCLUSION
A good home screen can make your app more attractive to users and boost its chances of doing well. Swing2App no-code app builder makes it super easy to customize your home screen looks whether you’re making an online store app or something else.
The best part is you don’t have to be an expert in designing apps to create a great home screen with Swing2App no-code app builder. The Swing2App UI is easy to use and doesn’t require any coding at all!
So, if you want to learn more about creating a perfect home screen for your no-code app, check out Swing2App no-code app builder. Your app’s journey to success begins with a home screen that people love!
“Does my app really need a landing web page?” You might have asked yourself this question, thinking that your app can thrive solely in app stores with some optimization. But here’s the scoop: every app could use a special place online to help it grow and get people excited about it. That’s where a fantastic mobile app landing page comes in.
Think of it as your app’s online home base that attracts users browsing the internet and says, “Hey, check out this awesome app!” An attractive landing page plays a big role in user acquisition and provides you an additional online platform to build hype around your app; way more than you get in the App Store or Google Play.
In this blog, you will learn everything about designing the best landing pages for your mobile app. We’ll even throw in some examples from big-name brands to inspire your 2023 webapp strategy. Ready to dive in and make your app shine online?
WHAT IS A MOBILE APP LANDING PAGE?
Consider your app’s landing page as the virtual doorstep where visitors arrive after clicking on your app’s advertisements. These ads can be found on various platforms, from social media to paid articles, videos, or QR codes.
The sole purpose of the mobile app landing page is to effectively promote your app. It should vividly describe the features and value your app offers, enticing visitors to take the next step: clicking through, downloading, and installing your app.
In essence, it’s a web page meticulously crafted to showcase your mobile app to potential users. It’s usually just one page with simple words and big buttons to download the app.
This page is where you get to tell people why your app is fantastic. Such messages might easily be missed while they casually browse their iPhone or Android app stores. So, the landing page gives you the additional opportunity to show them why they should give your app a shot.
Since this is the first time people interact with your app, your landing page must clearly describe what your app does.
This might be your one chance to get them interested. And you know, making a good first impression is very important!
Hence, it’s important to design app landing pages not only for web browsers but also to ensure responsiveness across various devices. It should adapt seamlessly to the reader’s chosen device and prioritize essential content while on mobile platforms. Plus, it should focus on relevant information and not have extra stuff that clutters up the page.
APP LANDING PAGE BENEFITS
Your business website hosts your app landing page, which helps to increase user traffic, conversions, brand visibility, trust, retention, and revenue.
Following are some of the major benefits of creating landing pages for your app:
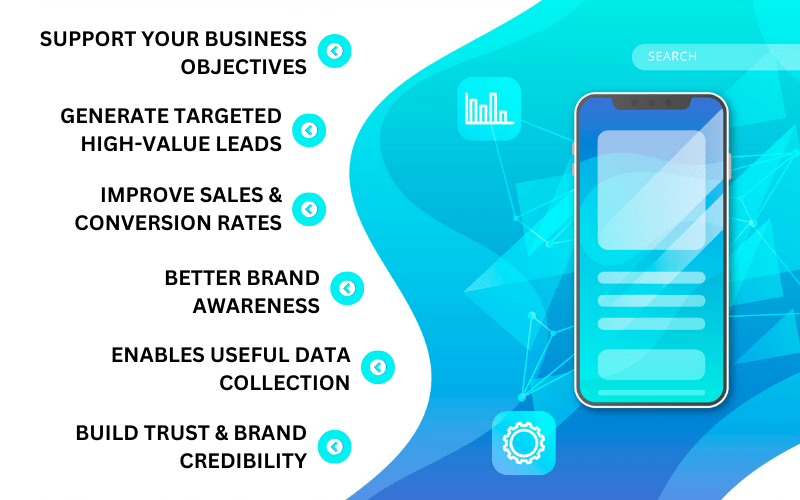
Support your business objectives:
In the two largest app marketplaces, Apple’s App Store and Google’s Play, there are millions of apps. Making yours stand out can be a challenge especially if you are a beginner. Provide app download link to both the Apple App Store and Google Play Store on your app landing page to reach users across platforms.
App landing pages are built to promote new products: your newly built app. The goal of landing page supports your business goals, that is to attract new customers and boost app downloads.
Generate targeted high-value leads:
Landing pages have only one objective and one call-to-action – to boost conversion which means to increase the app downloads. Unlike those who might just visit your website’s homepage, the visitors arriving at your app’s landing page are valuable prospects. They’re actively seeking a specific value that your app can offer.
Improve sales & conversion rates:
A great landing page for your app does two cool things: It gets people excited and makes them take action. The landing page should make visitors feel like they’re in the right place, which will make them more likely to invest time and money in your app.
But here’s the secret: when your app landing page describes how awesome your app is, it’s not just going to get people interested – it’s also going to make them want to use or buy it!
Therefore, a great landing page will not only look good, but it will also help you increase sales and app downloads.
Better brand awareness:
While app store pages may seem similar, your app landing page is your chance to stand out. You get to decide how your app landing page will look, so it can match your app theme perfectly. In addition, you can let the personality of your brand shine through with the words you choose. Don’t forget to place the app download links where they can be easily accessed.
App landing pages also do something cool – they help you spread the word about your brand. You can use them to collect info from your marketing campaigns and even guide people to your website if you offer more than just the app. It’s like having your very own stage to show off your app and brand!
Enables useful data collection:
The way people use the landing page can tell you a lot about your users (like how they like to shop and what they’re into). You can monitor and analyze what they do and use that information to make smart business choices. Moreover, you can make your user’s app experience even better by customizing it according to their style and preferences. It’s like having a superpower for your app!
Build trust & brand credibility:
Having a website makes your app look more trustworthy. It shows users that your app is here to stay, and you’re a real business with a story to share. Plus, you can share user reviews and ways for people to reach out to you, which helps build trust.
Apps without websites miss out on a chance to give users extra info and gain their trust, which is super important for getting more people to use your app.
Here’s a cool idea: think about making a “pre-launch landing page” before your app is ready. It can get people excited and even sign up early to try your app!
TIPS TO BUILD THE BEST APP LANDING PAGE
Follow the tips to build the best app landing page compiled below and create a magical experience for your potential consumers. Let us begin:
1. Create a prototype and test
To create a fantastic landing page, begin by crafting a prototype. Design a few sample pages and have your in-house testers or trusted team members review them.
Conduct some research on current trends and outline the navigation for your app. Develop a clear draft design for your landing page, considering multiple options before settling on the one that stands out. It’s like creating a blueprint before building something amazing!
2. Enhance the content presentation
Your landing page should be exciting and eye-catching, and it usually follows a standard style. While you can get creative if you have awesome ideas, a typical landing page includes these elements:
Headline
As soon as a visitor opens your app landing page, this is what they see. And hence it is crucial for creating an impactful first impression. It should be placed at the top of the page with a bold and clear message, so users see it without scrolling. Use the headline to convey the core feature of your app or its main purpose. For example, if you have a shopping app, your headline might say, “Discover the Best Deals Online!”
Body text
While the headline grabs attention, the body text provides more details. Subheadings, paragraphs, and other textual content on the landing page take up a significant portion of the screen. Keep the text concise and informative, introducing users to what your app offers. Use this space to explain how your app can solve their problems or meet their needs.
Call to action
The CTA button is a vital element on your landing page. It’s the part that tells users what action to take next. Make it prominent and clear. For instance, if your app is about fashion, your CTA could say, “Explore the Latest Trends Now!” or “Start Shopping.” This guides users on how to interact with your app, whether it’s browsing products, signing up, or making a purchase.
Social proof
Building trust is crucial. Social proof can help with that. Consider showcasing testimonials from satisfied customers or sharing statistics that demonstrate your app’s popularity or success. For example, you can showcase reviews/ feedback from a happy customer, or you can highlight the number of active users or recent purchases. By providing real-life proof you can influence potential users to take required action, such as downloading the app or making a purchase.
Creative visuals
Visual elements like images, videos, and graphics play a significant role in capturing user attention and building trust. Use these media strategically and thoughtfully. For example, if you have a fitness app, incorporate images or videos of people achieving their fitness goals using your app. Visuals can convey the benefits and features of your app more effectively than text alone.
By carefully crafting each of these elements, your app landing page will become a powerful tool for engaging users and encouraging them to take the desired actions within your app.
3. Use Your Brand Colors & create aesthetic landing page
Using the right colors on your landing pages isn’t just eye candy; it can make a real difference in how people perceive your brand and boost sales. In fact, a study found that adding some color can increase your sales by a whopping 80%.
But here’s the trick: the colors you choose should match your brand’s identity to keep things looking and feeling consistent everywhere. When your landing pages reflect your brand’s unique style, visitors will instantly know it’s all about your business. So, don’t be shy with colors, but make sure they jive with your brand’s vibe.
4. Avoid Long Scrolls & Follow the thumb rule of navigation
Ensure your landing page delivers all the essential information right at the top, so visitors don’t have to scroll endlessly. Avoid making them work too hard for it!
In some cases, a longer scroll can be beneficial, especially when explaining complex details. However, always prioritize placing vital content at the page’s beginning to prevent overwhelming your visitors.
You can employ effective strategies like using lightboxes for additional content that won’t clutter the main view or incorporating parallax scrolling for a more engaging experience.
Keep in mind that many app users rely on their thumbs for navigation, so when designing your app’s landing page, position important buttons and features within easy reach of the thumb. Ensure your icons are user-friendly for various thumb sizes and preferences.
5. Highlight benefits and inspire actions
Utilize your landing page as a platform to showcase your brand’s key strengths and highlight the app’s standout features. Identify a Unique Selling Proposition (USP) and make it a prominent focal point on the landing page.
Motivate users to delve into the app’s various functions and sections, providing them with compelling reasons to do so. Encourage them to take the desired actions, fostering a supportive app community with the landing page as its foundation.
6. Allow Social Sharing
Creating an attractive landing page that people would love to share on social media is a smart move. Although it might not lead to instant sales; it can bring in more visitors. However, with these increased visitors seeing your landing page, your chances of turning some of them into loyal customers also increases.
To boost your landing page’s shareability, add social buttons right at the top of your page. In this way, your audience can easily share your awesome content on popular social media platforms like Facebook, Twitter, Instagram, Pinterest, and LinkedIn. Sharing is caring, after all!
EXAMPLES OF BRILLIANT APP LANDING PAGES THAT CONVERT
1. Nike


Nike’s app landing page is all about taking action. Right at the top, you’ll see a link that takes you directly to the app store. You also get a notification at the bottom to download the app. It’s a bold move, and it shows how confident Nike is in its brand. They don’t waste time trying to persuade you because they know you already know who they are and what they offer. It’s a bit like a famous actor not needing to audition for a role – Nike is that well-known!
However, to attract you they display collections named after famous sprots’ personalities as shown in the images above.
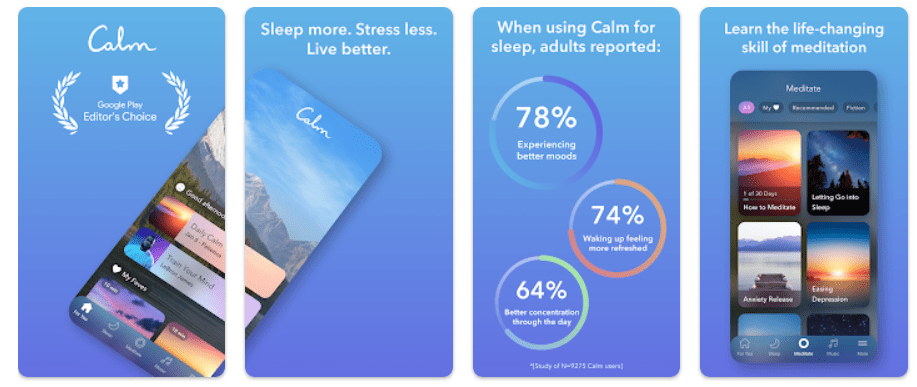
2. Calm


Calm is a wellness app that knows how to connect with its visitors. When you visit their landing page, they don’t just throw information at you. Instead, they ask what you need and guide you through questions about your sleep and stress. It’s like having a personalized experience that’s all about you. And if you look at the pictures, they make you feel calm and relaxed, just like the app’s goal – to help you chill out.
CREATE YOUR OWN APP AND LANDING PAGE
That’s a wrap on creating captivating landing pages for your mobile app! By putting these tips into action, you can ensure your users have an exceptional experience every time they open your app.
For more insights on mobile app design, development, and marketing, be sure to check out our other blogs. We regularly update this space with valuable information from the app and online business industry. Whether you’re using platforms like Wix, Shopify, WordPress, or WooCommerce, our tips are applicable to any web app looking to enhance its mobile presence.
If all of this seems a bit overwhelming, don’t worry. You can simplify the process by signing up for Swing2App, the no-code app creator. With our holistic assistance, you can design your own web app home screen and pages, providing an amazing experience for your customers. Create, customize, test, and publish your mobile app without any coding – you’ll be ready for the future of mobile commerce!
If you are planning to build a health & fitness app then read on to explore the latest trends in the health & fitness apps with our top 10 unique ideas for your journey!
In today’s digital age, fitness apps have become the go-to choice for health-conscious individuals seeking personalized and convenient workouts. This article unveils 10 groundbreaking fitness app concepts that are revolutionizing the sector. From AI-driven personal trainers to immersive VR workouts and holistic wellness platforms, we’ll delve into innovations captivating health enthusiasts and reshaping the fitness app landscape.
Plus, we’ll introduce you to Swing2App, the no-code app builder, and show you how to turn these ideas into reality. So, join us on a journey to uncover the exciting developments in health and fitness app development in 2023. Get ready to be inspired and create apps that redefine the fitness experience!
TOP 10 HEALTH & FITNESS APP IDEAS TO USE IN 2023
1. On-Demand Fitness Apps
On the forefront of fitness app innovation, you’ll find a revolutionary trend known as on-demand fitness apps. The on-demand health & fitness apps are reshaping the fitness app landscape, granting users access to workouts available anytime, anywhere. The rise of on-demand fitness apps is ushering in a new era of health and fitness app development, centred around the core values of convenience, flexibility, and personal choice.
Gone are the days of rigid gym schedules and fixed fitness class times. On-demand fitness apps empower users to control their fitness routines by themselves. You decide when, where, and how you want to work out, all at your own pace. This newfound freedom has struck a chord with busy people, accommodating diverse schedules, fitness levels, and workout preferences. It’s no wonder that on-demand fitness apps are causing such a sensation in the fitness world.
Example: FitOn
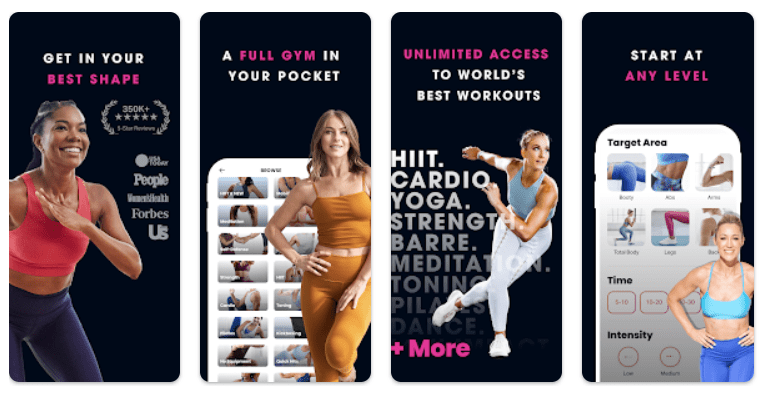
FitOn shines brightly in the world of on-demand fitness apps, making a name for itself by offering a treasure trove of free workouts. Picture this: You’ve got a galaxy of workout styles at your fingertips, all led by celebrity trainers. From heart-pumping HIIT sessions to muscle-building strength training, graceful Pilates routines, and even energetic dance classes – FitOn’s got it all.
But here’s the real star of the show: FitOn isn’t just about solo workouts; it’s a social fitness fiesta. You can rally your friends to join in on the fitness fun, creating a vibrant community of motivated exercise enthusiasts. It’s like having a workout squad right in your pocket!
FitOn’s secret recipe? A potent blend of accessibility, workout variety, and a strong sense of togetherness. It’s not just another app; it’s your fitness partner, cheering you on every step of the way.
2. AI-Based Fitness Apps
In the spotlight for 2023, we’ve got a game-changer: AI-Based Fitness Apps. These bright ideas are all about using the magic of artificial intelligence, machine learning, and super-smart data analysis to bring you fitness on a whole new level.
Think of it like having your own fitness genie. These apps don’t do generic; they craft a fitness journey just for you.
While the old-school fitness apps treat everyone the same, AI-Based ones are like your personal fitness detective. They study your workouts, check your progress, and dig into your fitness dreams. Equipped with this data, they create personalized workout and nutrition plans that are like a perfect fit for your goals and abilities.
No more one-size-fits-all nutrition, as everyone’s needs are different. It’s like having a fitness coach who truly there for you, and it’s all thanks to the power of AI!
Example: Fitbod
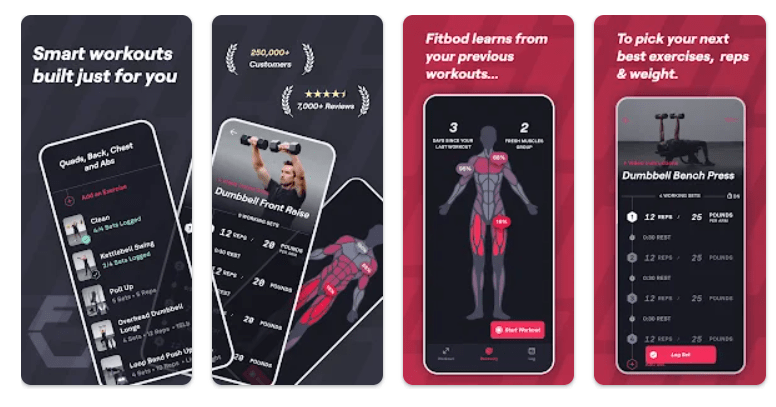
Fitbod is an AI-driven fitness app that stands out in the health& fitness industry. Fitbod is like having a super-smart gym buddy right in your pocket. This AI-driven fitness app is making waves in the health and fitness app development world.
Here’s the deal: Fitbod takes your workout history and turns it into gold. It’s like having your own personal trainer 24*7 at your service, that provides you new plans every day. It analyses what you’ve done before and provides you a plan what you should do next.
So, every time you use Fitbod, it’s like a brand-new workout adventure, tailored to your needs and goals. It’s the power of AI at its best, giving you a fitness plan that evolves with you! 
3. Personal Fitness Apps
Imagine having your very own fitness guru right on your phone – that’s what personal fitness apps are all about! They’re the OGs of the fitness app world, and they’re here to make your fitness dreams come true.
Picture this: personalized workout plans just for you, a tracker that watches your every move, and feedback that’ll keep you on the right track. These apps are like your fitness BFF, there for you every step of the way.
They’ve got it all – detailed workouts, meal plans made just for you, tools to see how far you’ve come, and even ways to connect with others on the same journey. It’s like having a fitness coach, nutritionist, and workout buddy rolled into one app.
So, if you’re looking for a well-rounded fitness experience that’s tailored just for you, these personal fitness apps are where it’s at! 
Example: JEFIT
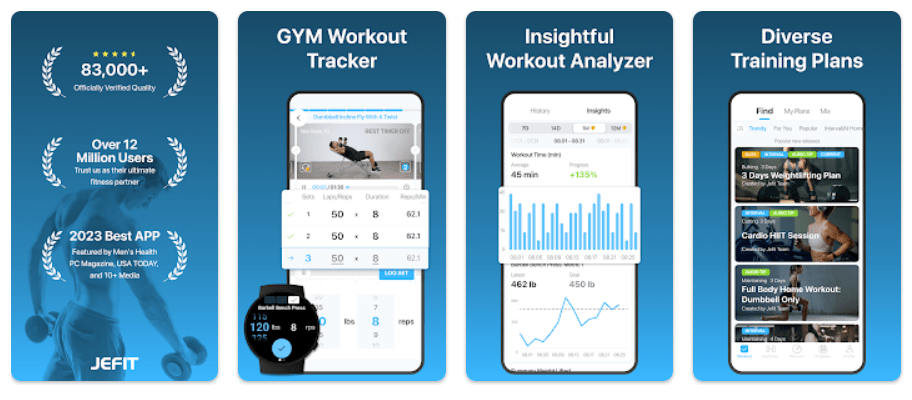
Let’s talk about JEFIT – it’s like having your own personal fitness planner and tracker right in your pocket!
Imagine getting to customize your workouts, having animated instructions to show you the way, and keeping tabs on your progress. JEFIT does all that and more!
It surely helps you to plan your workouts, but the best part is that gives you a community to connect with. It’s like having a personal fitness coach and a workout buddy, everything in a single app.
So, if you’re looking for a fitness app that’s personalized just for you, JEFIT is for you! It’s like having a fitness expert and a helpful community right by your side, every step of the way. 

4. Nutrition and Diet Apps
Let’s dive into the world of nutrition and diet apps! 

These apps are like your personal nutritionist, helping you manage your diet effectively. They’ve got meal plans, food trackers, and loads of nutritional info – everything you need to crush your fitness goals.
People have become more health-conscious in today’s world, making these apps even more important. Calorie counting is not enough; they want to know which foods healthy and which ones are not and also want recipe guides.
They’re like having a nutrition expert in your pocket, helping you make those yummy recipes and smart food choices that lead to a healthier you! 
Example: MyNetDiary
Meet MyNetDiary, a big name in the world of nutrition and diet apps.
Why? Because it’s got all the goods: a powerful calorie counter, personalized diet plans, and a handy food diary. This app provides users with detailed insight into their dietary habits through its calorie counter, personalized diet plans, and food diary. With an extensive food database, users can log their meals and access nutritional information easily, making it a valuable tool for improving their diets. 

5. Virtual Reality Fitness Apps
In the ongoing digital evolution of the fitness industry, Virtual Reality (VR) fitness apps have found a distinctive niche. These innovative fitness concepts harness the immersive capabilities of VR technology to revolutionize conventional workouts, transforming them into interactive and engaging experiences.
They use fancy VR tech to transform your ordinary workout into something extraordinary. 
By enabling users to participate in physical activities within a virtual environment, these apps introduce a novel approach to making exercise more enjoyable and compelling.
These apps turn workouts into exciting games, keeping you pumped and motivated. 
So, if you’re looking for a fresh way to get fit and have fun, VR fitness apps are where the action’s at! 
Example: Supernatural
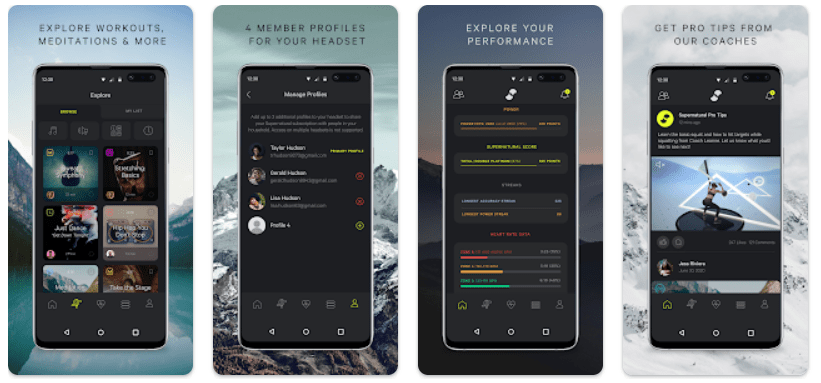
Supernatural is gaining significant traction as a VR fitness app in today’s market. It delivers immersive full-body workouts set in breathtaking virtual landscapes 
 . Whether you’re hitting targets on a sunny beach
  or doing squats in a snowy mountain range
  , Supernatural fuses the captivating world of VR with physical fitness, crafting a dynamic and visually stimulating workout adventure
  . With offerings like real-time guidance
  , expert coaching
 , and daily workout updates
  , Supernatural ensures that your fitness routine remains both exciting and challenging, making it an ideal choice for those seeking a fun and effective way to stay in shape .
6. Community-Based Fitness Apps
A fitness app that not only guides you on your health journey but also connects you with like-minded individuals the essence of community-based fitness apps, a rising trend in the fitness app market . These innovative apps harness the strength of social networks, allowing fitness enthusiasts to come together virtually, share their progress, offer encouragement, and even compete in friendly challenges 
 .
.
By creating a sense of community, these apps keep you motivated and engaged, transforming your fitness routine into a shared adventure . Say goodbye to the solo workout grind and hello to the collective support of fellow fitness enthusiasts  .
.
Example: Nike Run Club
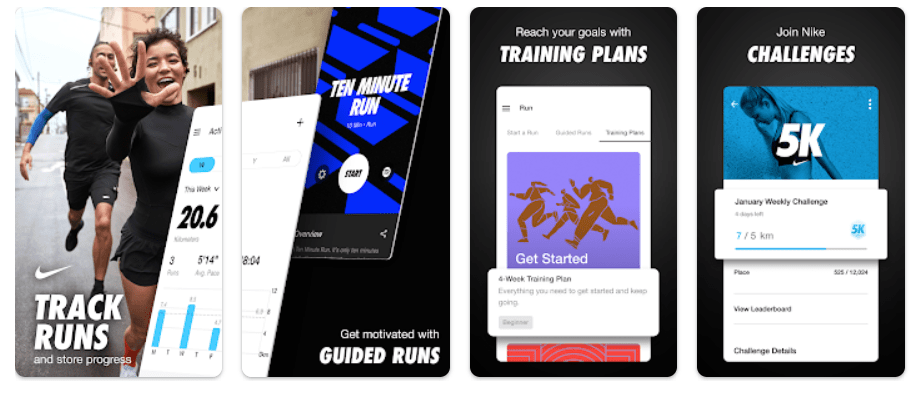
Nike Run Club isn’t just about running; it’s a thriving fitness community  . Beyond personal coaching and workout tracking, it’s a vibrant platform where runners unite. Share your stats, conquer virtual races, and cheer on fellow members. It’s a testament to the motivation found in a supportive fitness family.
  #FitnessCommunity
7. Mental Health and Wellness Apps
In the world of fitness tech, there’s a significant focus on mental health and wellness  . As conversations about mental health grow, fitness app creators are tuning into this crucial aspect of overall well-being. They understand that mental and physical health are closely connected.
These mental health and wellness apps come packed with helpful features. They offer guided meditations  , stress-busting strategies, tools to track and enhance sleep
  , and exercises based on cognitive behavioral therapy. By aiding users in managing their mental well-being, these apps complete the puzzle of holistic health and fitness.
Example: Calm
Calm has risen to the forefront as a top-notch mental health and wellness app, boasting a wide range of features dedicated to enhancing mental well-being. It delivers guided meditations, soothing sleep stories, gentle stretching exercises, and calming music tracks, all geared towards promoting focus and relaxation. Furthermore, Calm provides audio classes led by experts, covering a variety of mental fitness topics. With its comprehensive offerings, Calm stands out as a go-to platform for those seeking effective mental health management.
8. Move-to-Earn Apps
Move-to-earn apps are all the rage, rewarding users for getting active and harnessing cutting-edge blockchain tech. Plus, with NFTs, users can own and trade the rewards they earn in these apps. 

Example: Genopets
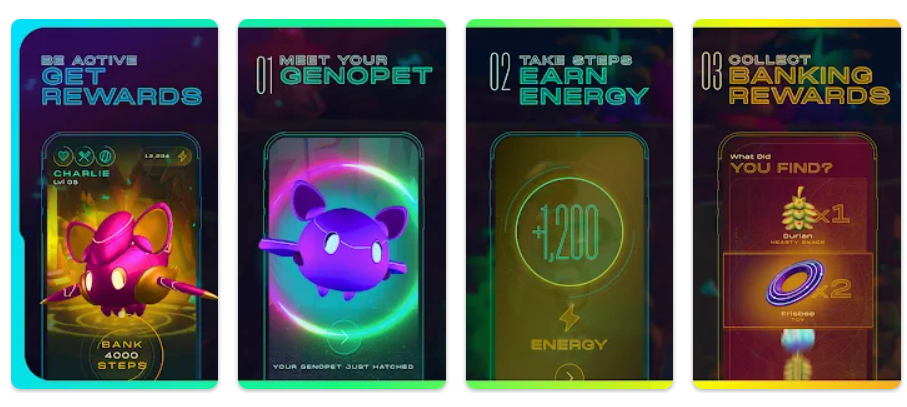
Genopets is among the pioneers of move-to-earn NFT games, bringing an exciting twist to fitness and gaming. It’s all about turning your real-world workouts into tokens that you can actually use. The app seamlessly connects with your wearables and health data to monitor your activity.
But here’s where the fun really begins. In Genopets, you have these adorable NFT creatures called Genopets. Think of them like your in-game buddies from a role-playing adventure. With the tokens you earn through exercise, you can level up your Genopets and create valuable items to gear up for epic battles.
So, imagine going for a jog or hitting the gym, and every move you make gets you one step closer to strengthening your Genopets and mastering the game. It’s a whole new level of fitness motivation that combines exercise, gaming, and NFTs! 

9. Fitness Shopping App
From yoga mats to weights, the world of fitness gear is booming online! If you’re thinking about a fresh startup idea that’s all about good old eCommerce, why not dive into the world of fitness merchandise?
Imagine having an app where folks can shop for all things fitness with ease. You’d have categories for different products, smooth payment options, a chat feature for queries, and even ways to make it profitable for your business. It’s like creating a one-point shopping app for fitness enthusiasts, making their fitness products shopping experience even better. 
So, if you’re ready to break a sweat and build your own fitness merch app, it could be a fantastic journey into the world of eCommerce!
Example: Decathlon
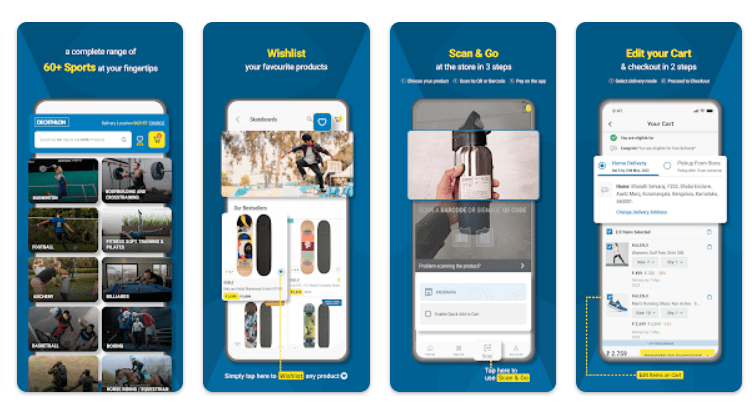
If you’re all about sports and gear, Decathlon’s shopping app is your best buddy! 
This app is like a treasure chest for sports enthusiasts. Whether you’re into football, running, or any sport under the sun, we’ve got you covered. From snazzy boots to comfy workout gear and all the big equipment, it’s all here, neatly organized.
And shopping with us? It’s as easy as scoring a goal!  They’ve designed their app to be super user-friendly. You can shop swiftly, and your payments are safe and sound. Plus, they’ve got loads of goodies like exclusive deals, discounts, and even free shipping!
10. Social Fitness App
Ever thought about a social app that’s all about fitness?
It’s not just about sharing selfies anymore. People are using social apps to supercharge their fitness journeys. Imagine an app where you can share your workouts, challenge your buddies, and even bring in your family for some friendly competition.
You could take this idea and make it your own. Put your creative spin on it and launch a social fitness app that gets folks moving, connecting, and having a blast! 
Example: FitTogether
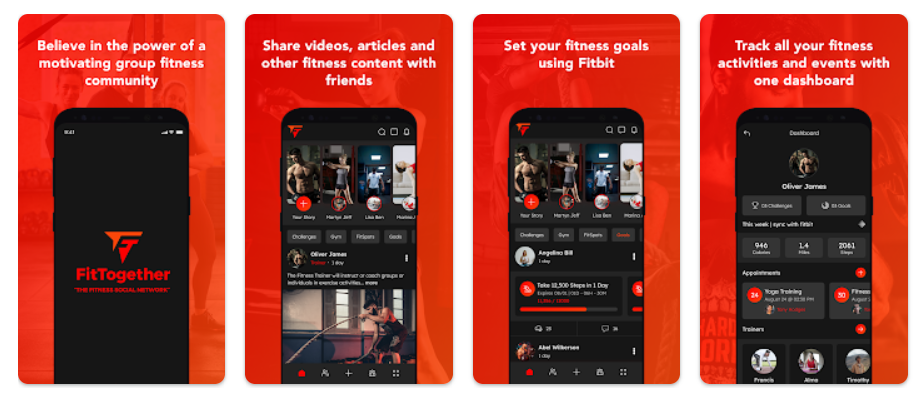
Meet FitTogether!
It’s not your ordinary fitness social network. FitTogether goes the extra mile by giving gym managers and personal trainers special tools to connect with their members and clients. So, it’s not just about your workouts; it’s about building a fitness community that’s super supportive and connected. 
It’s like having your own fitness squad right in your pocket! 
USE SWING2APP FOR FITNESS APP DEVELOPMENT
When it comes to turning your fitness app dreams into reality, you need a partner who understands the game. Enter Swing2App, your ticket to the fitness app world!
With Swing2App’s no-code technology, you don’t need to be a tech wizard to build an awesome fitness app. Our user-friendly platform empowers you to create cutting-edge fitness solutions that cater to the evolving needs of health enthusiasts.
Our team of experts will hold your hand every step of the way. We’re not just about creating no-code apps; we’re about creating engaging, personalized fitness experiences. Think workout plans, activity tracking, nutrition guidance, and more – all tailored to your users.
Plus, we’re all about exceeding expectations. With Swing2App, you’re not just building an app; you’re building an exceptional app experience for your users. So, let’s make your fitness vision a reality! 
Also read, How to Build a Health and Wellness App with No Code App Builder?
Checkout the various health templates provided by Swing2App no-code app builder for free!
CONCLUSION
In the grand finale, here’s the bottom line: the future of fitness is digital.
As we dive deeper into the digital age, fitness apps are taking the lead in reshaping the fitness industry. By exploring these innovative fitness app ideas, you’re not just keeping up with the times; you’re becoming a trailblazer in the thriving fitness app market.
Opportunity knocks, and the door is wide open. The fitness app development landscape is brimming with possibilities, and the time to seize them is right now. 
By grasping the pulse of the trends and the types of fitness apps that are making waves in 2023, you can harness this knowledge to craft a fitness app that meets the current market’s demands and stays on the cutting edge of fitness technology. 
So, gear up and get ready to shape the future of fitness with your groundbreaking app! 
Struggling with your push notifications? Discover 10 common push notifications mistakes and how to steer clear of them for a better experience.
Have you ever been rudely awakened by the relentless beeping of your phone, only to find it’s just another promotional message or an app notification? These nuisances can lead to app uninstalls and subscription cancellations. Picture this: you’re enjoying an afternoon coffee break, checking your phone for missed calls, texts, or emails when a push notification pops up. It’s about a sale on those boots you’ve been eyeing, complete with pictures and a special promo code. You immediately open the app, find your favorite pair, and make the purchase. That’s the power of a well-timed push notification.
However, push notifications can either engage or annoy users. To ensure they’re effective, you need to steer clear of these ten common push notifications mistakes. But, first, let’s understand a bit about push notifications and their importance.
WHAT ARE PUSH NOTIFICATIONS?
Push notifications are the short CTA (Call-to-action) message that pops up on your phone, even when you’re not using that app. Apps generally send push notifications to get your attention and share important information, reminders, or exciting offers with you.
These notifications usually have a title, a message, a picture, and a web link. Sometimes, they can also have logos, images, or emojis to make them look more attractive and fun. Depending on whether you use an Android device or an Apple phone, push notifications might look a bit different.

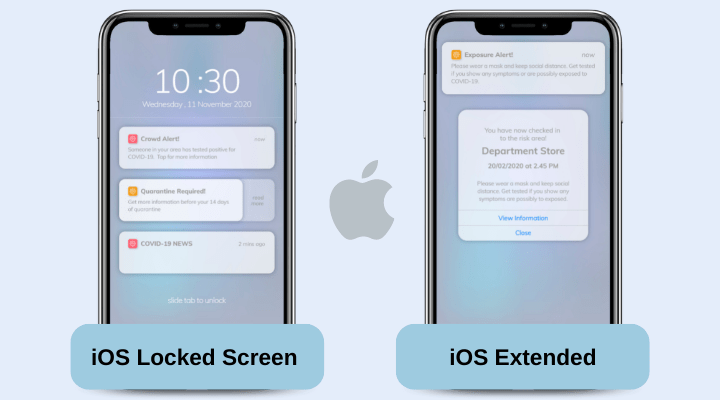
So, the next time you see a such message pop up on your device’s screen, it’s probably a push notification trying to tell you something interesting!
WHY ARE PUSH NOTIFICATIONS IMPORTANT?
Push notifications are like secret messengers for your mobile apps. They pop up on your device to grab your attention, even if you’re not using the app. Here are five cool reasons why they matter:
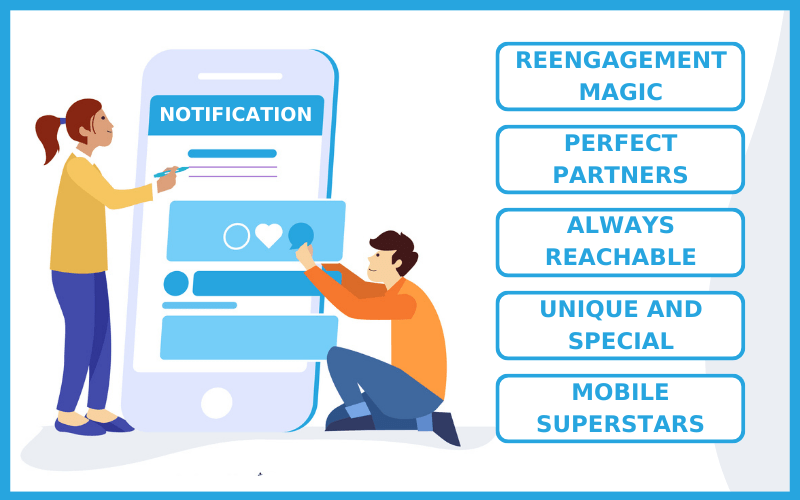
Always Reachable: Push notifications can talk to app users anytime, anywhere, whether they’re using the app or not. That’s like having a direct line to your users’ attention.
Reengagement Magic: If people forget about your app, push notifications can remind them it exists and bring them back. It’s like a friendly nudge, saying, “Hey, we’re here!”
Perfect Partners: They work great alongside emails, text messages, and web notifications. It’s like having a superhero team of communication.
Mobile Superstars: When we say, “push notifications,” we often mean the ones on mobile devices. They’re super popular and have superpowers to capture attention.
Unique and Special: Push notifications have a unique charm. They always stand out in a crowd of boring SMSs and other alerts, making sure you don’t miss the important stuff.
So, remember, push notifications are your app’s little helpers, ensuring your messages reach the right people at the right time.
For more information read: Push Notification Explained And Why Do They Matter?
Also read: Push Vs SMS: Which Is Better?
TOP 10 MISTAKES TO AVOID WHILE SENDING PUSH NOTIFICATIONS
Following are the top 10 common mistakes that you must avoid while sending mobile app push notifications.
1. USING PUSH NOTIFICATION AS EMAIL REPLACEMENT:
Push notifications are like digital post-it notes for your users. They can be used for different purposes, just like emails. You can send out announcements, order updates, and special offers through channels like SMS, in-app messages, and emails.
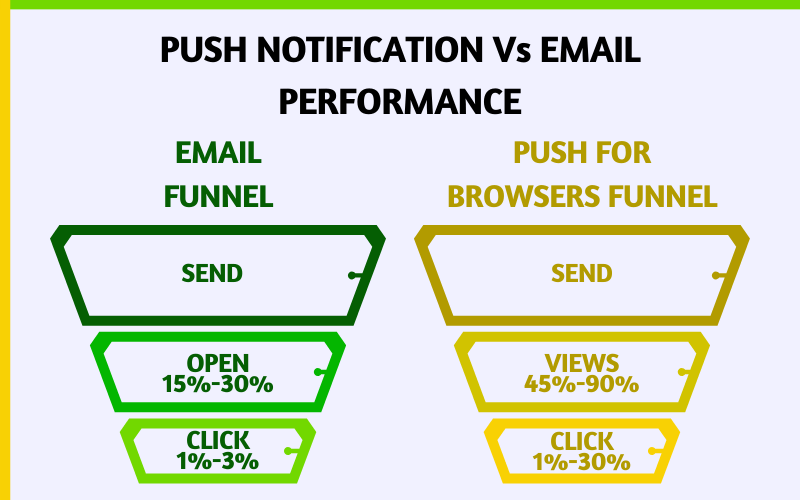
Sending push notifications, the correct way:
Push notifications work best when they’re like a friendly tap on the shoulder, sharing info that’s super relevant right now. Think about things like nearby deals, price drops, or limited-time offers. Save those push notifications for moments when your users will really appreciate them.
Bad Push Notification:
“Get 10% off at our store today! Hurry, the offer ends soon!”
Better Push Notification:
“Hey there! Looking for deals nearby? Check out our store for a surprise 10% discount today, just for you! But don’t rush, you’ve got all day to enjoy it. ”
2. NOT TARGETING THE PUSH NOTIFICATIONS:
When a user downloads your app, it clearly indicates their interest in your brand. It’s your golden opportunity to understand their preferences better. Start by collecting data on how they interact within the app and use this valuable information to craft user engagements that lead to higher conversions.
Sending push notifications, the correct way:
Instead of sending generic messages at your convenience, consider messages triggered by user actions or inactions. Align your marketing communication with the user’s journey toward making a purchase. Some key moments in the user’s app journey that have proven to boost engagement in e-commerce apps include:
First App Opening: Provide a warm welcome and guide users to relevant products and categories. Suggest items based on what’s frequently bought or similar to their preferences.
New User: Make new users feel special and engaged.
Cart Abandonment: Send a friendly reminder about the items left in their cart, encouraging them to complete their purchase.
Price Drop Alerts: Notify users about price drops on products they’ve recently viewed, added to their cart, or wish list.
Re-Engagement: For users who’ve been inactive for a while, offer look-alike recommendations to spark their interest again.
Time-Sensitive Discounts: Present time-bound discounts on categories or products aligned with the user’s interests.
By timing your messages effectively and tailoring them to user behavior, you can significantly enhance engagement and conversions in your e-commerce app.
Poorly Timed Push Notification (Bad Way):
“Check out our amazing deals on electronics now!”
Well-Timed Push Notification (Right Way):
User behavior: A user has recently viewed smartphones in the app and added one to their cart but abandoned it.
Push Notification (Right Way):
“ Price Drop Alert! The smartphone you liked now comes with a special discount! Grab it before the deal expires! ”
3. SENDING TOO MANY PUSH NOTIFICATIONS:
One of the key considerations is ensuring that users don’t disable your push notifications. To achieve this, delve into user engagement data and prioritize delivering a positive user experience.
Sending push notifications, the correct way:
To ensure your push notifications hit the mark, it’s essential to follow a thoughtful approach. Linzi Breckenridge, Senior Content Marketing Manager at Vertical Response, suggests that every marketer should ask themselves seven fundamental questions before sending out push notifications:
Relevance: Is the content of the push notification genuinely relevant to the recipient’s interests or previous interactions with your app? Personalization can significantly improve engagement.
Timing: Have you considered the timing of your push notification? Sending messages at inappropriate hours may annoy users. Analyze their behavior to find the best timing.
Frequency: Are you bombarding users with too many notifications? Strike a balance between staying connected and overwhelming your audience.
Value: What value does the push notification offer to the user? It should provide something beneficial, whether it’s information, a discount, or a solution to a problem.
Clarity: Is your message concise and clear? Users should instantly understand what the notification is about and why it matters.
Call to Action (CTA): Does your push notification include a compelling CTA? Encourage users to take a specific action, like visiting your app, making a purchase, or exploring a new feature.
Feedback Loop: Are you actively seeking feedback from users about the notifications they receive? Their input can guide you in refining your push notification strategy over time.
4. SENDING PUSH NOTIFICATIONS ON INAPPROPRIATE TIMING:
Timing is key! Catch users when they’re most likely to respond for better results. Annoying them with untimely messages in the early morning or late at night can lead to app uninstalls due to irritation.
Sending push notifications, the correct way:
Take into account the user’s local time and their daily schedule. Dig deeper by analyzing user engagement patterns to pinpoint the times when they are most active. Tailor your messages to seamlessly align with their daily routines. Here’s how you can use rich media push notifications to connect with app users at various moments throughout the day.
Example:
Bad Timing Push Notification:
“Check out our new products now!” Sent on 6 am Sunday Morning!
Why It’s Bad:
This notification lacks consideration for the user’s schedule and may interrupt them at an inconvenient time, reducing the chances of engagement.
Improved Timing Push Notification:
“Good morning, [User’s Name]! Start your day with our latest arrivals. Tap to see what’s new!”
5. STATIC NOTIFICATIONS:
Push notifications have come a long way! They used to be boring, but now they can be as cool as ads. Here’s how they’ve evolved from simple text to awesome rich media.
Sending push notifications, the correct way:
To do it right, use multi-product carousels. Show off products with images, names, prices, and clickable buttons that take users right to the product in your app. Make your notifications pop! Make your push notifications exciting with these ingredients:
Product image 
Product name 
Price details – like discounts or final prices 
Buttons that link to the product in your app
And guess what? Rich media push works on both Android and iOS. It’s a clever and budget-friendly way to bring users back to your app!
6. POOR MESSAGES AND CTAs (Call to Action) IN YOUR PUSH NOTIFICATION:
Choose the right words and actions that are proven to work. Keep your message short and clear because your users have limited time. Be straightforward and get to the point.
Sending push notifications, the correct way:
Many push notification tools let you see how your messages will appear to users. Use this feature to make sure your messages look exciting when your users see them.
Select CTAs that have been effective for you before. For example, does “BUY” or “SHOP” get more responses?
Should you mention the discount percentage or the final price in your message? It depends on what your users prefer. Different categories of users might respond better to one or the other. For example, electronics shoppers tend to click more when they see the final price, while luxury fashion buyers like to see the discount percentage. So, tailor your message accordingly for the best results.
Bad Push Notification:
“Check out our amazing deals now! Buy today!”
Right Way Push Notification:
“Hey [User’s name] Last chance! Get 50% off on selected jewellery brands . Shop now!”
7. NOT PERSONALIZING PUSH NOTIFICATIONS:
When it comes to push notifications, it’s not just about sending messages; it’s about sending the right message at the right time. Think of it like tailoring a suit – one size doesn’t fit all. Personalization is key here. Studies show that personalizing notifications can boost conversions by up to 5.5%.
Sending push notifications, the correct way:
To nail personalization, you need a push notifications platform that dives deep into user preferences. Look for a tool that can personalize messages individually, not just to broad groups. It should connect with your app’s data, like what products users are interested in or if there are any ongoing discounts.
Here’s the secret sauce: Make sure this tool can analyze real-time user interactions and adjust your notifications accordingly. It’s like having a personal shopper who always knows what you want when you want it.
Bad Push Notification:
“Check out our amazing deals! Click here!”
Right Way:
“Hey [User’s Name], we noticed you were eyeing those running shoes. Good news – they’re now 15% off! Grab your pair today and hit your fitness goals with style. ”
This personalized message not only addresses the user by name but also offers a discount on a product they’ve shown interest in. It’s more likely to grab their attention and lead to action.
8. SENDING TOO MANY PUSHES, TOO OFTEN:
Receiving a barrage of push notifications can be quite irksome for users. While push messages are cost-effective, it’s important not to overdo it and annoy your audience.
Sending push notifications, the correct way:
To strike the right balance, create specific user groups and avoid including users in multiple segments. Establish frequency limits, cooldown periods, and prioritization algorithms to ensure you’re sending highly relevant notifications without bombarding users.
A good rule of thumb is to limit your weekly notifications to 3-5, and even then, make sure they offer something valuable. Understand how users incorporate your app into their daily routines and find opportunities to enhance their experience through push messages.
Another effective strategy is to segment users based on their app engagement level, setting lower frequency limits for highly engaged users to prevent uninstallation risks.
9. IGNORING THE PUSH NOTIFICATION DATA:
Don’t miss out on valuable data! Let your users register and enable push notifications. This information can be a game-changer when it comes to connecting with your audience effectively.
Sending push notifications, the correct way:
Many marketers make the mistake of using outdated email-focused strategies for mobile apps. By doing this, they miss out on the unique opportunities that mobile engagement offers. Pay attention to the push notifications that users respond to, as they can reveal their preferences and dislikes. This knowledge can guide you in reaching out to them at the right time and improving their journey to making a purchase.
10. SKIPPING THE TESTING PHASE
Experiment with various approaches to find what clicks with your audience. A/B testing can be your best friend when it comes to keeping app users interested.
Sending push notifications, the correct way:
To nail this, divide your users into two groups. One is based on who they are, and the other is based on how they use your app. Then, send them different messages tailored to their preferences. This helps you understand what each user likes.
Next, figure out the perfect time to connect with your mobile audience. Test two sets of campaigns. One should hit their screens at a local time when they’re usually active. The other set should pop up when they take specific actions in your app. This reveals the sweet spot when users are most eager to engage with your brand.
LAUNCH A PUSH NOTIFICATION-ENABLED APP WITH SWING2APP
Mobile app push notifications beat web and desktop notifications hands down. To turbocharge your goals and supercharge your push notification game, all you need is Swing2App. No coding skills, no extra costs, and no stress.
Guide to create & send push notifications using Swimg2App no-code app builder. Also, check out this YouTube video to understand the Swing2App push notifications better.
Swing2App is your ultimate tool for sending unlimited push notifications. Here’s why it’s a game-changer:
Segment and Target:
With Swing2App, you can precisely target different user groups, ensuring your messages are spot-on.
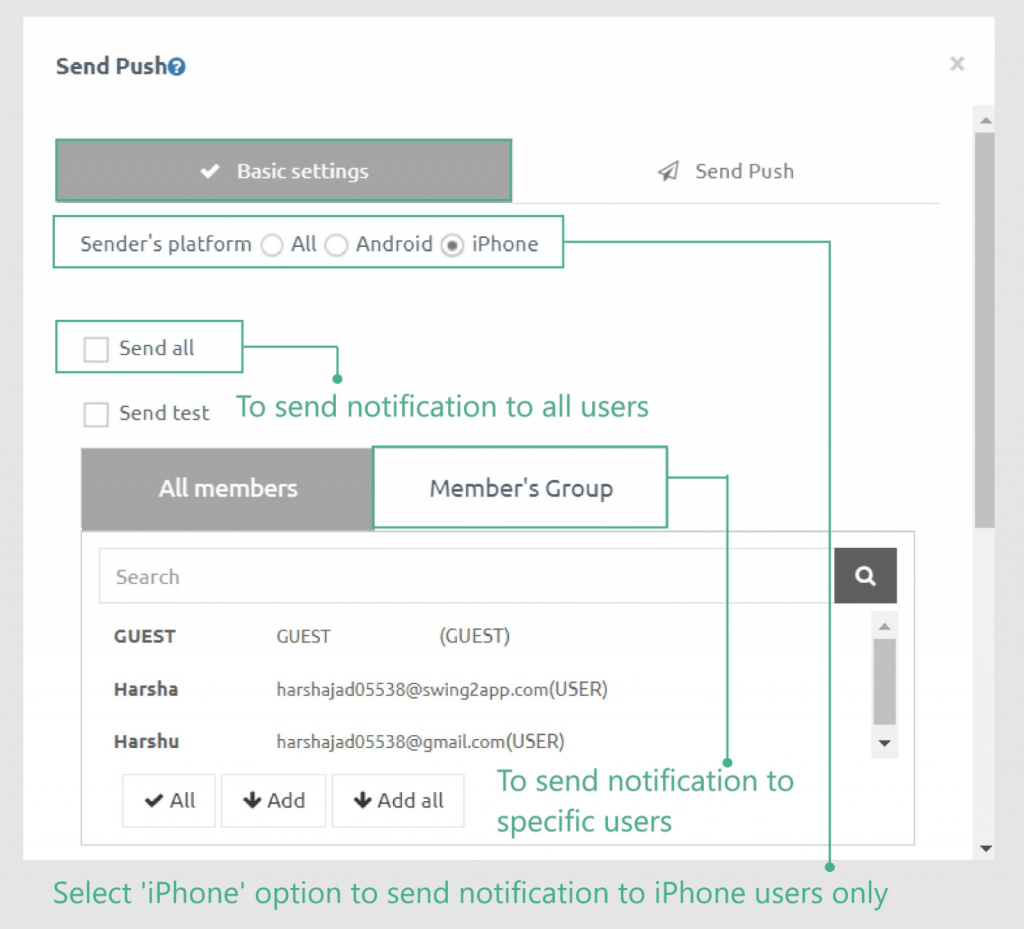
Personalized Notifications:
We make it simple to create personalized notifications that resonate with your audience.
Timing and Frequency Control:
Adjust when and how often your notifications go out with ease.
Add Images: Want to make your messages stand out? Swing2App lets you include images effortlessly.
effortlessly.
The finalized result will look something like this on the users’ screen:
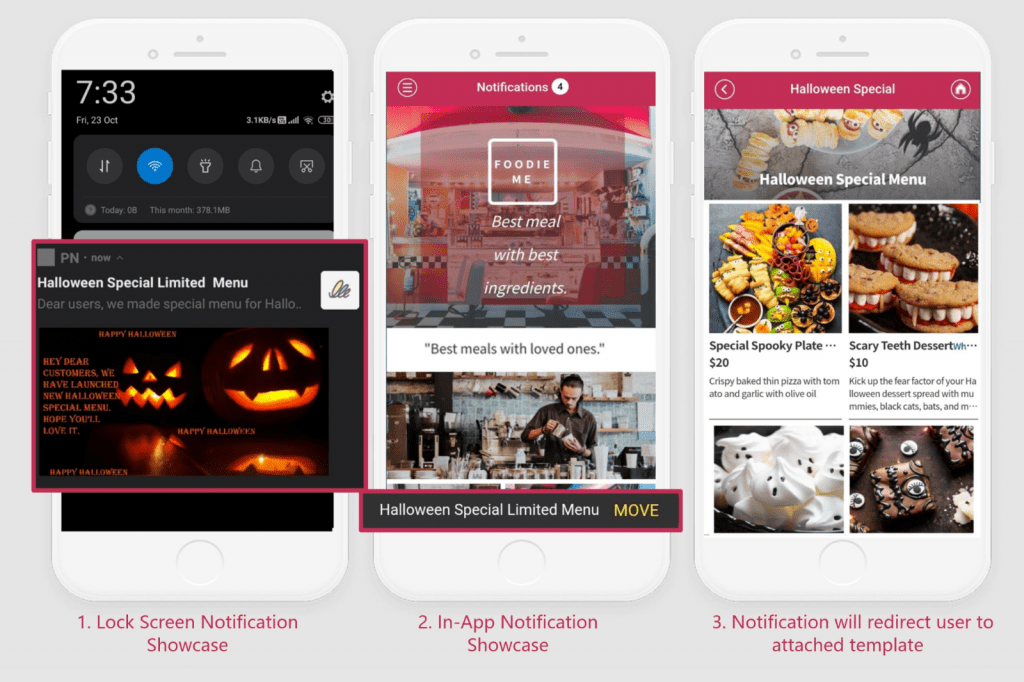
Swing2App’s no-code app builder empowers you to create your app in minutes. And guess what? It comes with awesome features like push notifications, chat, monetization, and more—all for free!
Managing push notifications is a breeze with Swing2App. You can set them up, schedule them, send them, and keep track of everything from one handy dashboard.
So, don’t wait. Build your app now, publish it on Google Play and the Apple App Store, and start wowing your users with push notifications. It’s time to launch killer campaigns and watch your profits soar!
Plus, here’s a bonus: You can also use Swing2App to send SMS messages, available as an optional extra. Say goodbye to limits and hello to effective communication with Swing2App!
Ready to build an App? Use Swing2App!
Mobile app vs. Tablet app development, which one is better for your business? Choosing between mobile vs tablet app development is one of the first questions that comes into your mind when you are looking to build an app for your business. Since mobile and tablet apps are poles apart mainly in terms of User Experience (UX) and user behavior, it is an important decision to choose between a mobile app or a tablet app.
All the gadgets including tablets and smartphones have invaded all parts of our life. As the user base has increased on both mobile phones as well as tablets, it has become essential for businesses to build mobile apps or tablet apps or both as per the needs of their customers. However, with so many different types and sizes of devices in the market, choosing between tablet app development and mobile app development has become a difficult decision.
In this blog post, we will help you understand the differences between tablet apps and mobile apps, and factors to consider for your app development project, whether mobile app or tablet app development.
RISE OF TABLETS USAGE AND TABLET APPS: KEY STATISTICS
The global tablet market is projected to grow at a CAGR of 3.4% from 2021 to 2029.
Users spend an average of 10.9 minutes per session on tablet apps, while only to 7.2 minutes per session on mobile apps.
Tablets are becoming increasingly popular among businesses, with 60% of enterprise organizations now using tablets for their work.
RISE OF SMARTPHONES AND MOBILE APPS: KEY STATISTICS
As per the Statista’s report, 83.07% of the global population own a smartphone.
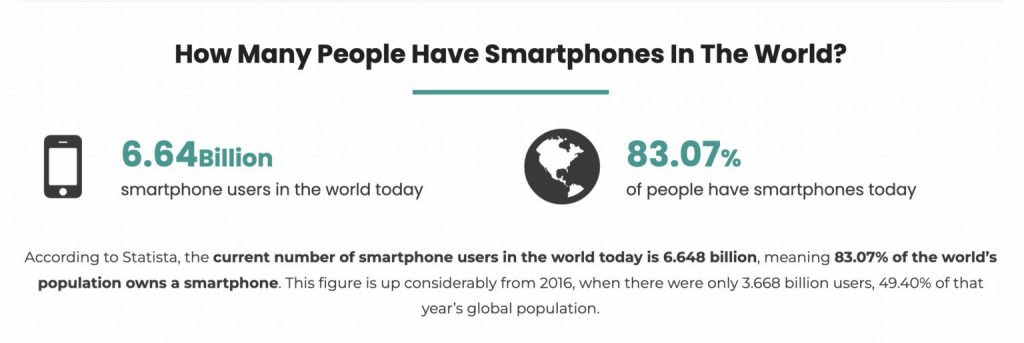
However, statistics alone can’t help you choose between mobile app and tablet app development. Before jumping to any conclusion, let’s first understand the major differences between tablet apps and mobile apps.
DIFFERENCES BETWEEN MOBILE APPS AND TABLET APPS
| CRITERIA | TABLET APPS | MOBILE APPS |
| Screen Size & Resolution | The larger screen of 7-12 inches, but the lesser screen resolution | Small screen size of 4-6 inches, but better resolution (more pixels in less area = sharper image) |
| Hardware Features | Often includes additional hardware features that require better processor | Lesser hardware features are available due to limited the processor |
| User interface and navigation | designed with a focus on larger screens and more detailed information, meaning that features may be spread out | users should be able to reach all of the app’s features within one or two taps, as these devices are designed for quick access to information |
| Processing power | More powerful | Less powerful |
| Battery life | Greater due to the bigger battery size | Lesser due to the smaller battery size |
| Preferred by | apps that require more screens like real estate, Healthcare, Automotive Industries, etc. | Quick-to-use apps like Scan and pay, social media apps, etc. |
| Appstore presence | Lesser availability in stores | Larger availability |
| App development cost | Developers may need to code separate apps as per tablet screen size, and the costs increases | Costlier because needs more optimization and coding than tablet apps |
It is important to understand that these are general differences, and there may be some common aspects between tablet and mobile app design and functionality. Moreover, the decision of choosing to build a mobile app or a tablet app depends on the specific needs and goals of your app, user behavior, and business context.
Tablet users interact with apps quite differently as compared to mobile users, and for different purposes.
For example, tablet users are more likely to use tablet apps leisurely at home or in a cafe and usually tend to spend more time using tablet apps than mobile apps. This means that tablet apps should be designed to be more appealing, immersive, and engaging, with advanced features and detailed graphics.
On the other hand, mobile apps should be designed for an easy, quick, and on-the-go experience, with simpler user interface (UI) and functionalities. For example, mobile apps are designed to be used single-headedly, hence all the features should be arranged in a way that the fingers reach easily. Hence, the cost of developing both mobile apps as well as tablet apps becomes higher.
Fortunately, with the right app builder platform, app development can be easy and more efficient. Swing2App no-code app maker is a no-code platform for building mobile apps, allowing app developers to create high-quality mobile apps as well as tablet apps quickly and cost-effectively. With Swing2App no-code app maker, developers can build engaging apps on any device without compromising the app performance or user experience.
ADVANTAGES AND DISADVANTAGES OF MOBILE APPS
Mobile apps offer much more advantages compared to other types of apps. The biggest and most obvious benefit of mobile apps is the convenience and portability of smartphones, as they can be used anywhere and anytime.
This makes mobile apps the best option for those who are always on the go or need quick access to information. Additionally, mobile apps have a larger market than tablet apps, making them a great way to reach potential as well as targeted customers.
However, like any other thing, mobile apps also have some drawbacks. The biggest challenge while developing a mobile app is the small screen size, which creates difficulty in designing a rich UI app or displaying all of the features that can be easily done for a tablet app.
Moreover, mobile phones tend to have limited processing power and hardware capabilities compared to tablets and computers, which may limit the functionalities and features that can be included in the mobile app. Due to the variety of smartphones available in the market, app developers may need to build separate versions of the same mobile app for various devices to ensure proper app functioning and usability.
ADVANTAGES AND DISADVANTAGES OF TABLET APPS
The biggest benefit of tablet apps is the bigger screen size of tablets. This allows app developers to create more appealing, immersive, and interactive apps.
Tablets often have better processors and hardware capabilities compared to smartphones—which means that they can easily support the complex features and functionality in an app that a smartphone can’t.
However, there are also some drawbacks to look into when building tablet apps. The most challenging aspect of building a tablet app is the smaller market share of tablet apps, as tablets are not as affordable or popular as smartphones.
As per the data, over 83% of the global population owns a smartphone. However, only 2.4% of the global population own tablets. Moreover, the global market share of tablets dropped by 50% between 2017 and 2022. You can see the stark difference between the user base of smartphones and tablets, and it is huge!
From this, it is clear that tablet apps will have fewer potential customers than mobile apps, and it can take a lot of to time and money to rank your tablet app in the app stores.
Additionally, the advantage of larger screen size and increased hardware capabilities becomes a disadvantage when it comes to the cost of tablet app development, as it becomes more expensive and time-consuming than developing a mobile app.
FACTORS TO CONSIDER WHEN CHOOSING BETWEEN MOBILE APPS AND TABLET APPS
Now you have a clear understanding of the differences between a mobile app and a tablet app, their advantages and disadvantages, but that is not enough. When choosing between developing mobile apps or tablet apps, you must consider a few key factors to consider.
Develop an app as per your target audience and their habits
Firstly, let’s what is the target audience and the user habits before you choose between mobile app or tablet app development.
For example, if your business fits the on-the-go category like booking apps, or payment apps most of your users will be using your app on their phones while they are on the go, so developing a mobile app may be the right option. However, as per recent reports, nearly 86% of tablet owners use their devices at home, which means tablet owners prefer to use tablet apps over mobile apps.
So it all boils down to your target group, if you’re potential customers are more likely to use apps at home like doctor consultation apps, real estate apps, etc. then building a tablet app may be more beneficial for your business.
Develop an app that helps you reach your business goals and deliver a desired user experience
Your business goals are the actual reason for developing an app for your business. Goals can be achieved only when the customers are satisfied, hence the user experience is key to a successful business app.
Both the tablet apps as well as the mobile apps have their own design guidelines, capabilities, and functionalities that should be taken into account to ensure that the user experience is customized for specific devices.
A tablet app may require more features and functionality, whereas a phone application may need to prioritize speed and usability.
Develop an app according to your budget
The availability of resources and budget are major constraints especially for start-ups when deciding between building mobile apps and tablet apps.
Developing an app for both the mobile and tablet platforms can be costly and time-consuming. Hence it is important to decide if you want to build a mobile app or a tablet app or both while keeping in mind the budget of your app development process. In addition, tablet apps could be more expensive to develop due to additional hardware capabilities and design considerations.
App development cost is a huge hurdle in the app development process, so let’s this aspect in detail.
COST CONSIDERATIONS FOR DEVELOPING TABLET APPS VS. MOBILE APPS
Business owners must carefully consider the cost factors before investing in tablet application development or building mobile apps.
Costs for app development vary depending on the type of app. A project’s complexity and scope can greatly affect the cost of app development.
Factors to consider for The Cost Of App Development ( Tablet app vs. mobile app):
1. Platform – Developing for multiple platforms (iOS, Android, etc.) will increase development costs as each platform requires separate coding and testing.
2. Features – The app’s complexity, functionalities, and number of features can significantly increase the app development costs. This raises tablet app development costs more than the mobile app development.
3. Design – Complex, advanced, and custom app designs, graphics, and themes can further increase the cost of development.
4. Development team – The size and experience level of the development team can also impact the cost of app development.
5. API Integration – The number of APIs integration also raises the cost of your mobile and tablet app development
Generally, tablet app development cost is comparatively more expensive than mobile app development due to the larger screen size, better hardware capabilities, and more complex features.
Strategies For Minimizing Costs of App Development And Maximizing ROI
1. Prioritize features – Identify the must-have features and prioritize those in the development process to avoid unnecessary costs.
2. Use pre-built templates – developing an app using pre-built templates can save time and money during the development process.
3. Choose the right app builders or experienced developers – Experienced app building platforms or professional mobile or tablet app developers can help you create quick-to-launch apps as well as provide cost-saving opportunities in the development process. They will also support you during the entire app development process, so you won’t have to invest again to rectify minor errors.
4. Easy and early testing – Testing your app throughout the app development process is a wise decision that can help identify and rectify issues early on, saving time and money in the long run.
USING SWING2APP FOR DEVELOPING MOBILE APPS AND TABLET APPS
Swing2App no-code app maker makes it possible for you to develop both mobile app as well as tablet apps at the same time—enabling you to launch apps quickly and save costs.
With Swing2App no-code app maker anyone can build both a mobile app and a tablet app at the same time, that too without any coding skills.
Swing2App no-code app maker provides the best option that is both time and cost-efficient and ensures high-quality experience across all devices. The platform provides many functionalities and features that make the development process quite easy and provide developers with a powerful visual editor tool.
The key benefit of using Swing2App no-code app maker is its easy-to-use no-code app development process. Swing2App no-code app maker is a one-stop solution to help anyone and everyone develop mobile apps quickly and easily.
With choose-and-select features, a visual editor tool, no-code technology, and comprehensive analytics tools developing apps with Swing2App no-code app maker is simple and time-efficient.
Swing2App no-code app maker also provides easy-to-customize features to help businesses create customized experiences for each device.
With the mobile app and tablet app-specific design considerations, you can relax while the Swing2App no-code app maker creates a fully optimized app for all users regardless of the device they are using.
Swing2App no-code app maker also offers analytics tools to track and analyze user engagement and make informed decisions about how to enhance the app experience. This is a sure-shot way to maximize user engagement and make the most of your investment.
With Swing2App no-code app maker you don’t have to worry about choosing between developing mobile apps or tablet apps. With Swing2App no-code app maker, you can create both mobile app and tablet apps by building a single app.
CONCLUSION
Building mobile apps or tablet apps or even both is a great way to reach a large app market to increase user engagement and retention. With the right app-building platform like Swing2App no-code app maker, anyone can build high-quality apps quickly and cost-effectively that are customized for different devices.
Swing2App no-code app maker is an excellent choice for anyone looking to build mobile apps or tablet apps without any coding at all. By simplifying the app development process, providing comprehensive analytics tools, and offering powerful customization options, Swing2App no-code app maker creates an all-in-one platform for building mobile apps and tablet apps. Your app is ready to launch in no time with Swing2App no-code app maker, and each app is customized for its respective platform.
We appreciate your time reading this! I hope you have gained a better understanding of how to build an app for a mobile or tablet after reading this article.
Visit Swing2App no-code app maker to build an app for different platforms!
The process of turning an app idea into a reality and getting your app published in app stores can often be complex and intimidating, especially for those without coding knowledge or technical expertise. However, with the emergence of no-code app development platforms like Swing2App no-code app maker, the app publishing process has been simplified and made accessible to a wider audience.
In this blog post, we will explore how Swing2App no-code app maker streamlines the journey from idea to app store, enabling individuals and businesses to bring their app concepts to life without the need for extensive coding or development skills. We will delve into the features, steps, and benefits of using Swing2App no-code app maker, providing a comprehensive guide to help you navigate the app publishing process with ease.
THE CHALLENGE OF UNDERSTANDING APP STORE SUBMISSION REQUIREMENTS & PREPARING FOR YOUR APP PUBLISHING PROCESS
App creation completion is just the beginning of the app development process, not the end. The next step is to deliver your app to your users, and for this, you need to publish the app in stores.
For the app publishing service provided by these app stores charges a fee for app uploading and in-app purchases. This is how app stores make their money while helping your app to reach a global audience.
The app publishing process can be challenging, especially if you’re a small business owner. In some cases, businesses must launch apps quickly to take advantage of opportunities. Businesses are increasingly using their own apps to increase sales or to provide customers with an alternative platform for using their tools and services. In fact, 42% of millennial-owned businesses have their own apps.
However, while a mobile app can generate quite a bit of revenue, quickly launching a successful app is made more challenging by its low barrier to entry.
Following are some major challenges faced during the app publishing process:
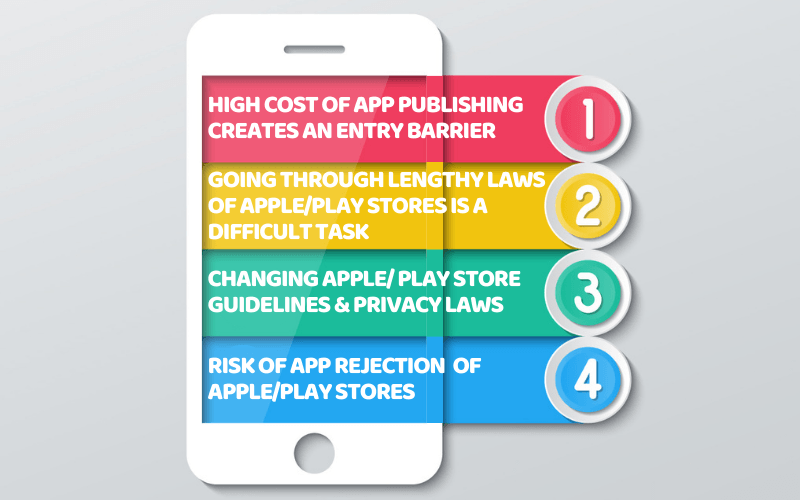
HIGH COST OF APP PUBLISHING CREATING AN ENTRY BARRIER:
Traditional app developers just create an app for you, to publish your app on the Appstore/ Play Store you need to pay more or hire an app publisher. They charge you for every edit you make in your app to comply with the App Store/ Play Store guidelines.
So, if you don’t create your app compliant with the Appstore/ Play Store guidelines from the very beginning, your app development as well as app publishing costs will increase.
Most small businesses or new entrepreneurs are not well aware of the App Store/ Play Store guidelines and have no option but to pay hundreds of dollars for the app publishing process.
GOING THROUGH LENGTHY COMPLIANCE LAWS OF APPLE/PLAY STORES IS A DIFFICULT TASK:
If you look at Appstore/ Play store guidelines it seems to be endless, but if you miss out even on a single guideline your app will stand rejected, thus halting your app publication process.
For a small business or a new entrepreneur, it is a difficult task to spend long hours reading and understanding each and every App Store/ Play Store guideline.
CHANGING APPLE/ PLAY STORE GUIDELINES & PRIVACY LAWS
As new developments emerge on a regular basis, developers have found it difficult to keep up with the current industry standards.
To ensure a successful launch, programmers must ensure that the software supports the most recent operating systems. When a new version is released, app developers must ensure that the existing app or the app on which they are working supports the latest version. Even after the solution is delivered, app owners must ensure that the app is kept up to date with the latest versions.
Aside from that, most users now prefer to use app development services that offer automated updates, allowing them to access new features, bug fixes, and security patches as soon as they are available.
With large firms like Google, Apple, and Microsoft releasing two to three new versions of their operating systems each year and announcing plans for regular updates beyond that, many small businesses simply cannot compete.
RISK OF APP REJECTION
Now, just going through the App Store/ Play Store guidelines might not be enough. The Apple App Store can be tough on your app and as a small business, you might need a bit of guidance to get the App Store to approve your app. Both the Apple App Store as well as Google Play Store have, in recent times become quite stringent about the apps it approves and this article can help you avoid app rejection and streamline the app publishing process!
UNDERSTANDING SWING2APP: EMPOWERING APP DEVELOPMENT
Swing2App no-code app maker is a leading no-code app development platform that empowers users to create mobile applications without the need for coding or technical expertise. It provides a user-friendly interface and a range of tools and features that simplify the app development process. With Swing2App no-code app maker, individuals and businesses can transform their app ideas into fully functional mobile apps in much less time as well as money.
Swing2App no-code app maker is the best way to launch iOS and Android apps. With just a few clicks, you can get started in seconds. Simply select a template and then you can add features, and menus by adding the required bulletin boards (chat, calendar, Google Maps, and much more).
With Swing2App no-code app maker, you can also add custom functionality. So, if you need something that’s highly customized and can’t find it on our platform, we can also create custom features for you.
As soon as the app is built, we will take care of the app launch on both the Apple & Play store. You just need to click “App Creation Request” when the app creation is completed.
Swing2App no-code app maker simplifies the process of publishing an app quickly and at a fraction of the cost of traditional development. Even better, you don’t have to worry about Apple or the approval process. All apps we prepare are 100% ready for Apple’s App Store and Google Play, and we submit them for you (under your own developer account). In case of a problem, we work directly with Apple or Google to resolve it as well as provide you with 24/7 support.
With Swing2App no-code app maker you won’t have to worry about Appstore rejection!
KEY FEATURES OF SWING2APP NO-CODE APP DEVELOPER KEY FEATURES
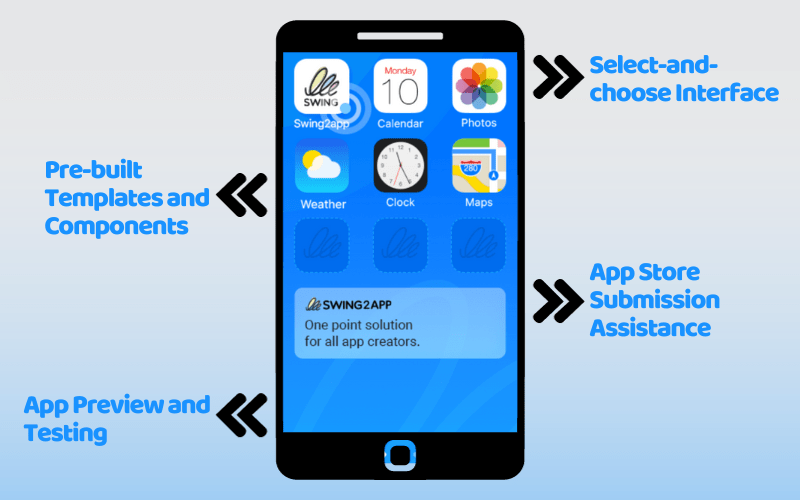
Swing2App no-code app maker offers a wide range of features that make app development as well as app publishing process accessible to everyone. Some key features include:
a. Select-and-choose Interface:
Swing2App no-code app maker’s intuitive select-and-choose interface allows users to easily design and customize their app’s layout, screens, and features. This eliminates the need for complex coding and simplifies the entire design process.
b. Pre-built Templates and Components:
Swing2App provides a rich library of pre-built templates and components that users can leverage to accelerate app development. These templates offer a range of designs and functionalities, allowing users to choose the ones that best align with their app vision.
c. App Preview and Testing:
Swing2App no-code app maker allows users to preview and test their app in real-time, enabling them to experience the app’s functionality before it is published. This feature helps identify any issues or areas for improvement, ensuring a high-quality end product.
d. App Store Submission Assistance:
Swing2App no-code app maker provides guidance and support throughout the app submission process. From generating app icons and screenshots to handling metadata and descriptions, Swing2App simplifies the technical requirements of app store submissions, ensuring a smooth app publishing experience.
STEP-BY-STEP GUIDE: PUBLISHING YOUR APP WITH SWING2APP
Now let’s dive into the step-by-step process of publishing your app using Swing2App:
Step 1: Defining Your App’s Concept and Design
Start by conceptualizing your app idea and defining its purpose, target audience, and desired features.
Utilize Swing2App no-code app maker’s user-friendly interface to design the app’s screens, layout, and navigation flow. Customize the look and feel using the available templates and components.
Step 2: Adding Functionality and Features
Leverage Swing2App’s extensive library of functionalities to add features like push notifications, in-app purchases, social media integration, and more.
Customize these functionalities according to your app’s unique requirements and objectives.
Step 3: Testing and Refining
Use Swing2App no-code app maker app preview and testing features to ensure a seamless user experience and identify any bugs or issues that need addressing.
Conduct thorough testing across different devices to ensure compatibility and responsiveness.
Step 4: App Store Submission
Follow Swing2App no-code app maker guidance and instructions to prepare your app for submission to the app stores.
Generate app icons, and screenshots, and write compelling descriptions using Swing2App’s assistance tools.
Verify that your app meets all the app store guidelines and requirements.
Step 5: App Store Optimization (ASO)
Implement app store optimization strategies to enhance your app’s visibility and discoverability. Optimize your app’s title, keywords, and descriptions based on relevant search terms and trends.
Encourage users to leave positive reviews and ratings, which can boost your app’s ranking and credibility.
Read more about Appstore Optimization to improve your app ranking.
Step 6: Creating App Screenshots and App Preview Videos
Share tips on capturing appealing screenshots and creating engaging app preview videos that effectively showcase your Swing2App no-code app maker’s features and functionalities. Explain the recommended dimensions and guidelines for each app store.
Step 7: Dealing with App Review and Approval
The App Review process is one of the most challenging and stressful parts of publishing an app on the App Store. There is still a great deal of mystery surrounding App Review a decade after its inception.
There are several reasons why your app might get rejected by the App Store or Play Store after the app review process. However, you can avoid your app getting rejected by adhering to the Appstore and Play store guidelines and updating your app timely.
Following all the guidelines is difficult. It can be hard to understand long documents based on App Review because they change frequently. Fortunately, you don’t have to be an expert to do this. Although the specific guidelines evolve over time, understanding the guiding principles behind them can help you sail through App Review.
Further read:
How To Appeal To AppStore Review After AppStore Rejection?
How To Appeal To Google Play Sore Review?
Step 8: Publishing Your Swing2App App: Going Live
The final steps to publish your app include selecting the release date, setting pricing (if applicable), and choosing distribution options (e.g., region-specific availability).
Once your app is approved and live on the app stores, develop a marketing strategy to promote your app to your target audience.
Leverage social media, content marketing, influencer collaborations, and other promotional channels to increase app visibility and downloads.
With Swing2Appp you can publish your app without much hassle by simply buying a Play Store upload ticket and an Appstore upload ticket. Click here to check out How To Apply For App Store Registration & Play Store registration.
Step 9: Post-Release Strategies: Gathering User Feedback and Iterating
For an app to succeed, it needs to be maintained and nurtured. We make sure you’re always in control and running smoothly with Swing2App no-code app maker, where we make sure your business doesn’t stop growing.
After launching your app, it is important to gather user feedback via a survey or App review section of app stores and work with them to update yours as per your customers’ needs.
With Swing2App, we don’t simply publish your app and hope it succeeds. Our goal is to safeguard your app and to ensure that it is future-proof. With our subscription plan, you will have round-the-clock technical support for bugs, software updates, and expert mobile app maintenance. Swing2App no-code app maker’s mobile app maintenance is free and for a lifetime!
Step 10: Promoting Your Swing2App App: Marketing and User Acquisition
Even though higher or exponentially rising app downloads may sound pleasing, they shouldn’t be the primary indicators used to measure a company’s performance.
Of course, more downloads mean more new users, but it’s also important to assess how satisfied current users are.
For example, a new user that downloads your app will increase the total number of downloads, but if they don’t utilize it or even register, it will be a waste of time for businesses. It doesn’t offer anything of real value.
However, even if an app has a small number of downloads but a large active user base, it continues to generate revenue for businesses. Moreover, acquiring new users is way more expensive than retaining the existing ones.
User engagement is a KEY component of app marketing to retain these existing customers. Read more: How To Increase User Loyalty And User Engagement On Your App?
THE BENEFITS OF SWING2APP’S SIMPLIFIED APP PUBLISHING PROCESS
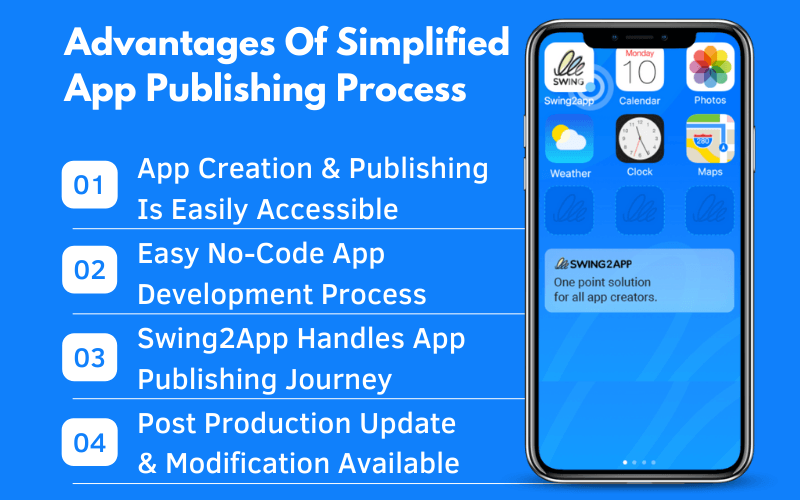
Swing2App’s simplified app publishing process offers several advantages:
a. Time and Cost Savings:
By eliminating the need for complex coding and development, Swing2App significantly reduces the time and costs associated with app creation and publishing. This makes app development more accessible to individuals and businesses with limited resources.
b. User-Friendly Interface:
Swing2App no-code app maker’s intuitive interface enables non-technical users to navigate the app development process with ease. The drag-and-drop functionality and pre-built templates make designing and customizing apps simple and straightforward.
c. Support and Guidance:
Swing2App provides comprehensive support and guidance throughout the app publishing journey. From tutorials and documentation to customer support, users have access to the resources they need to overcome challenges and ensure a successful app launch.
d. Real-time updates:
Swing2App no-code app maker enables users to iterate and improve their apps even after app publishing. With real-time updates and the ability to make changes on the go, users can respond to user feedback and market trends, continuously refining their apps.
Further read:
How To Submit Your App To The App Store
How To Publish An Android App On Google Play Store: A Step-By-Step Guide
CONCLUSION
Swing2App no-code app maker simplifies the app publishing process by providing a user-friendly interface, pre-built templates, and comprehensive support. From concept to app store submission, Swing2App empowers individuals and businesses to bring their app ideas to life without the need for coding expertise.
By streamlining the development process and offering guidance at each step, Swing2App no-code app maker enables users to focus on their app’s unique value proposition and user experience. Whether you’re a non-technical entrepreneur, a small business, or an aspiring app developer, Swing2App no-code app maker can help you turn your app idea into a reality.
Embrace the power of Swing2App no-code app maker and unlock the potential of your app vision with ease and efficiency.
Having the perfect app performance is the key to engaging more visitors. When competition gets higher, quality is what matters!
With so many apps targeted at attracting more and more clients, developers should now be highly cautious about their app quality.
And that’s exactly what the perfect User Interface does! Having the perfect User Interface (UI) design ensures better interaction of the users with your website or application, which consequently identifies their further interaction as customers with products or services presented there. In other words, the perfect interface design can not only provide the best user experience (UX) and traffic increase but also is the most effective way to boost your business performance.
Based upon Jakob Nielsen’s “Ten Usability Heuristics”, 10 general principles for interaction design, and Ben Shneiderman’s “Designing the User Interface” I’ll explain the top 10 golden rules for app UI designing.
In this article, you will learn about the golden rules of creating the perfect UI (user interface) design with examples and tips to benefit your online business. Let’s get this started!
TOP 10 GOLDEN RULES FOR APP UI DESIGNING
1. CONSISTENCY IS THE KEY IN PERFECT UI DESIGNING
Using different words or icons for the same things or actions could confuse them. And a confused user might skip to some other service or app than yours. For the perfect UI design consistency is the key- never confuse your users.
Jakob’s guidelines for UI design back this by stating that people spend most of their time using your competitor’s apps or digital products other than yours. This is simply because the competitor provides a better user experience with their consistent UI. Failing to maintain the app UI consistency forces them to learn new things to use a simple app and thus increase the users’ cognitive load.
Users don’t like surprises when it comes to using an app or a digital product. So, to create the perfect UI design you should use the “Principle of least surprise” and maintain consistency throughout your app.
In other words, all elements in your application must appear consistently. For example, a certain style of the button should always do the same thing, the previous screen button should be named only one thing (either return or back) or navigation should function logically and as per the hierarchy.
Example of consistency in UI designing:
- Most applications have an app UI design that provides users with quick login features like login with the App Store of Google, if your app asks for a detailed form then the user might just skip to some other app.
- The wish list is usually placed near the shopping cart. This consistency meets customers’ expectations and prompts them to buy quickly.
Tips to maintain consistency of functionality, appearance, and terminology in your app UI:
- Improve learnability by maintaining both internal and external consistency.
- Internal consistency means within a single product or a category of products or services.
- External consistency means following industry-set conventions.
2. VISIBILITY OF SYSTEM STATUS OR INFORMATIVE FEEDBACK IS THE BACKBONE OF THE PERFECT UI
The app UI system should always keep users well-informed about what is going on. System status can be made visible through appropriate feedback within a reasonable time. Never keep your users guessing or surprised — give them feedback on whatever is happening and keep them informed.
The user likes to be in control as this builds trust that the system will act as expected by the user. So, the app UI design should always keep users well informed about the system updates, to make them feel that they are in control.
When the users know everything about the current system status, they know the final outcome prior to the first. Such predictable app interactions create trust in the product as well as the brand.
Example of visibility of system status:
- OS Installation status
- Within the app, if you delete something, you get a warning that it will be permanently deleted
Tips to maintain visibility of system status or provide feedback
- Clear and concise communication is the key — no action should be initiated without the final outcome being informed to the users in advance
- Too much feedback is also bad, rather it must be relevant and important for the users
- Feedback of system status should be done immediately.
- Build trust with your users through open and instant communication.
3. MATCHING THE SYSTEM WITH THE REAL WORLD IS ESSENTIAL IN UI DESIGNING
Using fancy words or design might sound like a brilliant and unique way to create your app, but it’s not. If you want your app to reach a wide audience then simple app UI designing is the way to go. The system should speak the users’ language, and look the way they want rather than special design or system terms.
The app actions hierarchy should be organized into groups and when a process is finished, remember to display a notification message. Let the user know that they have completed all the necessary steps(For example, in payment apps like PayPal, you need to enter all the financial details, but once done you can use the service seamlessly.)
Moreover, the app UI design should speak the users’ language. Use words, phrases, and concepts familiar to the user, rather than complex technical language. ( for example, security “password or pin” is easier to understand than “security access code” Use real-world conventions, easy-to-understand UI design, and language to make information easier to understand.
When an app UI design follows real-world conventions and responds to the desired outcomes, it makes it easier for users to learn and remember how the app UI works. This helps to build an intuitive and logical user experience.
Example of app UI design that creates a match between the system and the real world:
- Gaming apps that use the FPP(First-person perspective) mode of gaming to give a real-world feel
- PayPal Payment proceeding to make payments easy like paying in cash
Tips for designing app UI to match the system and the real world:
- Ensure that users can understand meaning without having to go look up a word’s definition.
- Never assume your app users will also have the same level of understanding of technical terminology as yours.
- Conduct research to understand your users’ familiar terminology and their expectations.
4. THE PERFECT UI DESIGN MUST OFFER USER CONTROL, FREEDOM AND EASY REVERSAL OF ACTIONS
“This feature relieves anxiety since the user knows that errors can be undone; it thus encourages exploration of unfamiliar options.” As said by Ben Shneiderman.
Users often carry out some app actions accidentally. Your app UI design must provide a clear “emergency exit” to leave the accidental action without having to go through the entire process again and again. (For example, if a user fills in an incorrect detail in a form then he/she must be able to remove that individual detail rather than filling the entire form again).
The ability to undo mistakes or other actions builds a sense of freedom as well as confidence among the users. Exit options allow users to be in control of the app and avoid getting stuck or confused.
In apps, this basically refers to the undo and redo functionality.
Example of App UI that ensures user control and freedom:
- Google Images never permanently deletes your images in the first go
- Document History on your phone
Tips to create an app UI that gives your users more freedom:
Support Undo and Redo, and action history.
Show a clear way to exit the current action, like a Cancel button.
Make sure the exit option is clearly labeled and easily discoverable.
Exit or cancellation must not interfere with the workflow.
5. ERROR PREVENTION AND SIMPLE ERROR HANDLING WHILE UI DESIGNING
Everyone hates errors, but the feeling that the users themselves have done something wrong is worse. This drives users away from your app and thus makes you lose a potential customer.
So, it is best to either totally eliminate error-prone conditions or check for them and notify users in advance before they commit to the action.
As much as possible, design the app UI system so that there is no chance of making any serious errors. However, if an error is made, the system should be able to detect that error and offer a simple handling mechanism instantly and comprehensively.
Clear error messages are important, but the best app UI designs prevent the problems from occurring in the first place.
There are two main types of errors: slips and mistakes. Slips are not deliberate but rather unconscious errors caused by not giving proper attention. Mistakes are conscious errors caused by a mismatch between the user’s understanding and the app UI design.
Example of preventing errors in your app UI:
- In technical apps like insurance and finance apps, you find caution points to avoid mistakes
- While making a new Password it shows the necessary requirements
Tips for error prevention while designing your app UI:
- Prioritize your prevention over correction: Prevent high-cost errors first, then little frustrations.
- Avoid slip mistakes by providing necessary constraints and good defaults.
- Prevent mistakes by removing memory burdens, supporting undo, and warning your users
- Automatic detection of errors and Offer solutions for problems
6. CREATE UI DESIGN BASED ON RECOGNITION RATHER THAN RECALL
As Nielsen says, recognizing something is much easier than remembering it, and it is very true, especially for visual recognition. Focus on minimizing the user’s memory load: The user should not have to remember information from one part of the app to another. Instructions should be clearly visible.
Use icons (like “!” For help) and other visual aids such as themed UI design and consistent placement of items to help the returning users find the functionalities.
Create an app UI design so that it minimizes the user’s memory load by making elements, actions, and options visible. Information required to use the app UI design (e.g. field labels or menu items) should be visible or easily retrievable when needed.
Humans tend to have limited short-term memories. The app UI that focuses on recognition more reduces the amount of cognitive effort required from users.
Example of using recognition in your app UI:
- Almost in every app or digital product “!” represents help
- Cab pick-and-drop apps tend to save your recent locations
Tips for using recognition rather than recall while designing your app UI:
- Let people recognize information in the interface, rather than forcing them to remember (“recall”) it.
- Offer help in context, instead of giving users a long tutorial to memorize.
- Reduce the information that users have to remember.
- App clear structure for Implicit help by Visual aids
7. ENABLE FREQUENT USERS TO USE SHORTCUTS IN YOUR APP UI DESIGN
Shortcuts in your app UI design are very helpful to an expert or frequent user. Shortcuts that may be hidden from newbie users will speed up the app interaction for the expert user so that the app UI design can cater to both. Allow users to customize frequent actions, like setting alarms for daily chores.
Example of using shortcuts in your app UI design:
- Different devices provide different mechanisms to take screenshot
- Click Commands and Shortcuts
Tips for incorporating shortcuts in your app UI design:
- Provide keyboard shortcuts and touch gestures in your app UI design.
- Provide personalization of content and functionality for individual users.
- Automate frequently used operations
8. AESTHETIC AND MINIMALIST APP UI DESIGN IS THE BEST
Minimalist app UI design doesn’t mean a limited app UI design. Minimalism means that all information should be available in minimal possible steps.
You should simplify app UI design by removing unnecessary or complicated steps or content.
The app UI design should not contain any irrelevant information that just takes up the screen space. Every extra unnecessary unit of information in the app UI design competes with the relevant units of information and may overshadow their visibility.
This doesn’t mean you have to use a flat UI design, rather it’s about keeping the app content and visual design focused only on the essential app UI elements.
Example of using minimalistic and aesthetic design for your app UI:
Most of the news apps are quite minimalistic with limited UI elements like: daily news, monthly magazine live updates, and your subscription; and that’s all that a news app actually needs.
Tips to create a minimalistic and aesthetic app UI design:
- Keep the content and visual design of the UI focused on the essentials.
- Don’t let unnecessary elements distract users from the information they really need.
- Prioritize the content and features to support primary goals.
9. HELP USERS RECOGNIZE, DIAGNOSE, AND RECOVER FROM ERRORS WITH YOUR PERFECT UI DESIGN
Error messages should be expressed in plain language (don’t use system language to describe what the system is doing), precisely indicate the problem, and constructively suggest a solution.
Tell the user clearly and plainly what’s happening both in the background and when they perform an action.
Error messages should be expressed in plain language (no error codes), precisely indicate the problem, and constructively suggest a solution.
These error messages should also be presented with visual treatments that will help users notice and recognize them.
Example of App UI design to recognize errors easily :
When you use MS Excel and try to run some function, if that function is incorrect you get a detailed dialogue box information about what all might be wrong.
Tips to help users recognize errors easily while designing your app UI:
- Use traditional error-message visuals, like bold, red text.
- Tell users what went wrong in the language they will understand — avoid technical jargon.
- Offer users a solution, like a shortcut that can solve the error immediately.
10. HELP AND DOCUMENTATION SHOULD BE INCLUDED IN YOUR APP UI DESIGNING
Even though it is better if the interface can be used without documentation, it may be necessary to provide help and documentation. Any help information should be easy to search, focused on the user’s task, a list of concrete steps, and not too large.
It’s best if the system doesn’t need any additional explanation. However, it may be necessary to provide documentation to help users understand how to complete their tasks.
Help and documentation content should be easy to search and focused on the user’s task. Keep it concise, and list concrete steps that need to be carried out.
Example of easy documentation and help while designing your app UI:
Time and work management apps often have a detailed guide as well as a first-time download app tour to make the app UI design familiar for the users.
Tips for creating app UI design that provides easy documentation support:
Ensure that the help documentation is easy to search.
Whenever possible, present the documentation in context right at the moment that the user requires it.
List concrete steps to be carried out.
WITH SWING2APP YOU DON’T NEED TO WORRY ABOUT UI, YOU GET PRE-BUILT TEMPLATES
Swing2App no-code app builder provides you with pre-built UI designs that can be easily edited without any coding at all!
The Swing2App templates are industry-specific and include all the necessary features which can be easily added. Moreover, you can also add other features without any coding!
Check out the following hair salon template provided with Swing2App no-code app builder.
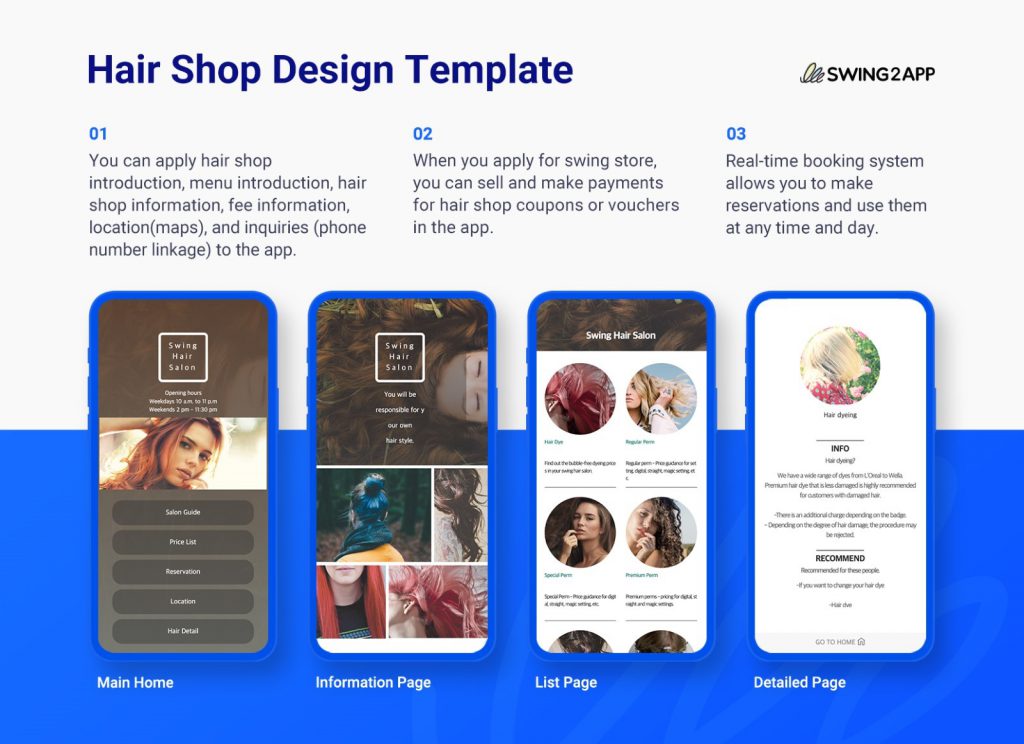
Read more about Swing2App templates here.
With Swing2App templates you don’t need to worry about Play Store or App Store UI guidelines as each template is of top quality and provides a seamless experience to the users.
]]>In this digital age, the world of mobile applications has grown exponentially and has become an inseparable part of our daily lives. We use apps for every aspect of our lives like while shopping, connecting with friends, or working from home, Apps have become an integral part of modern existence. Even though there are countless apps in the market, it is the app design that makes an app stand out, hence the app design is very important. It’s the first impression that draws users in, the user interface that keeps them engaged, and the overall experience that determines whether an app grows or gets ignored by the users.
To create easy no-code apps with great app design we present Swing2App no-code app builder, a powerful tool that has revolutionized the way we create apps. In this blog, we will delve into the compelling world of visual app design and explore how Swing2App empowers both professional app developers and novices to create attractive and user-friendly applications. We will unravel the significance of app design, showcase the remarkable features of Swing2App, and provide you with practical insights into creating apps that not only function flawlessly but also captivate your audience with their visual appeal.
Join us on this journey as we unlock the true potential of visual app design with Swing2App, paving the way for you to create remarkable, unforgettable mobile applications.
THE SIGNIFICANCE OF APP DESIGN
We are living in a technology-driven era dominated by smartphones and tablets, where the average person spends the majority of their time interacting with mobile applications, the significance of app design cannot be overstated. It doesn’t mean just making your app look pretty; it’s about building a user experience that leaves a lasting impression on your app users and keeps them hooked for more. Here’s why app design is of prime significance:
1. Making a Strong First Impression:
The age-old saying “You don’t have a second chance to create the first impact” remains valid in the realm of mobile apps. Users form snap judgments within moments of launching an app, deciding whether to engage with it or not based on its visual design appeal and initial interactions. A visually captivating app design can engage users right from the start, establishing a positive tone for their entire app journey.
2. Crafting User Experience (UX) and User Interface (UI) Design:
App design is centered on two fundamental elements: User Interface (UI) and User Experience (UX) design. UI design places its focus on aesthetics, arrangement, and visual components, guaranteeing that the app presents an enticing and user-friendly appearance. In contrast, UX design encompasses the comprehensive user voyage, spanning from their initial interaction to the successful attainment of their goals within the app. A well-thought-out UI and UX design, crafted with meticulous planning, can serve as the distinguishing factor between an app cherished by users and one that they quickly abandon.
3. App Design’s Impact on User Engagement:
User engagement serves as the lifeblood of an app’s triumph. Engaged users devote more time to the app, are more inclined to make in-app purchases, and tend to endorse the app to others. An intuitive and visually enticing design can elevate user engagement by enhancing the app’s overall enjoyment and user-friendliness.
4. Examples of Successful Apps with Outstanding Design:
A multitude of triumphant apps owe a substantial portion of their achievement to their design. Consider apps like Instagram, Airbnb, or Spotify – they are not only functionally sound but also exceedingly captivating in terms of design. These apps have set high standards for user expectations, underscoring the importance of design for app creators.
In our exploration of Swing2App, we will see how this visual app design tool empowers creators to harness the power of visual design to create apps that not only meet users’ needs but also delight and engage them visually. With Swing2App, you can bring your app design ideas to life, regardless of your coding expertise, and deliver an exceptional user experience that stands out in the competitive world of mobile applications. So, let’s dive deeper into the world of visual app design and see how it can transform your app creation journey.
INTRODUCING SWING2APP
In the fast-paced world of app development, tools that simplify the process and amplify creative potential are highly sought after. One such tool that has been making waves in the app development landscape is Swing2App no-code app builder. As we embark on our journey to explore the significance of app design and how Swing2App no-code app builder fits into this narrative, it’s crucial to get acquainted with this remarkable platform.
What is Swing2App?
Swing2App stands as a transformative platform, providing both individuals and enterprises the capability to craft mobile applications effortlessly and with remarkable efficiency. What differentiates it from traditional app development tools is its strong focus on visual app design. Swing2App helps you to build attractive applications without any extensive coding expertise, rendering it accessible to a wider spectrum of users, spanning from tech enthusiasts to entrepreneurial minds.
Features and Capabilities of Swing2App
Swing2App offers a rich set of features and capabilities that make app creation a breeze:
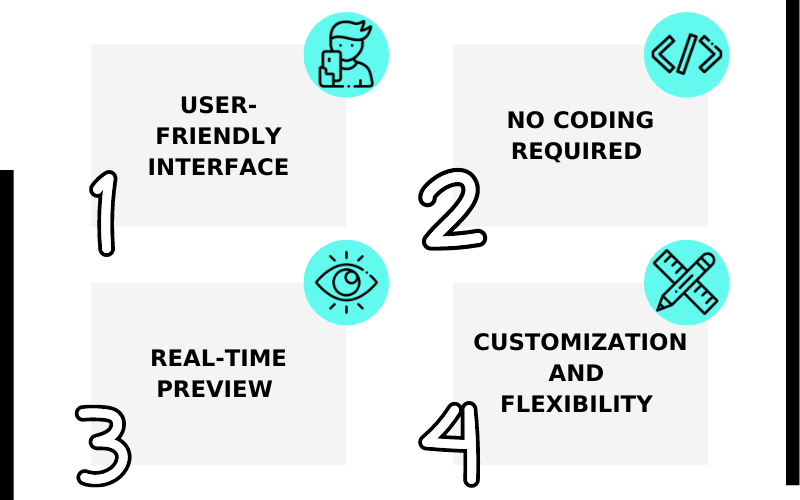
User-Friendly Interface:
Swing2App offers an intuitive, user-friendly interface that simplifies the app development process. Its click-and-choose functionality enables you to design your app’s layout effortlessly without any coding.
No Coding Required:
The most revolutionary aspect of Swing2App is that it doesn’t need any coding. You can build your app visually, saving you the time and effort typically required for programming.
Customization and Flexibility:
Swing2App offers easy customization of pre-built templates and features, allowing you to build your app’s appearance and functionality as per your needs. Regardless of the type of app you want to create, with Swing2App no-code app builder, you can do it all!
Real-Time Preview:
You can get an app preview of how your app will look and function in real-time as you design it on the app preview screen. This provides instant feedback and enables you to edit your app’s design and functionality simultaneously as you build your app.
How Swing2App Simplifies App Development
Swing2App no-code app builder democratizes app development by breaking down the barriers that often deter individuals and small businesses from entering the field. With Swing2App, you don’t need to invest years in learning complex coding languages. Instead, you can devote your time and focus on creativity and design, transforming your app idea into reality quickly and efficiently.
Swing2App’s visual app-building approach where you can preview your app simultaneously as you build your app saves a lot of your time. It streamlines the app development process, allowing you to prototype, edit, and refine your app ideas quickly. It empowers you to take control of your app’s design through the visual app making experience provided by Swing2App no-code app builder.
In the following sections of our blog, we will delve deeper into how Swing2App no-code app builder can be a game-changer for creating visually stunning apps and explore practical insights into leveraging this platform’s capabilities. So, stay tuned as we unlock the full potential of S Swing2App no-code app builder in the world of app design.
THE BENEFITS OF VISUAL APP DESIGN
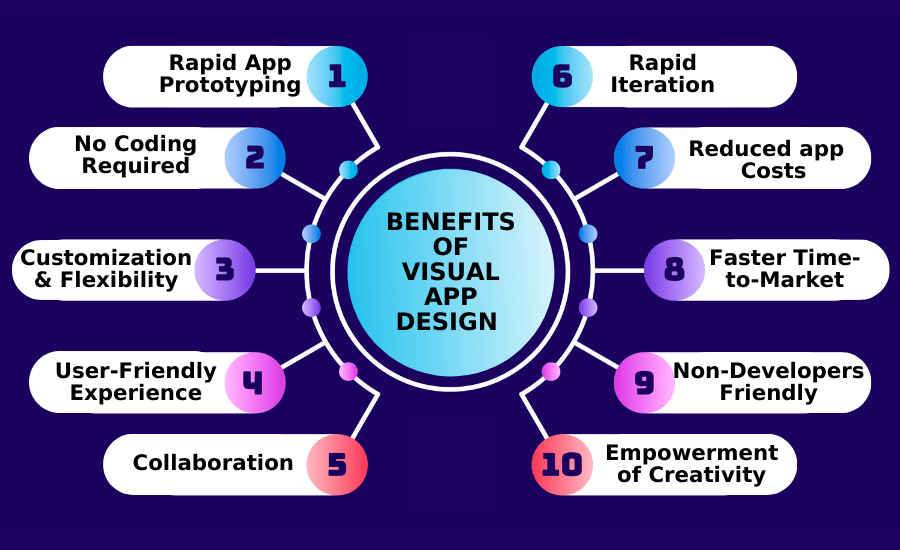
As we explore app design, it’s essential to talk about the big benefits of visual app design. When we look at Swing2App, these advantages are even more evident because it uses visual design to make beautiful apps. Let’s talk about the benefits of visual app design:
1. Rapid App Prototyping:
Visual app design allows for rapid prototyping. You can quickly build your app’s layout and features as well as edit it, seeing your ideas come to life in real time. The preview window of Swing2App is a unique visual designing tool where you get to see what you are doing and how your app will actually look, and any edits you make are also reflected in real-time. This agility is invaluable for testing concepts and making adjustments on the fly.
2. No Coding Required:
One of the most compelling benefits of visual app design is that it eliminates the need for extensive coding. With tools like Swing2App, you can design and build your app using intuitive drag-and-drop interfaces. This accessibility opens up app development to a wider audience, regardless of their coding expertise.
3. Customization and Flexibility:
Visual app design tools offer a high degree of customization. You have the creative freedom to design your app’s user interface, choose colors, fonts, and layout elements, ensuring your app aligns perfectly with your brand or vision.
4. User-Friendly Experience:
Creating apps visually simplifies the app development process, making it more user-friendly. You don’t have to navigate complex code syntax or worry about debugging issues. Instead, you can focus on the creative aspects of your app, such as its look and feel.
5. Collaboration and Team-Friendly:
Visual app design tools are inherently collaborative. Multiple team members, including designers and non-technical stakeholders, can work together seamlessly. This collaborative environment fosters innovation and ensures that everyone’s input is considered during the design and development phases.
6. Rapid Iteration:
The visual design allows for quick iteration. If you receive user feedback or have new ideas, you can make changes to your app’s design without the long turnaround times associated with traditional app development. This agility ensures that your app stays current and competitive.
7. Reduced app Development Costs:
By reducing the need for extensive coding and speeding up development, visual app design can significantly lower app development costs. This is especially beneficial for startups and small businesses working within budget constraints.
8. Faster Time-to-Market:
Visual app design accelerates the app development timeline. You can bring your app to market faster, capitalizing on opportunities and gaining a competitive edge.
9. Accessibility for Non-Developers:
Visual app design tools like Swing2App make app development accessible to individuals who may not have a background in programming. This democratization of app creation allows for a more diverse range of voices and ideas in the app development ecosystem.
10. Empowerment of Creativity:
Visual app design puts creativity at the forefront. Designers and creators can focus on crafting unique, visually appealing user experiences instead of getting bogged with technical complexities.
With Swing2App you can turn these benefits into reality, as the Swing2App no-code app builder enables app creators to build stunning, functional, and user-centric apps without the need for extensive coding. Swing2App empowers individuals and businesses to leverage the power of visual app design fully, setting the stage for innovative and visually captivating mobile applications. Stay with us as we delve deeper into the practical aspects of creating such apps with Swing2App.
CREATING STUNNING APPS WITH SWING2APP
Now that we’ve established the significance of app design and introduced Swing2App as a game-changing platform, it’s time to delve into the exciting process of actually creating stunning apps using this powerful visual design tool. With Swing2App, the possibilities are limitless, and your creativity can shine.
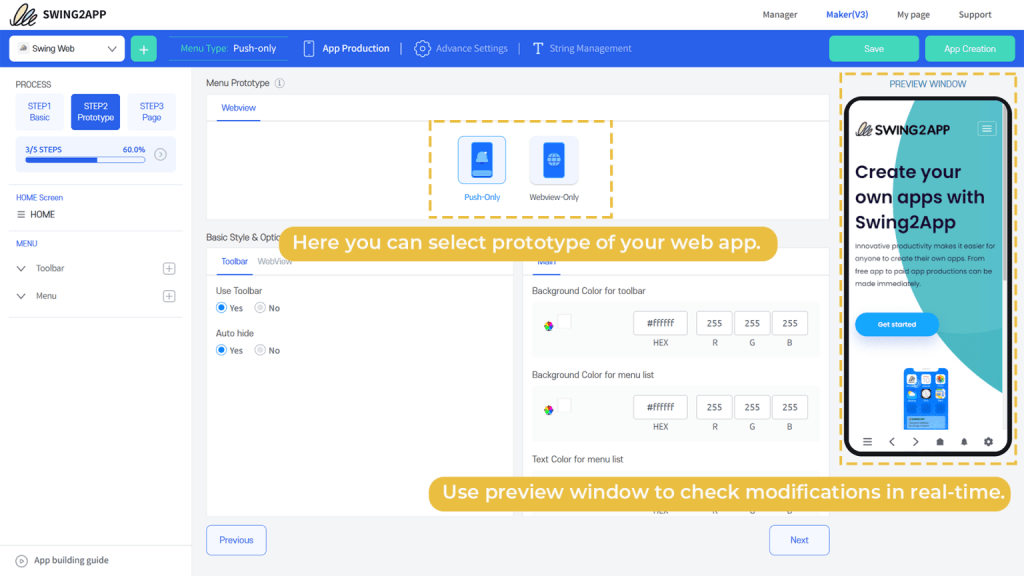
Further, read this guide to create apps that not only function flawlessly but also captivate users with their visual appeal and how to launch your app quickly with swing2app.
Incorporate best practices for visual app design throughout each step of the process to create an app that not only functions smoothly but also attracts users with its aesthetics and usability. Visual app design with Swing2App empowers you to bring your app ideas to life in a way that’s efficient, creative, and accessible to a wide range of individuals and businesses.
Watch the video below to understand visual app design and app creation with Swing2App:
CONCLUSION: UNLEASHING THE POWER OF VISUAL APP DESIGN WITH SWING2APP
Our voyage through the realm of app design and the amazing capabilities of Swing2App has unveiled the profound importance of creating visually captivating and user-centric mobile applications. We’ve learned that the visual impact of an app is more than just aesthetics; it’s the key to unlocking an app’s success.
Swing2App, a pioneer in the world of app development, has illuminated a path where creativity meets practicality. It empowers creators of all backgrounds to design exceptional mobile apps.
The benefits of Swing2App no-code app builder’s visual app design include rapid prototyping and cost-efficient app development, quick-to-launch apps, and the removal of coding barriers; thus, a perfect blend of innovation, creativity, and democratization of app creation.
As our journey concludes, we invite you to embark on your own adventure in app design with Swing2App. The power to create remarkable, visually stunning apps now rests in your hands. In the ever-evolving world of mobile applications, app design remains a beacon of user engagement. Swing2App represents the limitless potential of visual app design, ushering in a new era of app creation. Don’t hesitate any longer; dive in, explore, and let your creativity shine. Craft apps that not only meet user needs but also leave an enduring mark on the digital landscape. Your journey begins now, with infinite possibilities awaiting your innovation and design expertise.
]]>