Designing and developing your mobile app is only half of the job. If you want your mobile app to be successful, you must ensure that your Apple app store product page is thoroughly designed to attract new users and retain existing ones. So, how can you improve the performance of your iOS app?
The answer is iOS 15 Product Page Optimization (PPO), a native A/B testing tool for the App Store that can help with app marketing. This enables App Store developers to test up to three different treatments of their app product page to determine the best-performing option. Apple’s Product Page Optimization (PPOs) feature could assist you in improving your app marketing approach and generating more organic growth.
It is, however, easier said than done. How do you determine which settings and configurations produce the best results? How can you be certain that your product page displays the best app icon, app previews, and screenshots? Let’s find out more in today’s article.
WHAT IS iOS 15 PRODUCT PAGE OPTIMIZATION IN APPLE APP STORE?
Apple Product Page Optimization allows you to optimise your creative assets for mobile apps using native A/B testing. This was a huge step toward reducing reliance on external A/B testing tools and more closely aligning with the functions provided by Google Play Experiments.
App marketers can conduct each test for up to 90 days to target specific locations. You can also select the percentage of your audience that would see your test, allowing you to focus your efforts more effectively.
This enables you to compare the performance of each of your treatments to the performance of your default App Store product page or store listing, offering valuable information into impressions, downloads, and conversion rates. These metrics will provide you with useful information on the best creatives to employ when promoting your app and which will result in the most conversions.
MAIN PRODUCT PAGE VS iOS 15 PRODUCT PAGE OPTIMIZATION
It’s critical to understand the difference between the main product page and the Product Page Optimization function. The main product page is your default app store listing page in App Store, which all consumers see when no paid ads are happening. When you use the Product Page Optimization function, visitors to your store’s listing will be directed to either your default product page or a treatment page (if using iOS 15 Product Page Optimization).
WHICH iOS ELEMENTS CAN YOU TEST WITH iOS PRODUCT PAGE OPTIMIZATION?
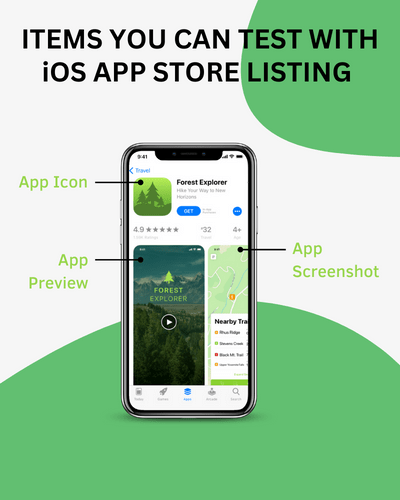
You can test three distinct app creatives on the App Store using iOS 15 Product Page Optimization –
- Screenshots
- app icons
- app preview videos
You can build three alternative versions (treatments) of your default product page with iOS 15 Product Page Optimization (PPOs). Similar to A/B testing in Google Play, those treatments are being tested directly in the Apple App Store versus the original store listing.
You can specify the percentage of users to whom the treatments will be shown at random, as well as the traffic allocation for the three various versions. Tests might last up to 90 days. You can also localise the test in multiple languages, but only for those for whom you’ve established a local app page. Last but not least, you must submit the product page test assets for evaluation, apart from the app binary or app build. When A/B testing app icons, you must submit the different versions in the app binary and go through the usual app build approval process.
GOOGLE PLAY EXPERIMENTS VS APPLE’S PPO
The main difference between Google Play Experiments and Apple’s Creative Assets is that Apple only allows you to test creative assets (on Google Play, you can also A/B test the short and long descriptions). PPO also needs you to submit your creative experiments for Apple’s review, whereas Google Experiments allows you to build up your tests whenever you want. Furthermore, you do not need to release a new app version every time you test your Android icon, whereas iOS icon experiments need you to include your icon in the binary of your new app build. The maximum duration of A/B tests on the App Store is 90 days, whereas A/B tests on Google Play can be run indefinitely.
WHY A/B TESTING? : BENEFITS OF APPLE PPO
Product Page Optimization is a tool that will assist ASO and app professionals in understanding how different page elements influence App Store conversion rates.
In the App Store, A/B testing and app experimentation have always been limited. Until recently, app marketers had to rely on third-party technologies or undertake sequential analysis to see how something worked before and after a test. Until iOS 15 PPO, the closest feature to A/B testing and PPO was Creative Sets (which were replaced with Custom Product Pages), which needed the use of Apple Search Ads.
App publishers can finally have a free and native product that uses App Store data and includes dedicated analytics with iOS 15 PPO.
And, like with A/B testing on the Play Store, there are several possibilities and test scenarios:
- Experimenting with new colours and palettes for your assets
- Testing various messages, screenshot alignments, and styles
- Highlighting a specific feature or culturally relevant content in a certain region
- Introducing new features and monitoring their performance
- Using videos instead of screenshots or vice versa
Anything that is important to your potential users and has the ability to influence your visitor-to-install conversion rate should be included in your App Store A/B testing plan.
HOW TO SET UP YOUR FIRST iOS 15 PPO TEST IN APP STORE
We’ve put up a detailed checklist to help you conduct your first iOS 15 product page optimization test smoothly:
STEP1: TEST CONFIGURATION
Login/Sign in to your App Store Connect account
Log in to https://appstoreconnect.apple.com/ with your email password.
Choose your app
Go to the “My Apps” section and select the app you want to optimize for (if you have multiple apps).
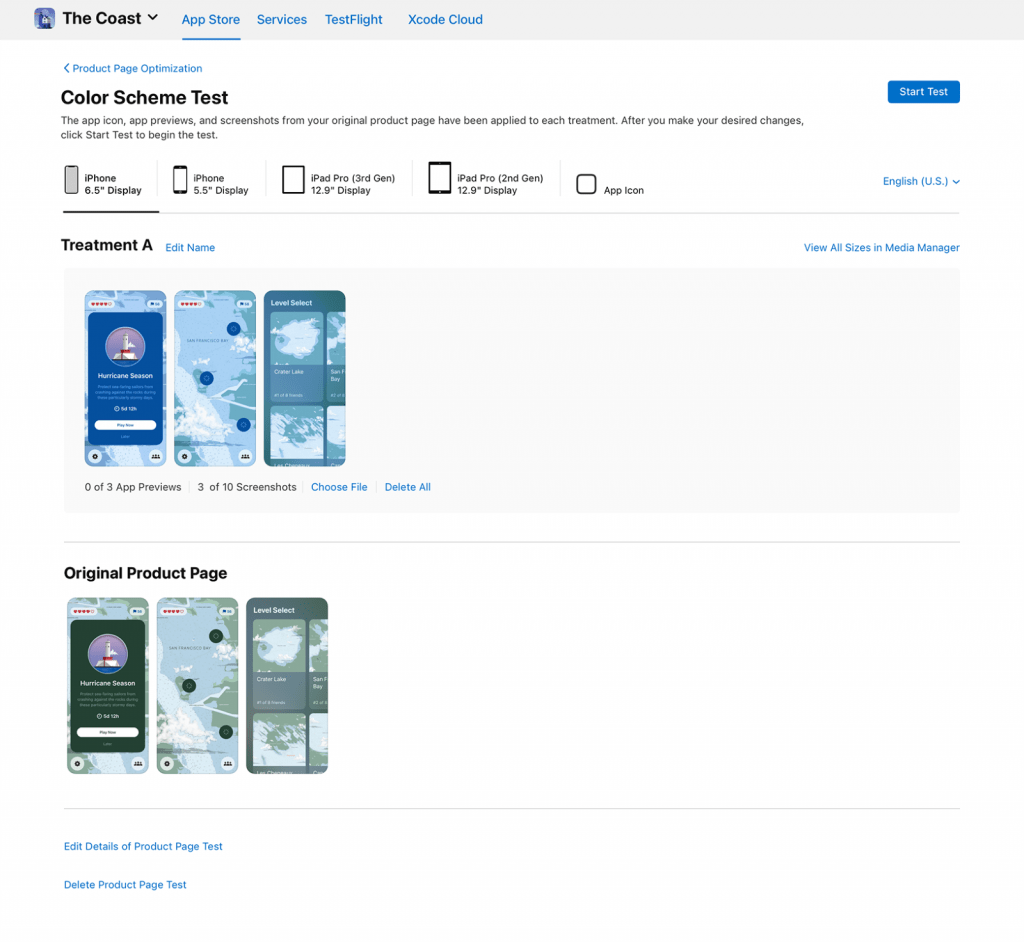
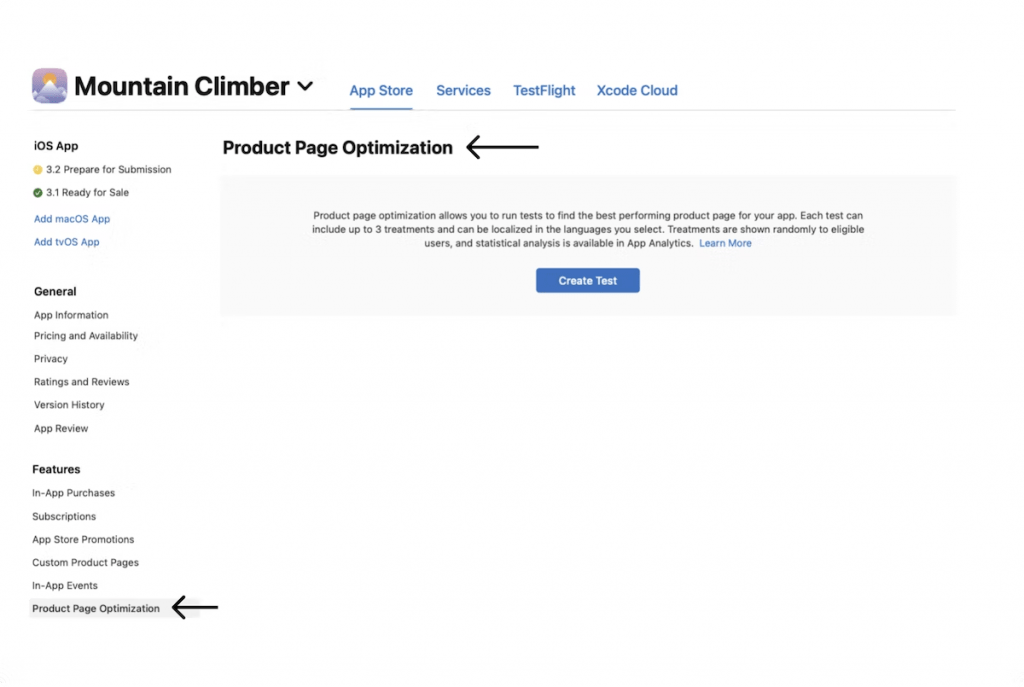
1. CREATE TEST
Select “Product Page Optimization” from the left menu to start creating a test. If you haven’t already, click “Create Test,” or click the plus (+) icon next to “Product Page Optimization.”
2. GIVE YOUR TEST A NAME
Make up a test name (up to 64 characters). Make it detailed so that when you view results in App Analytics, you can quickly recognise your test. “Valentine 2023 Screenshot Characters Test with 4 Characters,” for example.
3. CHOOSE THE NUMBER OF TREATMENTS
You can choose up to 3 treatments.
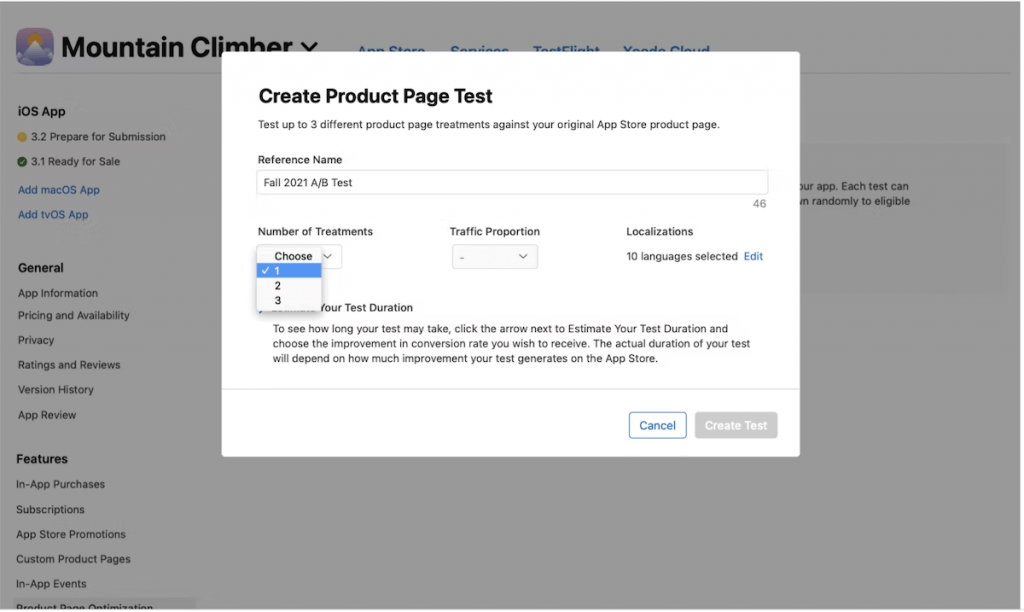
4. DETERMINE YOUR TRAFFIC ALLOCATION
Choose the percentage of users who will be shown a treatment instead of your original App Store product page at random. We propose that you evenly distribute visitors between your default product page and the various treatments.
5. SELECT THE LOCALIZATION
Select the region if you are localising the test. Only locations from the current app version are eligible for inclusion in the experiment.
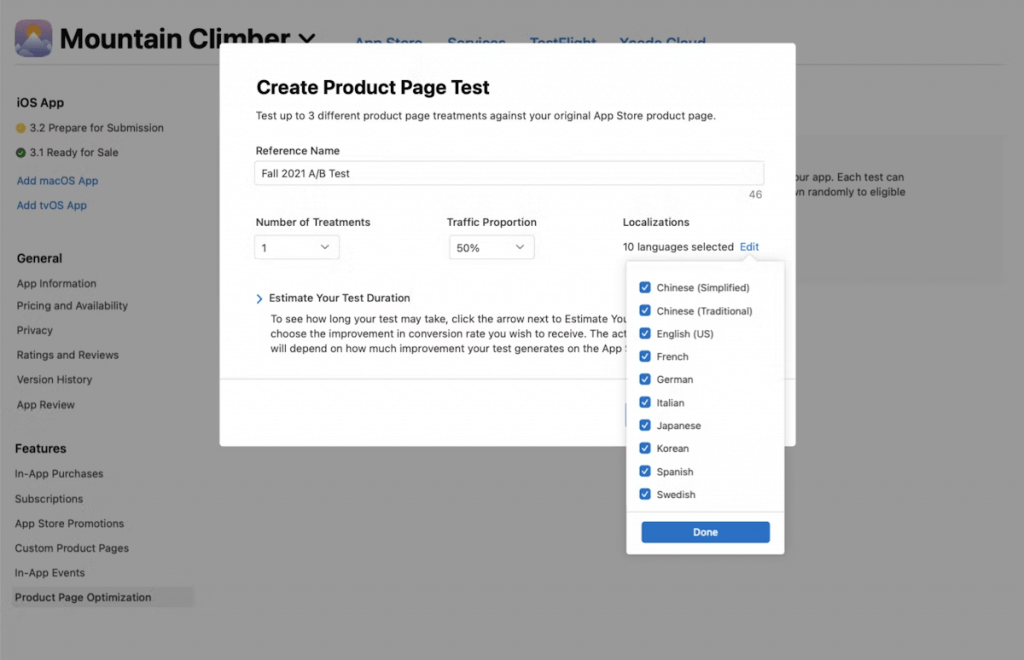
6. CALCULATE YOUR TEST DURATION
To estimate the time required to reach your objective, click “Estimate Your Test Duration” and select the conversion rate improvement desired. The test will run for a maximum of 90 days to assist you in determining whether you have achieved your intended outcomes within that time frame. You can also end the test manually within that time frame. It is important to note that the more treatments you add to a test, the longer it may take to get definitive findings.
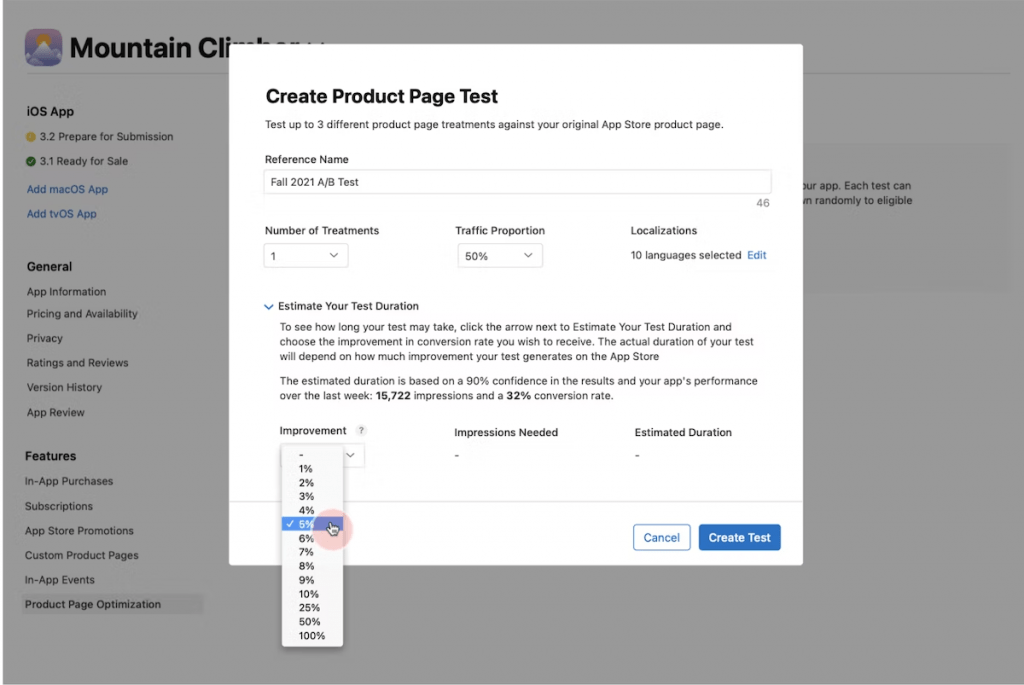
7. LAUNCH YOUR TEST TREATMENTS
Click the “Create Test” button. Limit the amount of elements in a treatment that you want to change at any given time so that you can quickly identify the one that actually influenced the results. Before you may use any of your creative assets, App Review must approve them. However, unless it is an app icon, no new version is required to begin the test.
STEP2: MONITOR THE TEST PERFORMANCE
The information on the test progress you previously put up will be available in the App Analytics section of App Store Connect. You may compare impressions, conversion rates, percentage improvements, and confidence levels to the main product page.
If you have several testing treatments, you can compare their performance.
The App Store will also provide additional information, such as if the test requires more data to be collected and which treatment works the best.
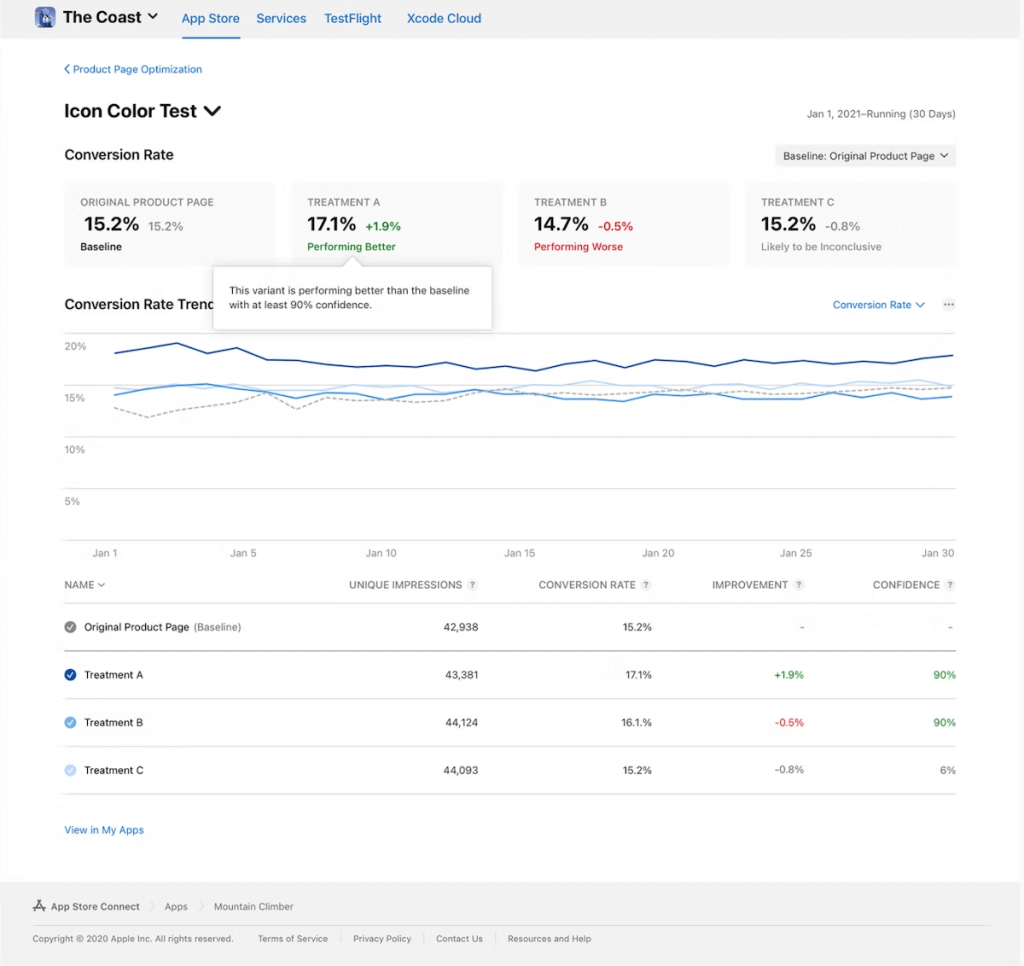
STEP3: APPLYING THE WINNING TREATMENT
The final step is to decide whether you want to continue with the existing product page or use one of the testing treatments. The test will finish if you apply a treatment.
Based on the results of your tests, you may want to apply a treatment to your original product page so that it appears to all App Store visitors. Applying a treatment while your test is still ongoing will result in the termination of the current test. As a result, before rushing to adopt a treatment or terminate a test, we propose waiting and observing whether at least one treatment outperforms or is worse than the existing one.
To verify that the treatment variant outperformed your main product page, use a 90% confidence interval to determine which option is considered the winner.
A/B TESTING CHALLENGES WITH PRODUCT PAGE OPTIMIZATION IN THE APP STORE
Although long anticipated, A/B testing on the App Store has yet to live up to many developers’ expectations. Instead, App Store developers appear to be facing a number of challenges:
- Only App Store users with iOS 15 or later will see product page optimization alternatives. Users who arrive via external channels or older versions will be directed to the default product page.
- Before testing, the App Store must review all test treatments (icons, screenshots, and app previews), which can take up to 24 hours. App icons must be included in the next version update’s app binary.
- A product page test can only be performed if your app development is “ready for sale.”
- Product Page Optimization (PPOs) will be available throughout the customer journey. Because the icon variants exist in the app binary, the variant customers see in the store will be the same one they see on their phone after downloading the app.
- You can only perform one test at a time.
- Your test will be terminated instantly if you submit a new app version. This is a challenge for teams that have a one- or even two-week delivery cycle. Every new version release will automatically terminate any running tests, significantly reducing the time required for your test to achieve statistical reliability.
- If you run a test for many regions, you won’t be able to tell them apart in reporting. So, if you want to better understand test results by locale, you must write a separate test for each region. Because you can only perform one test at a time, you will have to complete this in order, which can take a long time.
- Tests have extremely low confidence intervals, making it difficult to draw any conclusions and determine whether to use one of the tested versions. We recommend running A/B/B tests to aid with low confidence issues. This implies you design a test with three options, two of which are identical. If both “B” variations produce identical findings, you can be more certain about the possible impact.
BEST PRACTICES FOR APP STORE A/B TESTING
If you’ve been doing A/B testing for a while, you probably already have a solid idea of how to approach it and what to pay attention to.
Nonetheless, let us outline the key points and adapt them to the App Store’s characteristics.
1. While running your tests, don’t make too many changes.
Make your control group as consistent as feasible. Although you won’t be able to alter metadata without interrupting the Product Page Optimization (PPOs) test, keep the paid campaigns consistent so that the traffic sources don’t shift too much.
2. Understand what you are testing
Always think about what you’re going to test and why. And, especially in the App Store, be careful of the limitations we already discussed.
3. Plan well in advance
To get the most of Product Page Optimizations, you must plan your app releases and consider the tests you will conduct in between. Prepare your testing assets ahead of time so that you may take advantage of the gap between two app submissions.
4. Take caution when testing app icons
Testing app icons with PPOs is difficult and time-consuming. Furthermore, because you won’t know the traffic sources for your treatments, you may receive inaccurate outcomes. App Store Browse users, for example, often convert at a lower rate than App Store Search users. If your treatments receive a large number of Browse users (in the event that your app is featured), the outcomes may appear better than they are.
5. Before applying the results, consider the audience size.
As previously stated, Product Page Optimization (PPOs) require a sufficient amount of data to make test results meaningful and to identify a clear test winner. Many of the tests you will do may require higher confidence, so keep this in mind when considering results implementation.
6. Follow the general testing guidelines.
While there is a lot of guidance on how to perform A/B testing, you need also follow the basic rules while employing PPOs:
- Keep a close eye on your competition and schedule testing iterations depending on market trends.
- Pay attention to your present traffic sources and distinguish between them to determine which traffic source is most relevant to your test findings.
- To counter the limits of Product Page Optimization (PPOs) analytics, concentrate on one or a few highly comparable localizations.
CONCLUSION
Product Page Optimization is yet another excellent tool for A/B testing. Together with Google Play Store listing experiments, they enable you to conduct native A/B testing, which is not possible with other tools. As a result, PPOs should be an essential component of your app store optimization and conversion rate optimization efforts.
Product Page Optimization (PPOs) have several limits, but that doesn’t imply you shouldn’t utilise them. PPOs can provide a range of helpful insights if you plan appropriately, understand your testing objectives, and use other tools to solve restrictions.
]]>So, you’ve released an app and want it to rank higher in the Google Play Store or Appstore.
In this article, we will analyse significant ranking elements and compare keyword targeting on the App Store against Google Play. Everyone wants to be ranked higher, especially in the cutthroat world of mobile app development. Once you’ve settled on your keyword set, it’s time to incorporate it into your app store listing or app details. Your app is ranked for specific keywords by the App Store and Google Play algorithms.
To be honest, getting up there isn’t easy; there are a lot of factors that could bring you there; many mobile app development companies employ these aspects for App store optimization and actually improve them to do better than the competition.
What is the best way to use keywords to help your app rank higher? Let’s begin with the steps to perfecting your keyword for app store listing before publishing your app.
STEPS TO PREPARE YOUR APP’S STORE LISTING FOR LAUNCH
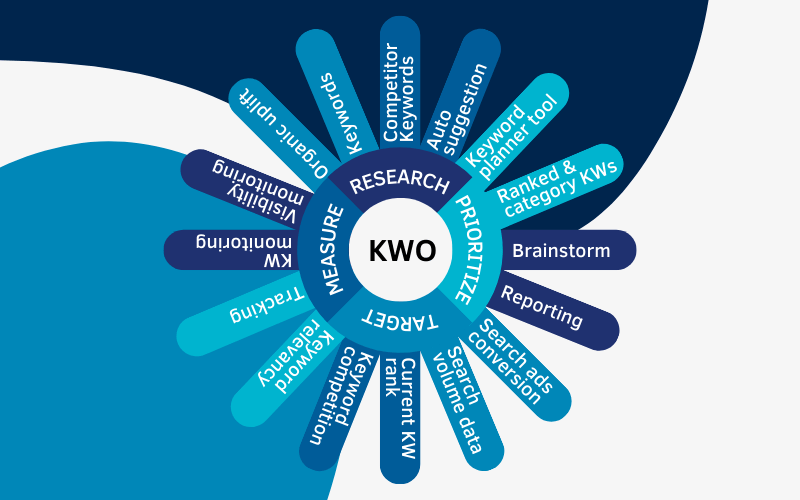
STEP 1: HOW TO RESEARCH KEYWORDS
Keywords are a fantastic free marketing tool because they assist you rank your app higher for user search queries. With over 70% of App Store users using search to find apps, it’s critical that you establish a keyword strategy that allows you to appear for these queries.
The first step is to conduct keyword research. You can accomplish this in a spreadsheet, but I prefer using an app marketing tool because the keyword data provided by the tool will serve as the core for your plan.
Before you begin, keep in mind that the bulk of keywords that people search for contain multiple words, or keyword phrases. While single-word keywords are useful, these phrases should form the foundation of your investigation.
A simple way to start researching keywords is to make a list of your app’s features. For instance, a video editing tool may have an option for “cropping video” and another for “putting music to video”. Remember to take notes on different versions! The terms “cropping video” and “cropped video” can also be used effectively.
Looking at rival or comparable apps is another wonderful technique to explore keywords. What words in their app title, description, and screenshots are you interested in? Brainstorm as many as you can think of because the next step will assist you decide which of these keywords to target.
For example, when you search for video, you get multiple auto complete text which can be used as keywords for your apps.

STEP 2: IDENTIFYING YOUR TARGET KEYWORDS
Now that you’ve compiled a lengthy list of keywords, the next step is to assess their potential.
- Relevance refers to how pertinent a term is to your app and how likely it is to convert users from that keyword. Many keyword tools will display search results based on that keyword (or you can check manually). Seeing apps that are similar to yours from this perspective is a good method to confirm if the keyword is relevant.
- Search Volume is a non-linear measure that determines how many times a keyword is searched for. A higher score indicates that more people are looking for it.
- Difficulty indicates how much competition a keyword has. If several large apps (such as Facebook, Instagram, and Snapchat) rank in the top ten for a keyword, it will be considerably more difficult for you to overtake their position. The quantity of apps that rank high for this keyword will also have an impact on this score.
Your goal is to identify niche keywords with volume scores ranging from 10 to 40 and difficulty values ranging from 1 to 30. Lower volume, lower difficulty keywords, often known as long-tail keywords, account for the vast majority of organic search searches. While they may not result in a significant number of instals per month, your chances of placing in the top three results are substantially higher. App ranking for a significant number of long-tail keywords will result in a powerful growth curve over time.
For example, in ahrefs or any other keyword tool when you search for keyword video editor, you get related keywords and their details as below:
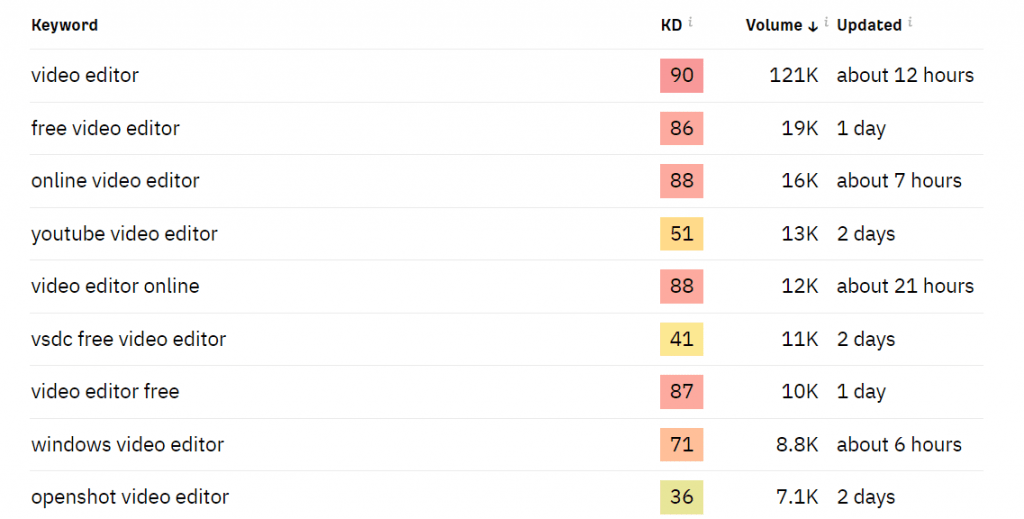
Lower the KD(Keyword Difficulty) higher are your chance to get found in the top list.
After you’ve decided which keywords to target, the following step is to incorporate them into your App store listing.
STEP 3: IMPLEMENTING YOUR KEYWORDS
The Apple App Store and the Google Play Store handle keywords differently. I’ve divided the two to explain how they work better.
The last step is to incorporate your selected keywords into your app store listing. Remember that for app ranking weight in both app stores.
Apple App Store
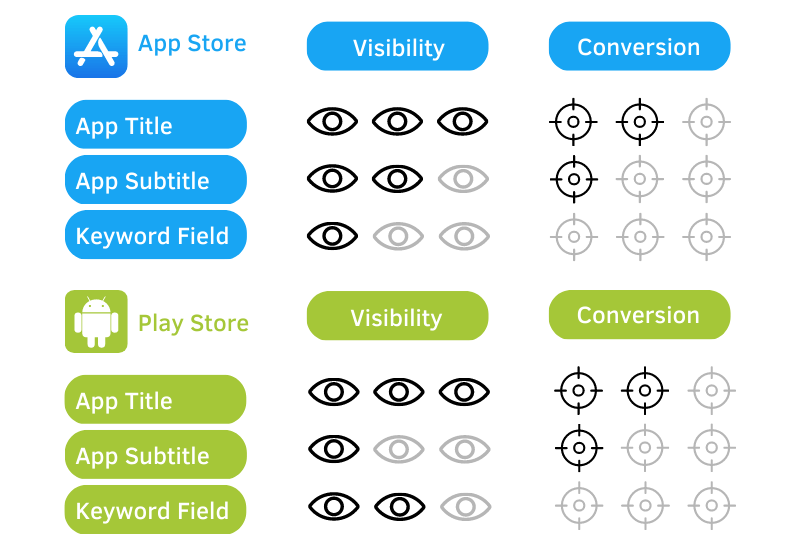
Apple gives you 3 keyword fields:
App Name: 30 characters
Subtitle: 30 characters
Keyword Field: 100 characters
It is your responsibility to combine and match your target keywords such that they fit within these areas. Don’t worry, keywords do not have to be near to each other to form keyword phrases! This means that keywords in your Title, Subtitle, and Hidden Keywords can combine to generate phrases even if they are not adjacent.
Target your most valuable keyword phrases by using the Title and Subtitle fields. It’s critical to make these fields legible and relevant because it will assist users grasp what your app does right away while also avoiding an Apple rejection for keyword spamming.
Apple also provides you with a few free keywords. Individual keywords such as [app, apps, free, the, and] do not need to be included into any keyword fields, nor do your developer name, app category, plural forms of singular words (only if you can add a “s”), or plural forms of singular words (only if you can add a “s”).
The AppStore Connect Hidden Keyword field should be utilised to generate additional low priority keyword phrases from your Title and Subtitle. Make the most of the 100 characters you’ve been given! Avoid using spaces because they are empty characters and remember to separate your keywords with commas.
Google Play
Google gives you 3 keyword fields to work with:
App Title: 30 characters
Short Description: 80 characters
Long Description: 4000 characters
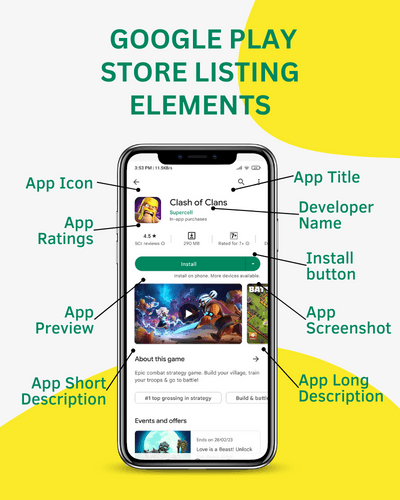
These are the most significant app information fields, listed from most important to least important. Another consideration is whether or not to repeat keywords.
Your Title and Short Description, like Apple’s, should include your targeted keyword words. Keyword phrases can be formed even when the keywords are not adjacent to one another (for example, a keyword from your Title and from your Short Description can form a keyword phrase).
Keyword spamming will reduce the legibility and relevancy of your app title. Because Google Play does not display app screenshots from the search results page, make sure visitors can readily understand what your app does from the title.
Your Long Description is a little more difficult. Unlike Apple, Google will search for terms in your Long Description field. It’s best to use your target keywords 4-5 times throughout. To prevent being tagged as spam, space them out and utilise them contextually.
NOTE:
You should never repeat keywords across any fields in the App Store.
You must repeat keywords at least 3-5 times throughout all areas for Google Play.
Where Else Can You Target Keywords?
Some developers have discovered that including a keyword in the product ID can influence keyword rankings.
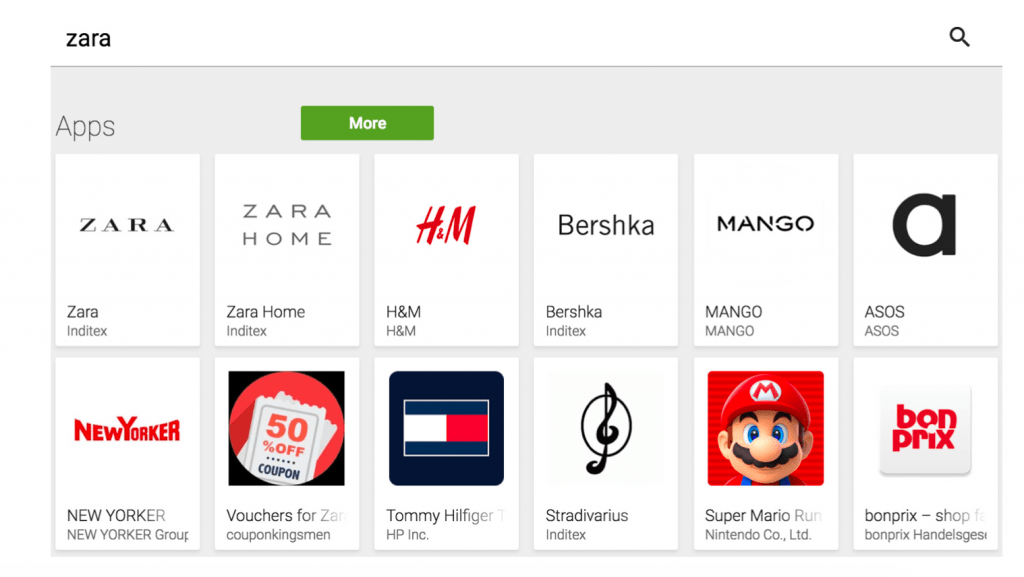
For example, Super Mario Bros featured “zara” in their product ID, which was most likely owing to a naming practise and was not meant to target the apparel brand. The game was able to rank for the phrase on many brief times; this does not necessarily imply that adding a keyword will result in app rankings, but it does show that Google indexes this field.
STEP 4: GROW INTERNATIONALLY WITH LOCALIZED KEYWORDS
International expansion is critical to the long-term success of your software. Localizing your app store listing is an excellent (and inexpensive) method to enter new markets, even if you haven’t yet translated your software.
You can add new languages to your app store listing using AppStore Connect and the Google Play Dashboard. The keyword fields for new languages will be similar to those for your primary language.
This can seem frightening with over 51 languages available on Google Play and 37 on the Apple App Store. My advice is to start with 5-10 languages. Here are a few websites to help you decide which languages to start translating for:
- T Country-specific smartphone users
- Market share of mobile operating systems by nation
- Which countries spend the most money on cell phones? (if you have IAPs)
Here are several translation services that may be of use to you in your localization journey:
- Google Translate [free] – Machine translation has improved significantly and is an excellent technique to obtain instant translations. You can also send these results to human translators for approval, saving you even more money.
- Freelancer [paid] – Find and hire a translator for a specific language. While this is a much more manual procedure, it allows for an organic back-and-forth as you validate and modify their recommendations depending on the facts you discover in the following stage.
- OR, alternatively, other premium tools.
Publish your keyword translations to your app’s keyword tool for the country it is targeting. This will provide data on Search Volume, Difficulty, and Relevance. You can now design your keyword fields accordingly.
| Language with people who spend money | Language with lots of people/users |
| English, Danish, French, German, Italian, Japanese, Korean, Swedish | Arabic, Hindi, Portuguese (BR), Russian, Spanish |
STEP 5: MEASURING THE IMPACT OF YOUR KEYWORDS
The next step is to measure performance now that your keyword implementations are live. I’ll show you how to track your organic growth using your app marketing tool, the AppStore Analytics Dashboard, and the Google Play User Acquisition Dashboard.
Your keyword tool will provide you with the most detailed information for particular keywords. Check the following areas:
- Ranking – The rank of your app in the search results for this term. If it is unranked, you must either wait longer or it was considered irrelevant.
- Ranking History – View your app’s ranking history. This is a very strong perspective since it shows you how you are expanding for that keyword.
- Installs – This indicator is provided by some platforms and is a rough estimate of how many monthly instals you are getting from a specific keyword based on its volume and your app ranking.
As new data comes in, your keyword strategy will evolve. While over-optimizing your keywords (making frequent changes) is not advised, you should continually consider ways to expand your keyword network based on the performance of your list.
Apple AppStore Connect Analytics
Apple does not provide particular keyword information. Instead, they present a summary of your performance from people who discovered you organically through Apple Search.
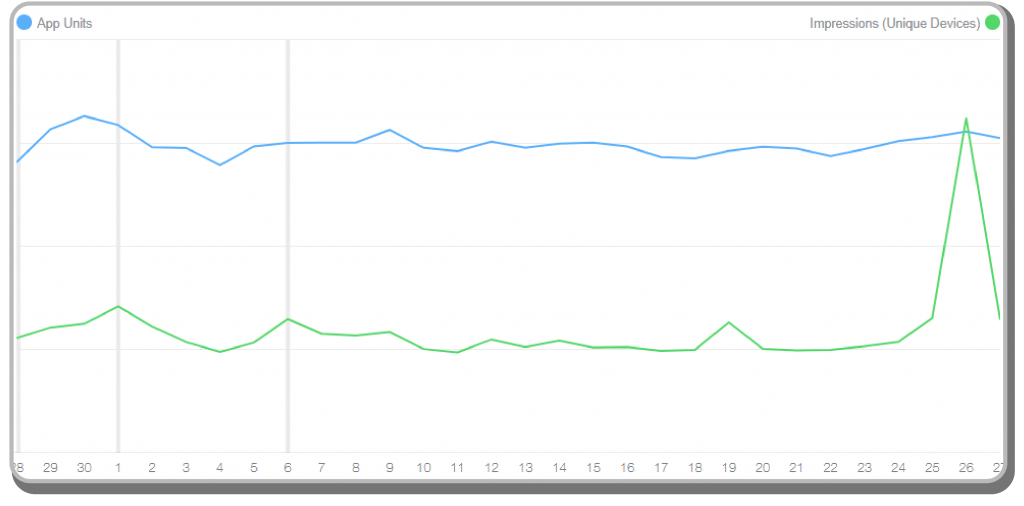
Navigate to the App Analytics Dashboard > Metrics to access this information. Then, apply a filter to display Source Type > App Store Search. This view displays App Units (instals), Impressions (every time a user sees your app), and Page Views (every time a user sees your app store listing) derived directly from organic search.
Using the Compare To feature, you can track your instal conversion rate. This allows you to track the percentage of users who convert from an impression or page view, which is a strong indicator of whether your keywords are relevant and/or performing well.
Large spikes in Impressions can indicate that you have begun keyword ranking for a term. Examine your app marketing tool for any new keyword ranks or rank fluctuations that correlate.
Remember to monitor your performance in specific nations by applying extra filters!
Google Play Store Acquisition Reports
Google Play has a couple of dashboards for tracking your instal performance.
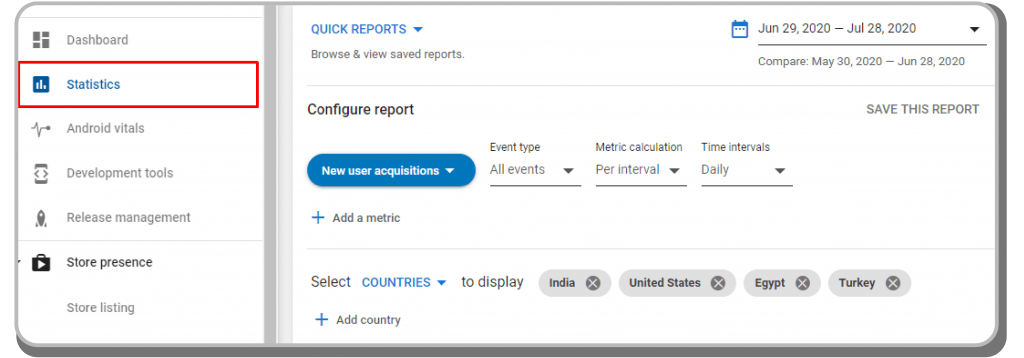
Statistics
The statistics dashboard allows you to track your overall instals. This report can be used to quickly review app installation performance by nation or language.
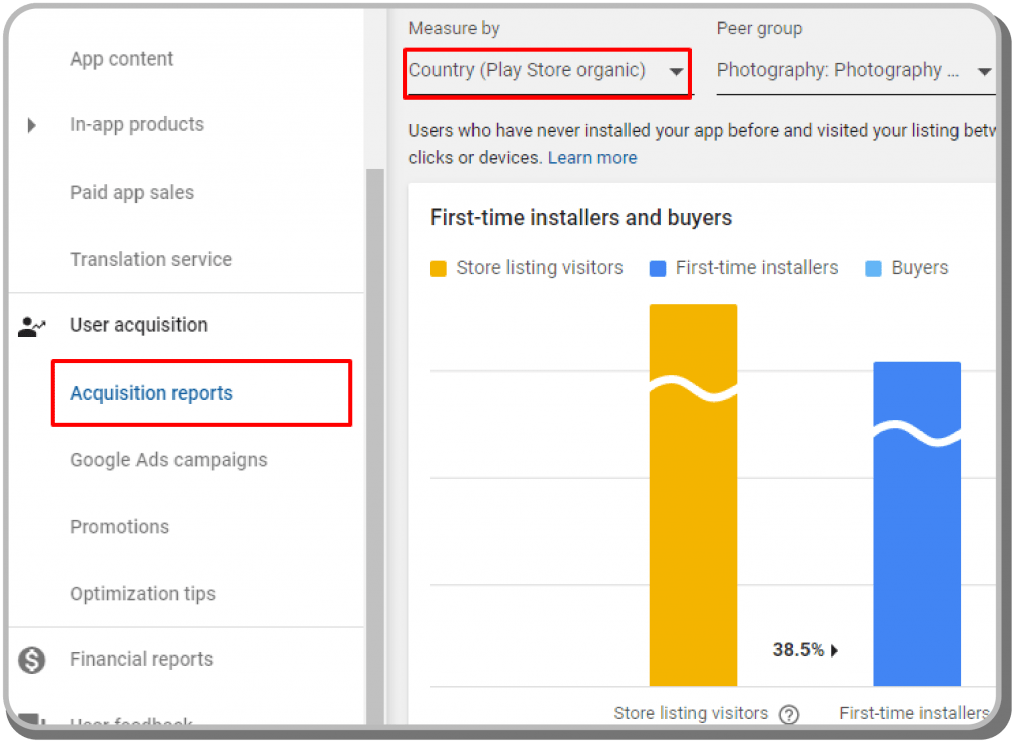
User Acquisition Reports
The User Acquisition Report dashboard will show you your conversion rate from users that discovered you organically through the Play Store. Scroll down to discover the conversion rate for each nation. This data is a key metric for understanding your overall performance.
CONCLUSION
Although Google Play app keyword placement differs from the App Store, there are numerous options to impact term ranks and target the correct users through search. Remember to focus on phrases that are most relevant to the app and to consider not just keyword placement but also app vitals and conversion when monitoring keyword rankings.
Keyword marketing is a constantly dynamic process. Continue to monitor the statistics and tweak your app store listing to compensate for underperformers.
]]>The common method for finding and installing iOS or Android apps — via the Apple App Store or Google Play Store — is now well known to everyone. Apps published on the App Store and Play Store are publicly available, meaning anyone can find and install your app on their device.
As developers have become increasingly aware of the need to distribute their apps outside of the traditional App Store, especially in order to limit the potential audiences for a particular app, distributing outside the App Store has grown in popularity. Businesses often look for such modes where only their employee have access to the company app. In response, both Apple and Google have provided an increasingly wide range of different distribution mechanisms to cater to use cases that require limiting access to more tailored audiences.
WHAT ARE UNLISTED OR PRIVATE APPS?
These are for companies and their employees only and aren’t available in stores, but rather shared via a link.
- Although unlisted Apps are still published through the App Store, only a direct link can be used to access them. These apps are not listed in any app-related categories, charts, search results, or other listings in the App Store. Apps that are not mentioned are regarded as hidden but not private.
- A private app is one that is exclusively accessible to users within an organization. Managed Google Play is entirely compatible with private apps. An organization can publish private apps to its managed Google Play store and remotely install private apps on users’ devices.
UNLISTED APP IN APPSTORE
The App Store is meant to publish apps for the general public that is accessible to all.
If you are building an app for the employees of a specific company, then you may want to restrict access to your app.
For business apps that don’t want public app distribution on the App Store, there are 3 possibilities.
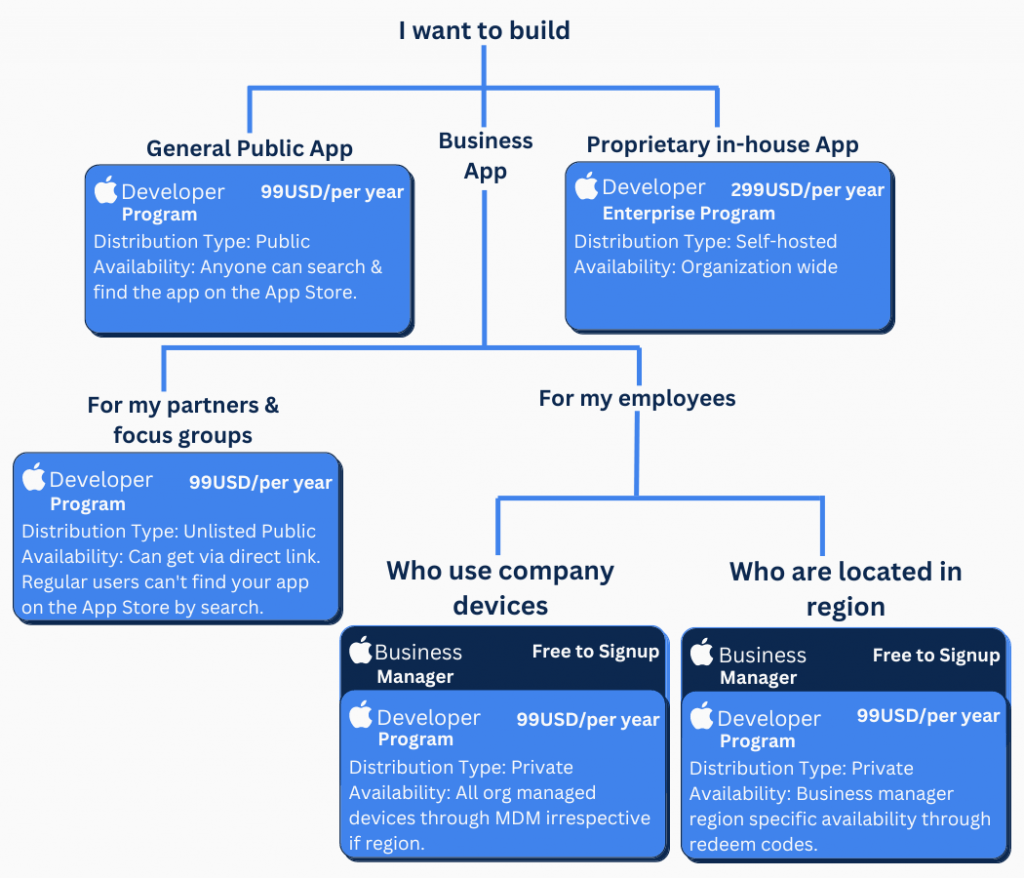
Apple gives 3 ways of app distribution outside their general store:
1) Custom Apps: Here you can distribute your app privately while using App Store Connect and Apple Business Manager.
You can deliver to certain partners, clients, etc. secretly and securely using Apple Business Manager and Apple School Manager. Additionally, you can give your internal staff access to exclusive apps.
Your app does not display in the public iOS App Store when it is distributed privately. As an alternative, you receive an infinite number of redemption links that you can distribute to your users. They can download your software from the App Store using these links.
That’s all. Your user doesn’t need to take any more action. They can start using your app right away and will automatically receive upgrades as you release newer versions. If you want to know how to secretly release your app through the App Store, keep reading.
2) In House distribution : Use an Apple Developer Enterprise Program to distribute the app outside of the app store, but with rigorous eligibility constraints. One of the requirements is to have 100 or more employees. The Apple Developer Enterprise Program subscription costs $299 per year.
Check Apple eligibility requirements
3) Unlisted app distribution: If your apps aren’t appropriate for public distribution, make them available as unlisted apps on the App Store that can only be found via a direct link. Apps for employee resources, partner sales tools, or research studies are a few examples of apps that may be suitable candidates for unlisted app distribution.
Neither the App Store nor the search results will show an unlisted app. The download link will be the only way to access the app.
NOTE: This mode of distribution is direct but not private because anyone with the download URL may still download an unlisted application.
For a fully private distribution, look at the Custom App distribution option and see what distribution method works best for your app.
Another important point to note is that even if the app is not visible, it is still distributed via App Store Connect and, therefore, must be compliant with the App Store Review guidelines .
HOW TO PUBLISH UNLISTED/PRIVATE APPS ON APPSTORE
In order to distribute your app through the public iOS App Store, you might consider the following options.
| | TestFlight | AdHoc | Enterprise (In-House) | Private Distribution (Custom Apps) | Unlisted App (added January 2022) |
| How to install | Install TestFlight app, then open invite link | Provide UDID and wait for signed build, then install via Safari | Install via Safari and accept developer profile in Settings.app before app will be able to launch | Click on a redemption link and install the app in the App Store | Click on a standard link and install the app in the App Store |
| Build Expiration | 90 days | 1 year | 1 year | Never | Never |
| Automatic Updates | Yes | No | No | Yes | Yes |
| Install Limit | 10,000 testers | 100 of each device type | Unlimited employees | Unlimited partners, clients, franchisees, and employees | Unlimited partners, clients, franchisees, and employees |
| Annual Cost | $99 | $99 | $299 | $99 | $99 |
| App Review | Less Strict | None | None | Less Strict |
Let’s discuss Private distribution as most businesses look for this option.
PRIVATE APP DISTRIBUTION (CUSTOM APPS)
Apps that haven’t yet been made available on the App Store can only use private app distribution. If you wish to publish existing software through private distribution, you must make a new bundle identifier.
Prerequisites
- Create a new app by going to App Store Connect. Then upload the build of your app.
- Choose Pricing and Availability from the left sidebar on your app’s page in App Store Connect.
- Select “Available for private distribution to particular organizations on Apple Business Manager or Apple School Manager” under Distribution for Business and Education by scrolling down to that section.
- You must enter at least one organization’s Organization ID, but you can always add more afterward. In Apple Business Manager, under Organization Info, you can locate the Organization ID for your company.
- Send your app for review when you’re ready.
Your app won’t be available in the public iOS App Store once it has been approved, but it will appear in Apple Business Manager for the organization(s) you specify!
Distributing the App to End Users
Each company that will distribute your app will need to set up an Apple Business Manager account. You’ll only create one account if you’re distributing an app to the staff at your business. If you have many clients who want to distribute to users in their business, they must create their own Apple Business Manager account.
On https://business.apple.com, click “Enroll now” to create an account. A few pages of simple forms regarding your business and your employees’ contact information must be filled out. Your company’s D-U-N-S number is the main piece of information you need to obtain before you can begin.
After submitting the form, you’ll need to wait a few days before hearing from Apple. The caller will inquire about your company briefly and obtain your verbal authorization to accept the Apple Business Manager conditions on behalf of your organisation. You’ll get an email with the subject “Thank you for verifying your organisation” after the call. To set up your account, you can follow the steps included in that email. Just make sure to use an email address that isn’t already linked with another Apple ID.
Getting the redemption links
Once you have an Apple Business Manager account, it’s very easy to get redemption codes.
- Go to Enrollment Information to enable Custom Apps.
- On the Custom Apps page, select your app, then select “Redemption Codes” as the license type.
- Enter the desired number of redemption codes and click “Get.”
- Under Redemption Codes, click Download to download a spreadsheet containing redemption codes and associated redemption links that you may send to users.
- Send each user the link and inform them to open it on their iPhone to download your private app without it being accessible to the general public!
UNLISTED APP DISTRIBUTION IN APP STORE
As of January 2022, you can distribute your app as an unlisted app, which allows you to link directly to your App Store product page instead of making it available on the general App Store. In contrast to the “Custom Apps” option, unlisted app distribution is easier to setup, and each user doesn’t need their own redemption link. For detailed process read Unlisted app distribution.
CREDIT: APPLE
BENEFITS OF UNLISTED APP DISTRIBUTION OVER PRIVATE APP DISTRIBUTION
Apple introduced the unlisted app feature in 2022 to simplify the limited audience app distribution process.
Discoverable only via a direct link
App Store apps that are hidden are unlisted. These apps don’t show up in search results, suggested apps, charts, or categories on the App Store. Businesses have the option of unlisting an app from the App Store and sharing a direct link with only their target market, allowing them to be the only ones to download and install it on their devices.
No Apple Business Manager Account Signup Required
To manage company-owned devices or distribute the app to customers in a specific region, businesses using the conventional private app distribution models are required to open an additional Apple Business Manager account. However, there aren’t any such limitations with the most recent unlisted distribution app model.
In-App Purchases Are Possible
In-app purchases are not supported by Apple Business Manager. However, users can make in-app purchases in unlisted apps.
Simplified App Review Process
Before the unlisted app feature, it was usual for an organisation to have conversations with the Apple review team to explain why their app is only for internal usage at their business and not for public distribution. However, a company can now buy a subscription to the Apple Developer Program in order to create the software and distribute it without being advertised on the App Store. The “Account Holder” for the Apple developer programme is responsible for ensuring adherence to the App Store publication requirements and submitting a form for approval.
PRIVATE APP IN ANDROID
Private distribution is the only option for apps that have not yet been made available on the Play Store. You must create a new bundle identifier if you want to publish an existing app through private distribution.
In Android you can create 2 types of private apps:
Google-hosted private apps
Google Play distributes the APK to users after you upload the APK for your private app to the Play Console. Applications hosted on Google Play benefit from the service’s dependability, security, and simplicity of management.
Externally(self) hosted private apps
APKs that are hosted externally are not transmitted to Google for inspection. The security of their content cannot, therefore, be ensured. When users access an app that is hosted externally, they are informed of this.
An externally hosted app is a personal app that has an APK hosted somewhere other than Google Play (such on your personal server, for instance). You (or the app’s developer) must upload a JSON file to the Play Console with the app’s metadata in order to distribute externally hosted apps through managed Google Play.
HOW TO PUBLISH PRIVATE APP ON GOOGLE PLAYSTORE
No matter how many apps your organization has, there are tools available to manage them all on the Play Store automatically. Google Play has a developer API that provides management of Play store listings, APKs, and more. Fastlane, a collection of app automation tools, was part of Google’s January 2017 acquisition of Twitter’s Fabric developer tool suite. Fastlane has the ability to sign/push apps to the Play store, handle beta deployments, and automate screenshots.
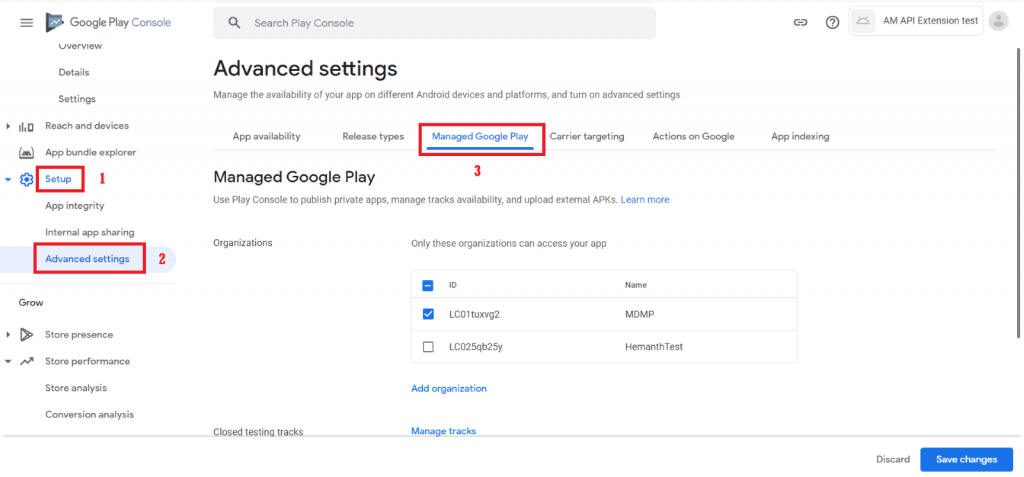
Additionally, Managed Google Play customers can create private hosted apps without passing a minimum version check thanks to the Custom App Publishing API. Managed Google Play is a marketplace for Android Enterprise offering support for private apps. Private apps are Android apps that are not public rather distributed only to internal users (via link).
Why this is important: The Custom App Publishing API, often known as the fastlane, considerably simplifies and minimises the friction associated with transitioning to Managed Google Play and connects with continuous integration tools and processes.
You also have other options to publish your private app on Google playstore:
OPTION 1: Publish private apps from the Admin console
You only need an Android application package (APK) and a title to upload and publish private apps in the admin panel. An organization-specific Play Console account is made when you publish a private app for the first time. Private apps are instantly approved for your company and usually available for distribution in less than ten minutes. Up to 15 private apps may be uploaded each day.
Further read how to Publish private apps from the Admin console
OPTION 2: Publish private apps from the Play Console
You must sign up for a Google Play developer account in order to publish private apps from the Play Console. You are granted the necessary administrator rights through the account in order to upload and publish personal apps to controlled Google Play. Then, you may deploy these apps to consumers via your EMM console.
Private apps must have certain settings to make sure that only people within your company can access them and that they are simple to find. If you’re hosting the app yourself rather than Google, you’ll also need to specify a few options. Only an Android application package (APK) and a title are needed to submit and distribute private apps.
Note: The Admin console allows you to publish private apps if Google is your EMM provider. You might be able to publish private apps from your EMM console if you utilize a third-party EMM supplier but for that you need the verify this with them.
Read to know the entire process to publish private apps from the Play Console.
Enterprise developer: Private app publishing guide
CREATE A NO-CODE APP FOR YOUR COMPANY WITH SWING2APP
It takes only a few weeks to create a no-code private app with Swing2App and you’ll be able to save a lot of money. Furthermore, you do not need to worry about all the unlisted/private app upload processes, we handle the entire process for you and ensure you publish your app without any issues.
To stay connected with your employees, you can create a professional app for your business.
HOW TO CREATE A PRIVATE APP WITH SWING2APP
You can create 2 types of Private apps with Swing2App no-code app maker:
1. Available after the administrator approval: Users can use the app only after the admin has approved them.
The user simply needs to sign up when the window appears when they run the app, and app users can use the app as soon as the administrator approves.
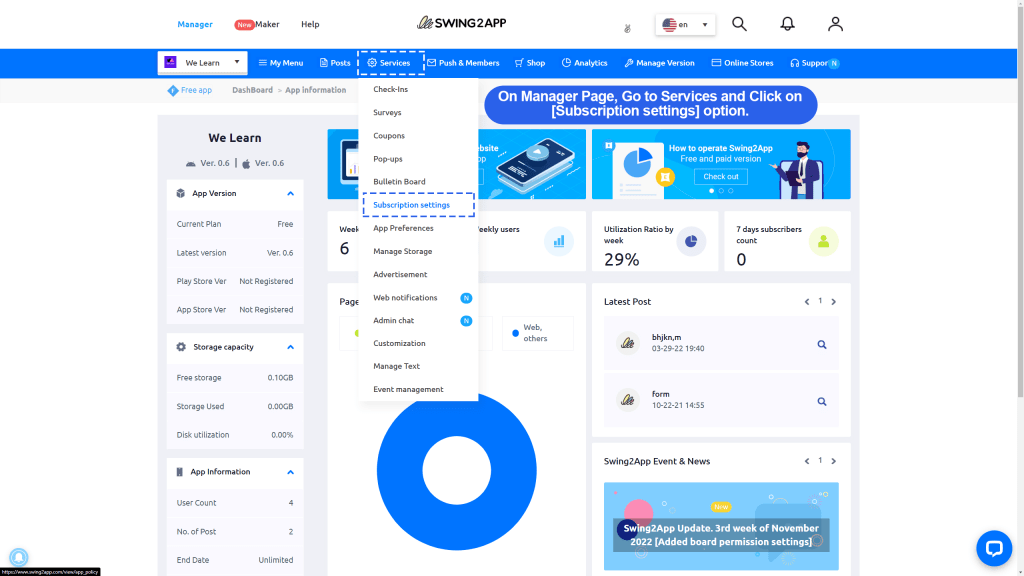
Steps to create private app (Admin approval)
- Go to Manager.
- Select Services.
- Click on Policy.
- Click Add Subscription Policy.
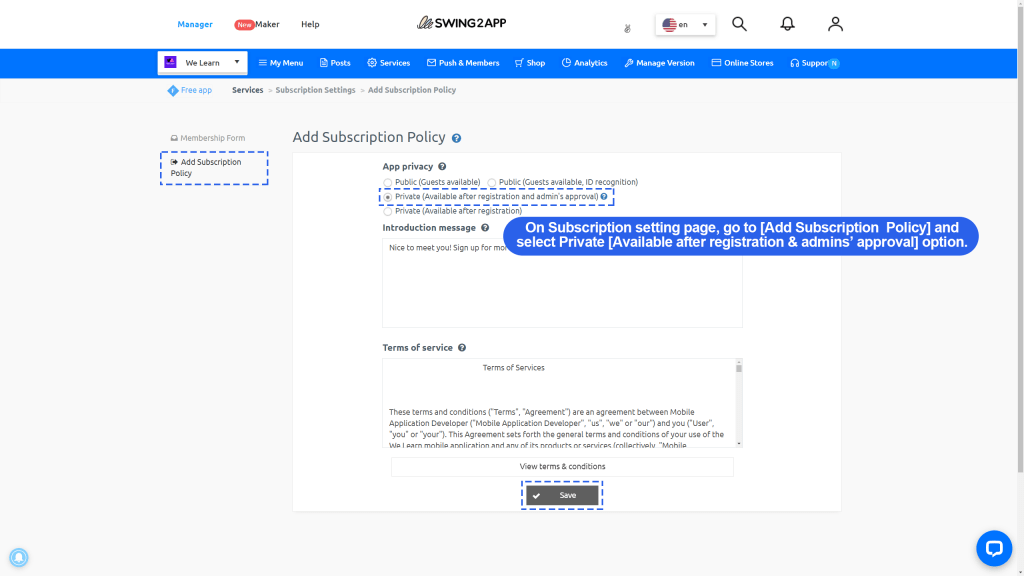
You’ll be directed to Membership Policy Page, where you can edit your policy.
Select Add Subscription Policy -> Check Private (Available after registration and admin’s approval) box [Under App Privacy] -> Fill Details Required -> Click on [Save] button.
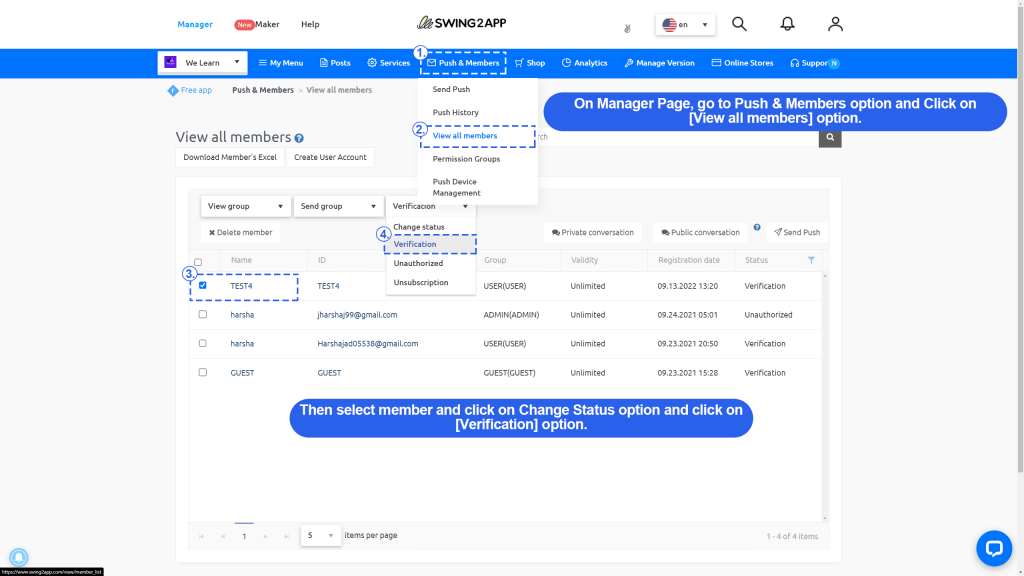
To give access to users who sign up you need to give them permission:
(Manager -> Go to Push & Members -> Click on Members View -> Give Permission to users)
If you haven’t given the permission user will be displayed a message like below image and will not have access to your app.

2. Available after signing up: Users can access the app after signing up, no need for admin approval.
Steps to create private app (Available after registration)
- Go to Manager.
- Select Services.
- Click on Policy.
- Click Add Subscription Policy.
Select Add Subscription Policy -> Check Private (Available after registration) box [under App Privacy] -> Fill Details Required -> Click on [Save] button.
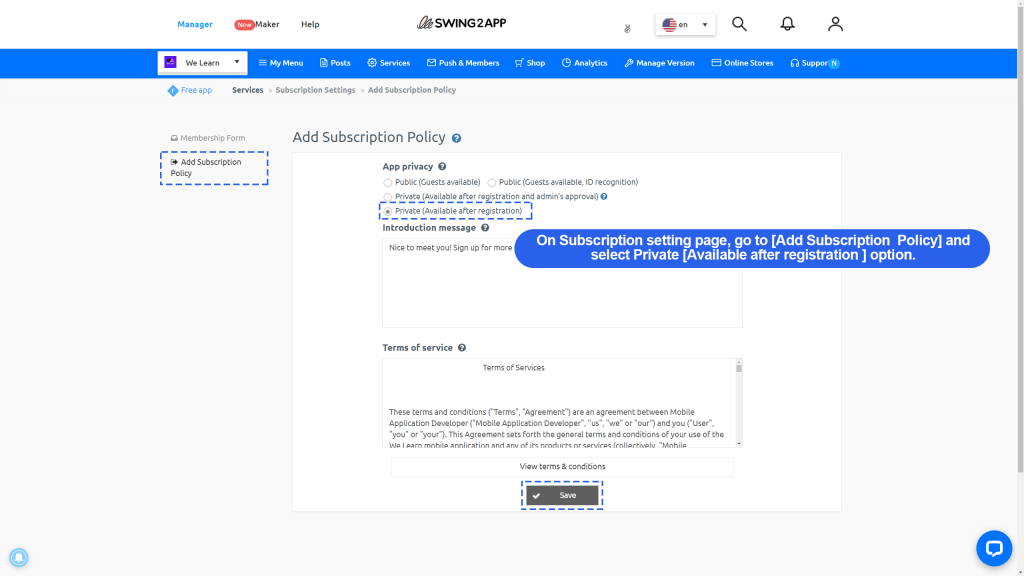
Swing2App provides a variety of features that can be added to your business app, these are:
- Chat-to stay connected with your employees
- Push notification for announcements- so that everyone is up to date with new task or projects
- Event Calander- this is one of the most important features as it relieves you from the stress of scheduling meetings and informing everyone about it
- Training- you can also conduct online training sessions that can remain available on the app and employees can access them any time
- Reporting- apps make employee reporting much easier
- Employee Survey and feedback by using Swing2App Survey bulletin board
In addition to these features, the list is endless as any feature can be added according to the needs of your company.
Additionally, you will be able to create apps for iOS and Android simultaneously for the same cost and time. Isn’t this great? Why wait any longer?
]]>Most businesses understand how important it is to develop apps. It’s not realistic for everyone to wait a year or more for the launch of their mobile app.
In some cases, businesses must launch apps quickly in order to take advantage of opportunities. Businesses are increasingly using their own apps to increase sales or to provide customers with an alternative platform for using their tools and services. In fact, 42% of millennial-owned businesses have their own apps.
However, while a mobile app can generate quite a bit of revenue, quickly launching a successful app is made more challenging by its low barrier to entry.
According to Alex Ahlund, former CEO of AppVee and AndroidApps, the average cost to develop a mobile app is $6,453 – and can go as high as $150,000 depending on its complexity. Furthermore, the average timeline for app development before launch is at least six months. Nevertheless, this guide will show you how to speed up the process.
WHY A SUCCESSFUL MOBILE APP LAUNCH IS SO IMPORTANT
Your mobile app launch can either determine or jeopardize the long- and short-term success of your app.
You risk missing out on some time-sensitive opportunities that directly affect app downloads and usage if you wait too long to launch the app. On the other hand, speeding through app development and releasing a subpar product might result in customers never using the app again due to a negative user experience.
The best method to make sure your app is successful for years to come is to have a smooth app launch with an app that is free of bugs and provides a seamless user experience. By putting the user’s needs first, you can increase the lifetime value of each individual that installs the app and keep them coming back to use it.
If your app doesn’t function as planned, even launching it in a matter of weeks rather than months won’t help. Therefore, you must strike a balance between a quick app launch and a top-notch product.
To be honest, certain apps just cannot be created in a matter of weeks or months. It is impractical to schedule a three-month app development period if you’re trying to build the next Facebook, Uber, or YouTube. App launches for games, augmented reality, and virtual reality applications are often prolonged.
However, the great majority of business applications may be released rapidly without compromising the app’s quality provided the proper technology is used and a tried-and-true success formula is followed (by following the steps in this guide).
Many professional business apps have been developed with Swing2App. We have seen our clients launch apps faster than the typical app development cycle, and we are aware of what it takes to be successful in this field.
5 STEPS FOR FAST APP LAUNCHES
The key to quick and effective app launches is simplicity. The entire procedure may be summed up in just five simple steps:
Step 1: Market Research
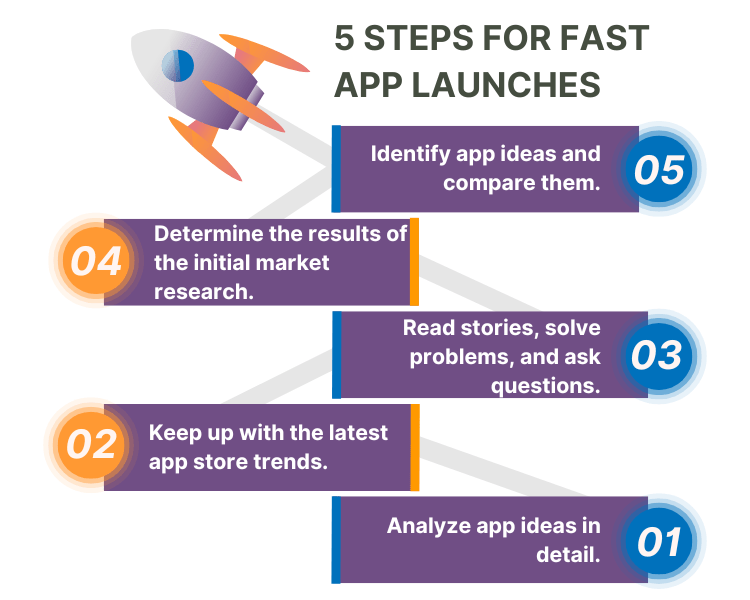
According to estimates, the Apple App Store will have 1,800,000 applications overall as of January 2020. And even those figures don’t include Android applications available in the Windows and Google app stores.
How does this affect you, then? There is definitely already plenty of competition for you. In order to genuinely distinguish your app, undertaking an in-depth market analysis is vital.
An app concept may be created by anyone. But before you start creating anything, you really have to confirm your concept through market analysis. Because the app developers ignored this phase, so many mobile apps fall short of expectations.
You may save time and money by taking the time to learn about your target market and target audience. You may discover that features or capabilities you first considered significant aren’t actually required by the app. So, you may skip those features entirely and launch the app quickly.
Consider the case of your small gift store. In order to increase mobile commerce sales during the busy Christmas season, you may want to create an app, that would prove to be a great idea.
You can track customer purchases and award them loyalty points, just like Starbucks and do much more with a business app. But after doing market research, you might find that the majority of your customer doesn’t want, need, or plan to use that feature of your business app.
You will save a lot of time and money by dropping this feature, enabling you to launch the app more quickly and affordably.
You may learn more about your competition, potential users, present and past customers, and comparable apps that are already available in the market by conducting market research.
Your ability to distinguish your application from others on the Apple App Store and Google Play Store will provide you an advantage over others.
Step 2: Pre-plan & organize
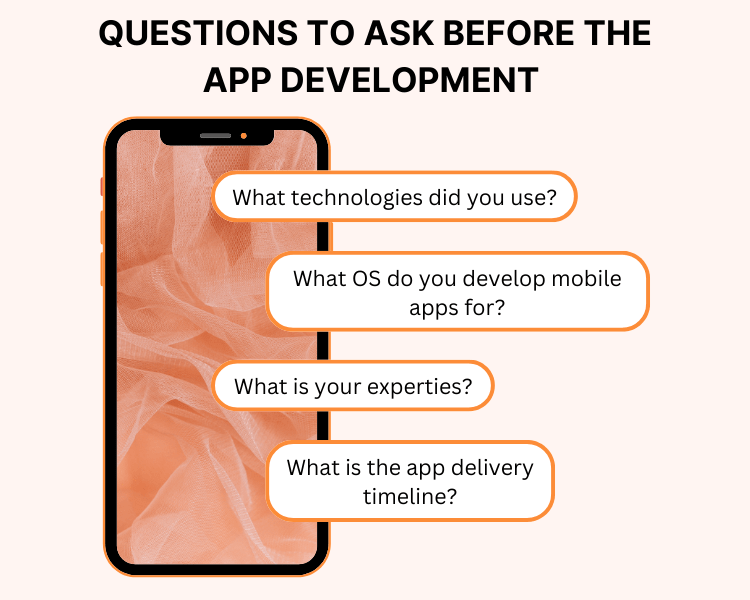
After completing the market research phase, you must develop a sound plan. Before you begin creating anything, use the following points as a checklist for the quick launch of your app:
- Select your app launch app stores (iOS, Android or both)
- Code your app or hire mobile app developers or use Swing2App
- Decide your app development budget
- Select tentative launch the app date
- Create a free app or Subscription based app
- Monetize app or not, if yes then how?
You are not yet prepared to develop and release the app if you don’t have the answers to these queries.
I won’t delve too far into any of those questions for the sake of this blog. Instead, we want to concentrate our efforts on quickly launching a high-quality app.
However, we have a lot of helpful articles and tutorials that will help you in organizing and build your app. Here are some articles related to the above-mentioned queries:
IOS Vs Android: Which Is Suitable For Your First App?
No-Code App Development: What Is No Code? & Benefits Of No-Code App Maker.
How To Publish An Android App On Google Play Store: A Step-By-Step Guide
How To Develop A Mobile App For Android & IOS
How To Reduce Your App Development Cost?
How To Submit Your App To The App Store In 2022
Step 3: Focus on the Key Features of your Mobile app
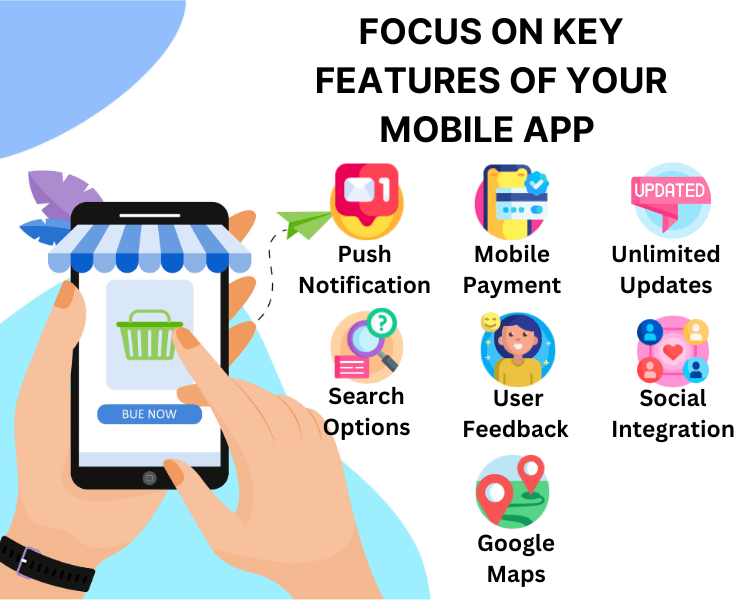
You ought to know exactly how you plan to make an app by this point. It’s time to concentrate on the functionality of the app, regardless of whether you’re going to develop it yourself or contract out the job to an app development firm.
Perhaps the most crucial stage when launching an app quickly is this one.
People often overestimate the usefulness of mobile app features. Instead of the “must-haves,” they place too much emphasis on the “nice-to-haves.”
Begin by making a list of the features that your app users need to solve a problem or achieve a goal.
There may be several distinct ideas on your initial list of features. But it doesn’t always imply you’ll use them all. Start crossing off the items on the list one at a time that doesn’t serve the main goal of the app.
Consider the scenario where you are developing an app for your restaurant. You may put lots of different functions in the app. But what is your real intention for your business app development?
A dine-in restaurant rewards app will appear very different & have different core features than a mobile ordering app for restaurants.
Wouldn’t it be amazing if the app could access the user’s camera and contact list? Some of you might feel this would be a great add-on. But is that genuinely required for the core motive of the app? Most likely not.
Step 4: MVP creation
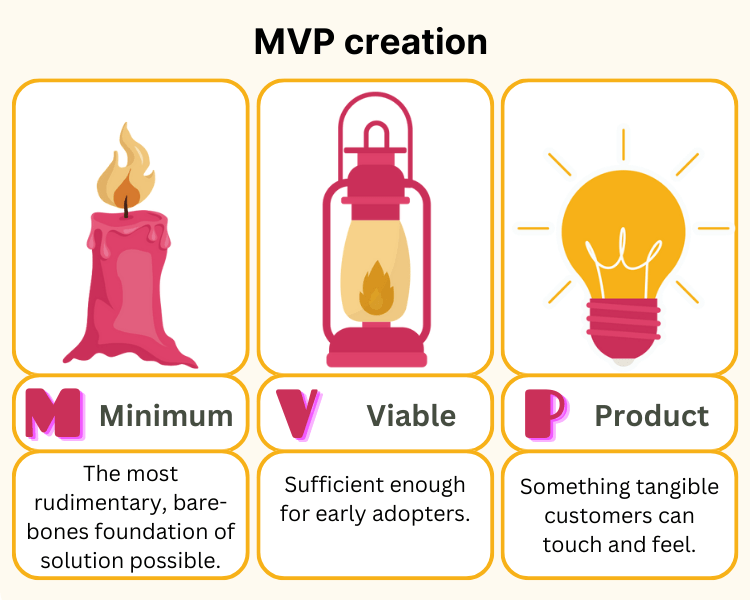
The term MVP (minimum viable product) is often used in connection with app analysis and beta testing. However, if you’re on a tight app development schedule, you may really use an MVP for your initial launch on the app stores.
By developing an MVP, you’re bringing the key features that were figured out in the previous phase into production.
You won’t be concerned about the excessive features. Just concentrate on the essential features, and you’ll have a functioning app that serves its main goals.
Consider developing an e-commerce app as a complement to your online store. Mobile payment options are the app’s main goal.
Therefore, even though a customer loyalty scheme or a mobile customer referral program sounds like fantastic features, neither would be included in the MVP. Instead, you would just provide an app with the most basic e-commerce purchase features.
Simply make sure the software has a built-in payment gateway (PayPal, Google Pay, etc.) and links with your online business.
Users can later be given the option to personalize their profiles by adding details like their birthdays, favorite goods, and the option to share items with friends. However, the MVP is only for the core app features.
Step 5: Testing, stabilization, & Beta release
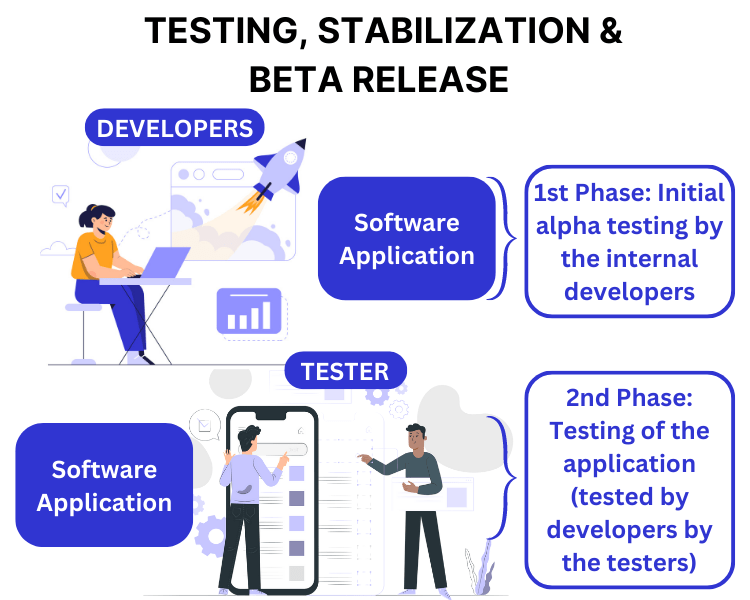
At this stage, defects are found and corrected, and the product is stabilized—everything is made completely release-ready. Experts in quality control examine the app’s functionality across a variety of platforms and operating systems using specialized services.
A mistake in launching your mobile app quickly may be quite expensive. Apps are available on Google Play in a matter of hours, and on the App Store in a matter of weeks. Errors trigger strong negative responses from users, who give products terrible ratings and reviews. Due of this, new users decide not to download the app after seeing it. This step of the mobile app launch process is very critical.
We highly recommend giving a limited set of beta testers access to your app’s pre-final version before submitting it to the app stores. To test new apps before they are released to the public, you may either distribute this version to testers or utilize tools that were designed especially for the purpose: Apple’s TestFlight and Google Play’s Play Console. A beta test is used to address any lingering problems a few weeks before the official launch.
Step 6: Prepare for Launch
While the MVP development is still ongoing, you may begin preparing your app for launch by promoting it.
Waiting till the app development is finished to start with this step is just going to add unnecessary length to your launch timeline. Examples of preparations include:
- Make a landing page for the iOS app and the Android app.
- In a blog article, promote your app.
- Create a buzz about the app on your social media pages.
- Create screenshots of the software to be used in promotional materials.
- Utilize app store optimization (ASO) best practices to be ready for app store search
- When launching an app, be aware of the variations between iOS and Android applications.
You may always refer to free and paid mobile applications for inspiration and take ideas from their marketing techniques if you’re stuck on any of these preparation procedures.
This allows you to launch your app quickly, as soon as development is complete.
QUICK APP LAUNCH WITH SWING2APP
Swing2App is the best no-code app builder for those looking to speed up their app development without sacrificing quality.
It is the easiest way for DIY users to make their own apps without writing a single line of code with Swing2App no-code app builder.
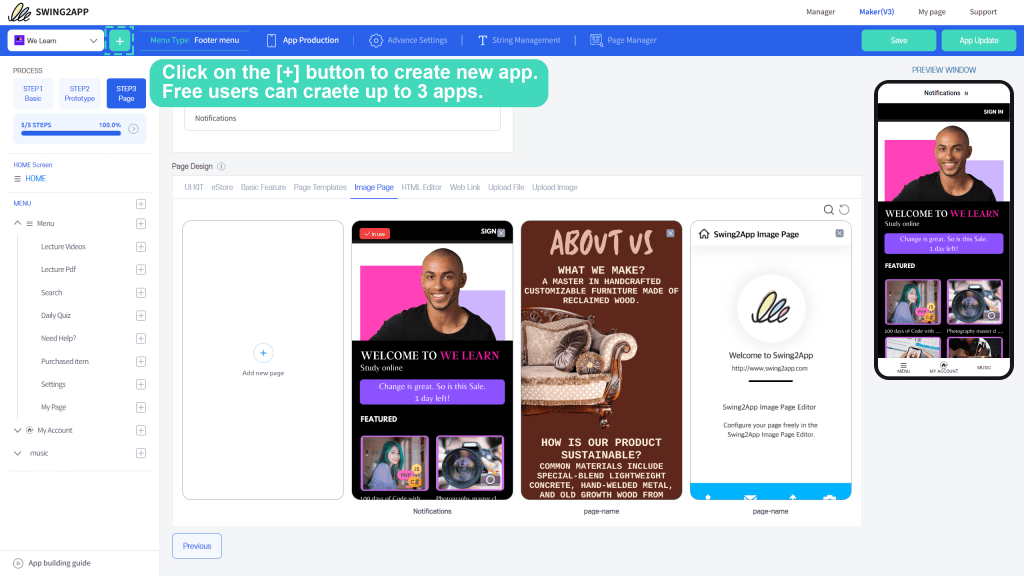
Our platform takes care of all the backend app requirements. It’s just a matter of adding your features and customizing the content.
Swing2App’s app maker is the best way to launch iOS and Android apps. With its easy-to-use interface and limitless scalability, it will fit any need.
With just a few clicks, you can get started in seconds. Simply select a template and then you can add features, and menus by adding the required bulletin boards (chat, calendar, Google maps, and much more).
With Swing2App, you can also add custom functionality. So, if you need something that’s highly customized and can’t find it on our platform, we can also create custom features for you.
As soon as the app is built, we will take care of the app launch on both the Apple & Play store. You just need to click “App Creation Request” when the app creation is completed.
Swing2App simplifies the process of launching an app quickly and at a fraction of the cost of traditional development. The app can be maintained post-launch and features can be added later on. It is therefore possible to begin with basic features and then add more advanced functions in months or even years to follow.
Swing2App custom app development
In case you don’t want to be involved in the development process and would rather outsource it, you can look for an app development company that can help launch your mobile app quickly.
There is no better solution than Swing2App’s no-code platform.
On top of Swing2App’s existing no-code app development platform, Swing2App offers custom app development. As a result, our in-house custom development team does not have to start from scratch.
When compared with hiring app developers or assembling an internal product team, this gives you a significant advantage.
As part of the process, we will work with you to ensure that the app meets your business goals, budget, and timeline.
FINAL THOUGHTS ON A SUCCESSFUL LAUNCH FOR MOBILE APPS
For many businesses and entrepreneurs, launching an app quickly is crucial. Ensure the quality of your final product doesn’t suffer due to your development timeline.
By working on your app marketing strategy and promotional materials during app development, you can also save time and prepare for a successful and quick app launch. When you are starting your app, you should focus on its core features and functionality. After the app launches, more features can always be added.
]]>Apple has released the new iPhone 14 and iPhone 14 Pro. This year, Apple launched the same number of iPhones as last year and the year before. Due to Apple’s decision to name this year’s iPhones differently and their differing features, the iPhone line-up is more confusing than ever before.
Among the brand-new iPhones, there are four basic versions: regular, Plus, Pro, and Max. Pre-orders began on September 9, with availability for iPhone 14 from September 16, and availability for iPhone 14 Plus will start from October 7.
If you’re wondering which one to choose or is the latest line-up is worth upgrading or not, here’s a quick explanation.
First, let’s begin with the iPhone 14 regular model.
iPhone 13 vs iPhone14
The latest reports are indicating that the pro and the pro Max make up to 80 percent of the pre-orders of the expensive phones everybody’s ordering and skipping the standard iPhone 14. Let’s discuss why that might be the case, if you watch Apple’s presentation then you recognize that this phone has a little bit more in common with the previous generation.
If you have already purchased iPhone 14 and no one is blinking an eye, it is not your fault. Both iPhone 13 and 14 look exactly the same except for the colours and camera bump which is hard to recognize. And this is perhaps the reason why pre-orders for iPhone 14 are Worse than For iPhone 13 Mini.
Moreover, it is for the first time that the chip is almost identical because the A15 bionic is still in the iPhone 14. The only difference is it’s using the A15 from the iPhone 13 Pro which means that you might get a little bit more performance if you’re playing games because of that extra GPU core now in terms of the design they’re pretty much identical. Also, iPhone 14 has aluminium build similar to iPhone 13, but it comes in a new blue colour.
So, if you already have a previous model of iPhone, it won’t be much of a change to switch to iPhone 14 regular model for $800, when you can get an iPhone 14 pro for just paying $200 extra.
However, don’t be disheartened because this time while you pay $200 extra you get actually much more as compared to the case in previous iPhone lineups in which regular and pro had much in common.
So, let’s check what is new in iPhone 14 pro, pro max, and plus.
iPhone 13 Pro vs iPhone 14 Pro, Pro max, and Plus
Difference between regular and Pro series of iPhone 14:
- Newer chip on the Pro
- Different build materials for chassis: aluminium on regular vs stainless steel on Pro
- Higher 120Hz refresh rate on Pro
- Higher outdoor peak brightness on Pro
- Always On Display on Pro
- New notch design and related software functions on Pro
- Higher storage options on Pro
- 48 MP count primary camera on Pro
- An added third camera on Pro, handling telephoto
- Night Portraits, ProRaw, and Macro are Pro-exclusive camera features
- LiDAR Scanner on Pro
Difference between regular iPhone 14 and 14 Plus; and iPhone 14 Pro and 14 Pro Max:
- Size difference for display and overall chassis: Plus, and Pro Max are bigger
- Battery size difference: Plus, and Pro Max have a bigger battery and will last longer, but will also take longer to charge
Let’s delve deeper into the differences, which will help you choose the best model of the iPhone 14 line up.
There are three major things that are new with the iPhone 14 Pro: the internals, the externals, the display, and the cameras.
1)The internals:
A) Latest A16 Bionic Chip
As expected, only the Pro models have seen a spec bump this year, meaning you’ll have to spend more money to get the best Apple silicon. The company’s new A16 Bionic brings a lot of meaningful upgrades to the table but it’s limited to the iPhone 14 Pro and the iPhone 14 Pro Max. The standard iPhone 14 and the iPhone 14 Plus, on the other hand, will use last year’s A15 Bionic. It’s still an upgrade from the iPhone 13 because new ones use the A15 Bionic with a 5-core GPU instead of the 4-core SKU.
Apple’s A16 Bionic may not bring any significant upgrades to the overall performance, but it adds things like the display engine for a significantly better experience. Not to mention, it’s also significantly more power-efficient so you can expect to see better battery life on the Pro models this year.
B) Storage
The non-Pro iPhones start at 128GB and top out at 512GB storage for the top-of-the-line variant, while the new iPhone 14 Pro models can be bought with up to 1TB of storage. Do keep in mind that you’ll have to pick up at least the 256GB variant of the Pro variants to take advantage of features like ProRes video recording at 4K-30fps.
C) More battery life
There is a 3,279mAh battery in the iPhone 14, which is a bit larger than the battery from the prior-generation iPhone 13. The iPhone 14 Plus has a 4,325mAh battery. The iPhone 14 offers up to 20 hours of battery life for video playback, up to 16 hours for streaming video playback, and up to 80 hours for audio playback, which is an improvement over the iPhone 13 by about an hour.
The iPhone 14 Plus offers up to 26 hours of video playback, up to 20 hours of streaming video playback, and up to 100 hours of audio playback.
Both devices are fast-charge capable and can charge up to 50 percent in 30 to 35 minutes with a 20W or higher power adapter.
D) New sensors of Car Crash
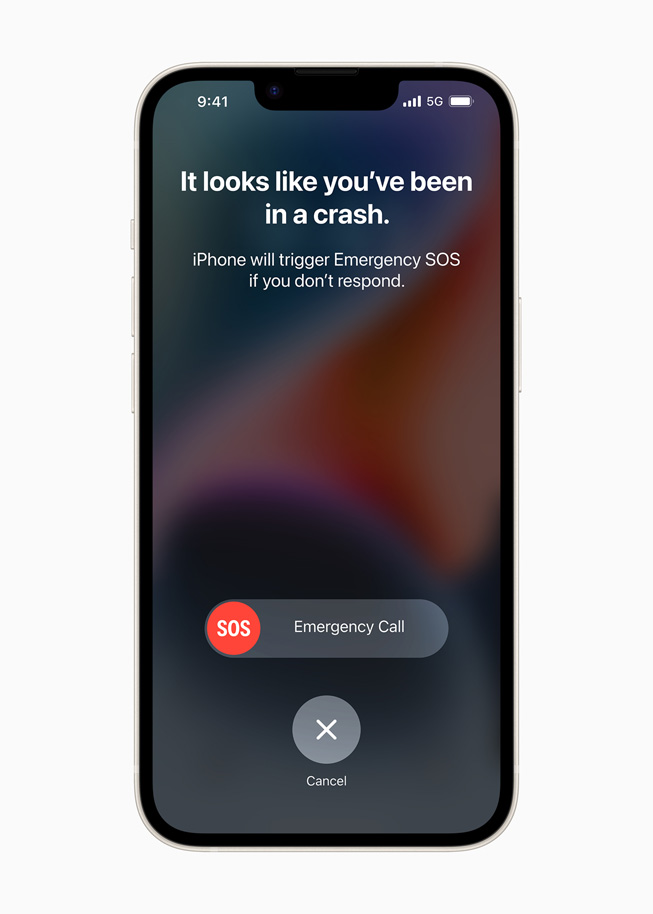
The whole iPhone 14 line-up debuts first ever safety features that can deliver aid in an emergency when it counts the most. With a new high dynamic range gyroscope and dual-core accelerometer that can detect G-force readings of up to 256Gs, Crash Detection on the iPhone can now identify a serious auto accident and quickly contact emergency services when a user is unconscious or unable to reach their iPhone. These capabilities expand upon already-existing features like the barometer, which can now detect changes in cabin pressure, the GPS, which provides extra input for changes in speed, and the microphone, which can identify loud noises characteristic of serious auto accidents. Even more precision is provided by sophisticated motion algorithms created by Apple that were honed using more than a million hours of actual driving and collision record data.
E) eSim only
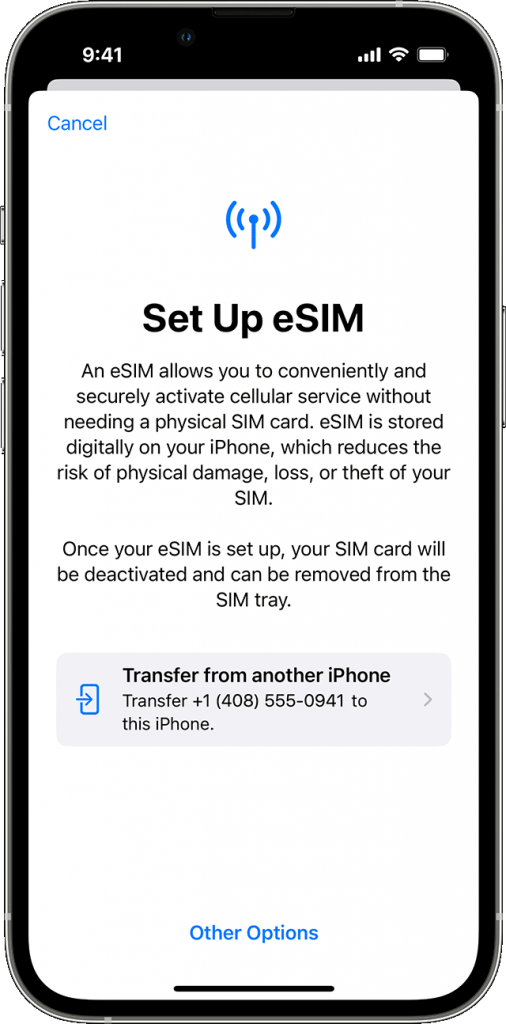
As with the iPhone 13 models, the iPhone 14 lineup support 5G connectivity (sub-6GHz and mmWave in the United States), and they use a new Qualcomm X65 modem. In the United States, iPhone models ship without a physical SIM card as carriers now use eSIM. For people who switch phones or use sim cards for data when traveling this may be a point of concern.
F) Emergency Satellite communications: SOS
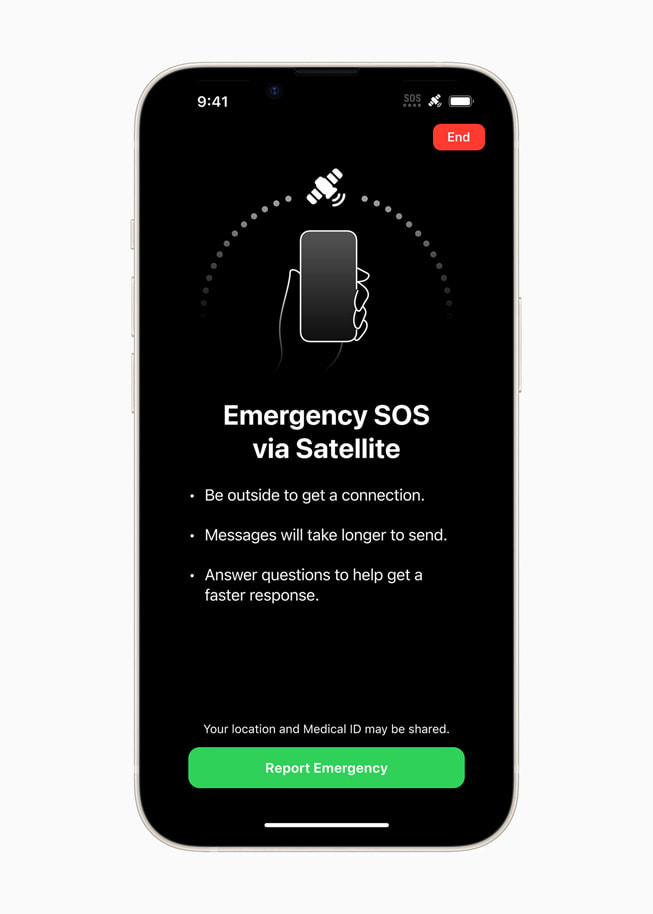
Another new feature of the iPhone 14 lineup is Emergency SOS via satellite, which combines specialised parts that are tightly linked with software to enable antennas to connect directly to a satellite, enabling communicating with emergency service providers when cellular or Wi-Fi connectivity is not available. Sending a message through a satellite might take minutes since they are moving targets with minimal bandwidth. When there is no cellular or Wi-Fi connection, this ground-breaking technology also enables users to manually communicate their position with Find My over satellite, giving them peace of mind while trekking or camping off the grid. Users in the US and Canada will be able to this feature via satellite in November, and the service will be free for the first two years.
2) The Externals
A) New colours
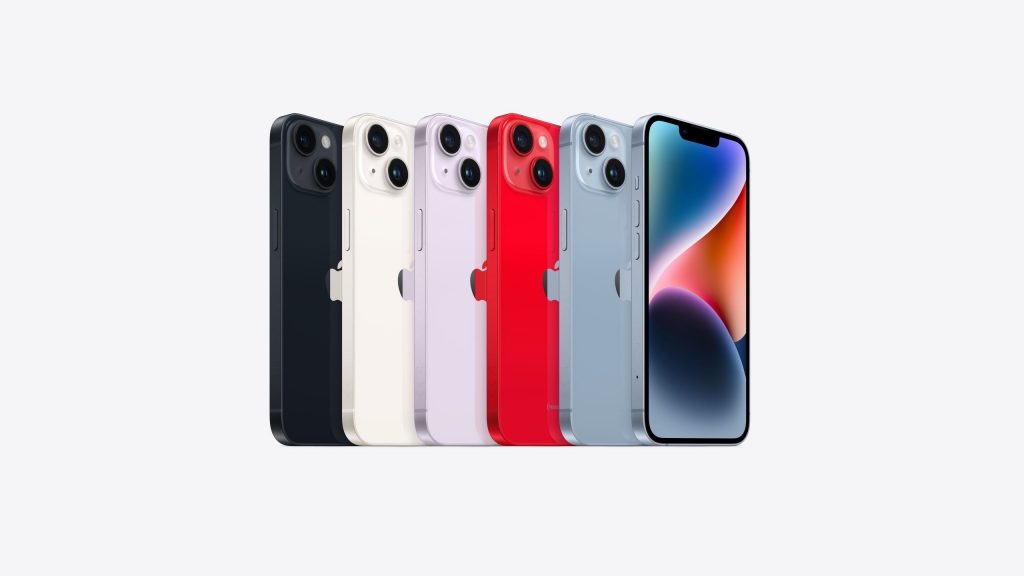
The new colours for the iPhone 14 lineup are : blue and purple and the pro version have a matte finish while as regular version doesn’t.
B) Bigger Camera Bump
This is not a stark difference between the 14 and 13 line-up, nevertheless it is worth mentioning your iPhone 13 case won’t fit iPhone 14 because of this reason.
3) The Display
A) 120 Hz OLED Display
The iPhone Pro models are the only iPhones with support for ProMotion technology with adaptive refresh rates up to 120Hz, which gives users a fluid and smooth experience. The regular iPhone 14 and the iPhone 14 Plus still have the 60Hz display.
B) Always on Display/ Lock screen
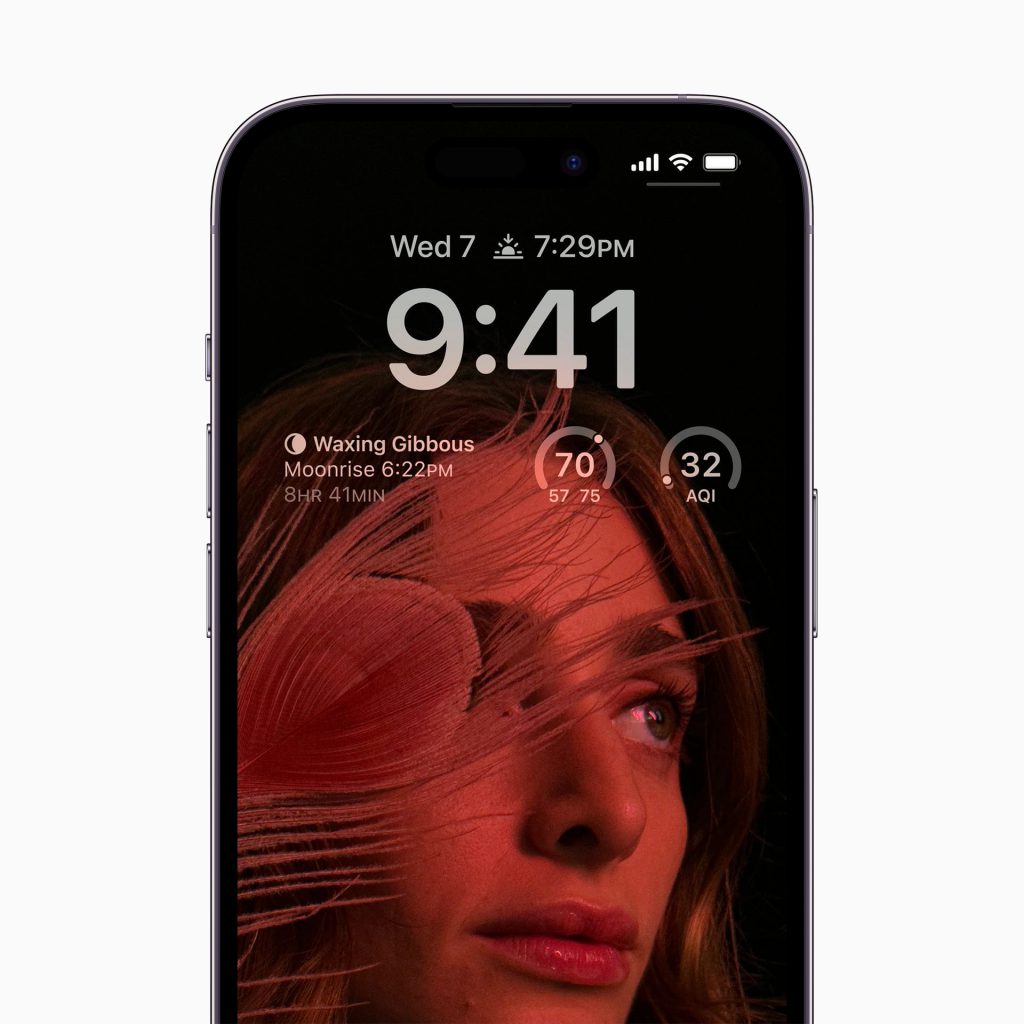
The iPhone Pro models support the Always-On display, which was already available in android, now apple has it too. This is enabled by the new Apple silicon; the A16 Bionics’ new display engine, which is also supports the brightness of up to 2,000 nits on the iPhone 14 Pro and the iPhone 14 Pro Max. The cheaper iPhone 14 models are still use the last year’s A15 Bionic chipset, so they don’t support Always-On display.
C) Dynamic Island
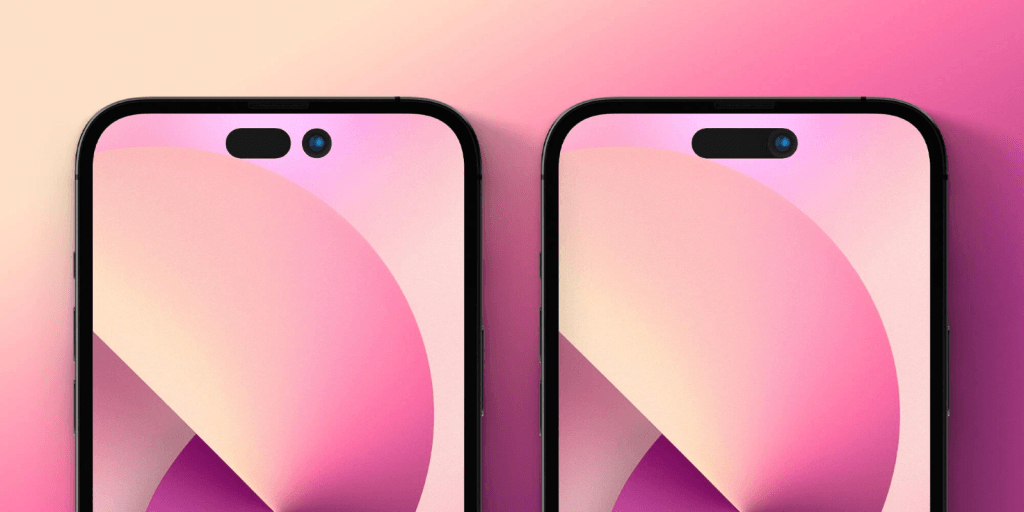
The new iPhone 14 Pro and the iPhone 14 Pro Max have a pill-shaped cut-out on the top of display screen instead of a notch over there. This is a big change for the new iPhone 14 line up as they’re the first ones. It’s named Dynamic Island and it has an inbuilt software that enables it to move around and animate to show you different UI elements.
The Dynamic Island, however, is available only in the Pro models, meaning the regular iPhone 14 and the iPhone 14 Plus still have the notch on the top. In fact, Apple didn’t even reduce the size of the notch on the iPhone 14, so it’s exactly like the iPhone 13’s notch.
4) The Camera
Pro series is all about camera. It is safe to say that the Pro models have received some major camera upgrades in 2022 but the standard iPhone 14 and the iPhone 14 Plus use the same dual-camera system as the one in iPhone 13.
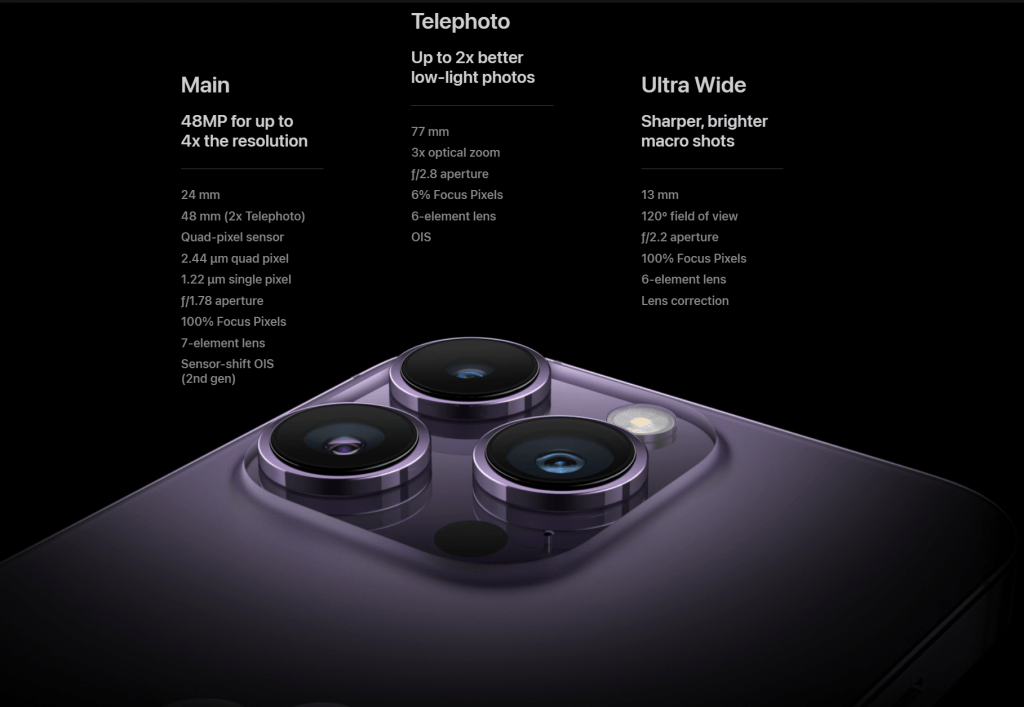
A) 48 Megapixel sensor: a big leap from 12 megapixels
iPhones are moving away from 12MP sensors to 48MP ones for the first time. For “professional” photographers and videographers, this is expected to be a big leap. Due to the new photonic engine, low-light photography will be greatly improved. As for the ultra-wide and telephoto lenses, you can expect some slight improvements over last year’s iPhone 13 Pro models. However, the 48MP sensor on the Pro models is the real showstopper.
In addition to the Photonic Engine, the non-Pro iPhones also have a dual-camera setup with 12MP main and ultra-wide lenses.
The larger sensor gives you more light gathering and sharpness, as well as faster shutter speeds, so motion is frozen more often in less-than-ideal conditions. Moreover, the shorter shutter time lets me take low-light pictures. However, the larger sensor also allows you to get a shallower depth of field without a portrait mode, which is more than an iPhone has ever been able to achieve.
B) Second-generation focus shift
100% coverage with focus pixels has been pretty locked in on tracking subjects and keeping things in focus even with the shallow depth of the field.
- Additional new features: new Action mode, true depth, optical image stabilization, 100% focus pixels, new F1.78 lens, a big leap in low-light performance & Ultra-wide improvements.
Summary
| Specification | iPhone 14 | iPhone 14 Plus | iPhone 14 Pro | iPhone 14 Pro Max |
| Build | Ceramic shield front Glass back Aluminium mid-frame IP68 dust and water resistance | Ceramic shield front Glass back Aluminium mid-frame IP68 dust and water resistance | Ceramic shield front Glass back Stainless steel mid-frame IP68 dust and water resistance | Ceramic shield front Glass back Stainless steel mid-frame IP68 dust and water resistance |
| Dimensions & Weight | 146.7 x 71.5 x 7.8mm 172g | 160.8 x 78.1 x 7.8mm 203g | 147.5 x 71.5 x 7.85 mm 206 g | 160.7 x 77.6 x 7.85 mm 240 g |
| Display | 6.1-inch Super Retina XDR OLED Display 2532 x 1170p resolution, 460PPI HDR True Tone Wide colour (P3) 2,000,000:1 contrast ratio 800nits max brightness, 1200nits peak brightness Fingerprint-resistant oleophobic coating | 6.7-inch Super Retina XDR OLED Display 2778 x 1284p resolution, 458PPI HDR True Tone Wide colour (P3) 2,000,000:1 contrast ratio 800nits max brightness, 1200nits peak brightness Fingerprint-resistant oleophobic coating | 6.1-inch Super Retina XDR OLED Display 2556 x 1179p resolution, 460PPI ProMotion technology (120Hz) Always-On Display Dynamic Island HDR True Tone Wide colour (P3) 2,000,000:1 contrast ratio 1000 nits max brightness, 2000 nits peak brightness (outdoors) Fingerprint-resistant oleophobic coating | 6.7-inch Super Retina XDR OLED Display 2796 x 1290p resolution, 460PPI ProMotion technology (120Hz) Always-On Display Dynamic Island HDR True Tone Wide colour (P3) 2,000,000:1 contrast ratio 1000 nits max brightness, 2000 nits peak brightness (outdoors) Fingerprint-resistant oleophobic coating |
| SoC | Apple A15 Bionic 6-core CPU 2 performance cores 4 efficiency cores 5-core GPU 16-core Neural Engine | Apple A15 Bionic 6-core CPU 2 performance cores 4 efficiency cores 5-core GPU 16-core Neural Engine | Apple A16 Bionic 6-core CPU 2 performance cores 4 efficiency cores 5-core GPU 16-core Neural Engine | Apple A16 Bionic 6-core CPU 2 performance cores 4 efficiency cores 5-core GPU 16-core Neural Engine |
| RAM & Storage | 128GB 256GB 512GB | 128GB 256GB 512GB | 128GB 256GB 512GB 1TB | 128GB 256GB 512GB 1TB |
| Battery & Charging | Battery rated for up to 20 hours of video playback up to 16 hours of video streaming Up to 80 hours of audio playback Fast-charge capable Up to 50% charge in about 30 minutes with 20W adapter or higher (sold separately) MagSafe and Qi wireless charging | Battery rated for up to 26 hours of video playback up to 20 hours of video streaming up to 100 hours of audio playback Fast-charge capable Up to 50% charge in about 30 minutes with 20W adapter or higher (sold separately) MagSafe and Qi wireless charging | Battery rated for up to 23 hours of video playback up to 20 hours of video streaming Up to 75 hours of audio playback Fast-charge capable Up to 50% charge in about 30 minutes with 20W adapter or higher (sold separately) MagSafe and Qi wireless charging | Battery rated for up to 29 hours of video playback up to 25 hours of video streaming Up to 95 hours of audio playback Fast-charge capable Up to 50% charge in about 30 minutes with 20W adapter or higher (sold separately) MagSafe and Qi wireless charging |
| Security | Face ID | Face ID | Face ID | Face ID |
| Rear Camera(s) | Primary: 12MP f/1.5, sensor-shift OIS Ultra-wide: 12MP f/2.4, 120-degree FoV Sapphire crystal lens cover True Tone flash | Primary: 12MP f/1.5, sensor-shift OIS Ultra-wide: 12MP f/2.4, 120-degree FoV Sapphire crystal lens cover True Tone flash | Primary: 48MP f/1.78, second-gen sensor-shift OIS Ultra-wide: 12MP f/2.2, 120-degree FoV Telephoto: 12MP, f/2.8, 3x optical zoom in Sapphire crystal lens cover True Tone flash | Primary: 48MP f/1.78, second-gen sensor-shift OIS Ultra-wide: 12MP f/2.2, 120-degree FoV Telephoto: 12MP, f/2.8, 3x optical zoom in Sapphire crystal lens cover True Tone flash |
| Front Camera(s) | 12MP f/1.9, autofocus with Focus Pixels | 12MP f/1.9, autofocus with Focus Pixels | 12MP f/1.9, autofocus with Focus Pixels | 12MP f/1.9, autofocus with Focus Pixels |
| Port(s) | Lightning connector | Lightning connector | Lightning connector | Lightning connector |
| Audio | Stereo speakers | Stereo speakers | Stereo speakers | Stereo speakers |
| Connectivity | 5G (sub-6GHz, mmWave) with 4×4 MIMO 4G LTE with 4×4 MIMO and LAA Wi-Fi 6 with 2×2 MIMO Bluetooth 5.3 Ultra Wideband chip for spatial awareness NFC Dual eSIM support (U.S. models are not compatible with physical SIM cards) | 5G (sub-6GHz, mmWave) with 4×4 MIMO 4G LTE with 4×4 MIMO and LAA Wi-Fi 6 with 2×2 MIMO Bluetooth 5.3 Ultra Wideband chip for spatial awareness NFC Dual eSIM support (U.S. models are not compatible with physical SIM cards) | 5G (sub-6GHz, mmWave) with 4×4 MIMO 4G LTE with 4×4 MIMO and LAA Wi-Fi 6 with 2×2 MIMO Bluetooth 5.3 Ultra Wideband chip for spatial awareness NFC Dual eSIM support (U.S. models are not compatible with physical SIM cards) | 5G (sub-6GHz, mmWave) with 4×4 MIMO 4G LTE with 4×4 MIMO and LAA Wi-Fi 6 with 2×2 MIMO Bluetooth 5.3 Ultra Wideband chip for spatial awareness NFC Dual eSIM support (U.S. models are not compatible with physical SIM cards) |
| Software | iOS 16 | iOS 16 | iOS 16 | iOS 16 |
| Other Features | Barometer High dynamic range gyro High-g accelerometer Proximity sensor Dual ambient light sensor | Barometer High dynamic range gyro High-g accelerometer Proximity sensor Dual ambient light sensor | Barometer High dynamic range gyro High-g accelerometer Proximity sensor Dual ambient light sensor | Barometer High dynamic range gyro High-g accelerometer Proximity sensor Dual ambient light sensor |
Click here to compare other iPhone models.
What are the well-known issues in iPhone 14 so far?
Apple’s new range has been jeopardized by numerous bugs at launch, for which Apple had to release two emergency updates already for iOS 16. Apple’s iOS 16.0.1 release notification described the update as providing “important bug fixes” and it mentioned the following fixes specifically:
- Phone crash issue during activation and migration during set up of iPhone 14 and iPhone 14 Pro
- Photos appearing soft when zooming in the landscape mode on iPhone 14 Pro Max issue.
- Enterprise single sign-on apps failure to authenticate
- Shaking Camera issue in pro models
However, there are several complaints that the latest issues impact CarPlay phone calls and freezing while data migration. There may be some other small issues too, but it is expected Apple would resolve those as well.
Worry for App Developers ?
As the new iOS 16 hits the market, the latest guidelines for app developers also change. This means you have to go through the entire Apple Developer policies documentation again so that your app gets approved by Appstore.
And this is not the end Apple will roll out new guidelines as soon as another update is launched, so it is a never-ending process. The burden falls on the app developers to check each and every detail of the guideline and ensure that their app follows all, which is a lot of work.
However, you don’t need to worry about this. Here comes Swing2App the no code app builder to your rescue.
With Swing2app you can create no-code apps supported by every device according to the new policy and new guidelines without much hassle. So, you don’t have to worry about the latest policy changes or iOS upgrades.
The new iPhone14 Pro has different looks from the previous model as well as the latest iOS 16, which means if you were creating an app, you will have to update it all as per the latest policy guidelines (which are very dynamic in nature as Apple keeps updating them time to time).
To avoid this risk of App rejection and extra work to upgrade, you can create a no-code app effortlessly with Swing2App.
Swing2App takes care of the entire app upload process over the Appstore for just $20!
All you need to do is come up with a brilliant app idea, create it in Swing2App’s codeless platform, and let us handle the difficult task of app publishing and approval.
Final Verdict
There’s no doubt that this year’s Pro models offer significantly better features than the standard iPhones, besides the obvious size differences between them. In addition to the unique camera cut-out, you also get a better screen with a higher refresh rate and higher peak brightness. Instead of just getting a storage bump on the top end, you get a better chipset inside the Pro models. Last but not least, the camera is the biggest difference between the Pro and regular iPhone 14 lineup. A new 48MP wide sensor is included in the Pro, which is said to be 65 percent larger than the standard sensor.
So, iPhone Pro is definitely going to be the wiser and better choice either if you are upgrading your old phone or intend to buy a new one.
]]>App creation completion is just the beginning of the app development process, not the end. The next step is to deliver your app to your users, and for this, you need to publish the app in stores.
For the app publishing service provided by these app stores charge a fee for app uploading and in-app purchases. This is how app stores make their money, while helping your app to reach a global audience.
In this post, we’re looking at Apple App Store fees, and Google Play Store fees, and highlighting the differences between the Appstore and google play stores.
What is an App Store?
An app store is an online platform where app developers publish their apps and customers download or purchase apps. The concept of creating an app store came only in 2008 when Both AppStore and Google Play store were launched. The reason behind the creation of App stores became familiar with the rise of mobile phones and tablets, but now it covers even desktop operating systems and Web browsers within its ambit. Web browsers like Mozilla and Google Chrome have their own app stores, from where users can download and install Web apps.
An App Store offers a variety of free and commercial apps, pre-approved for use on users’ devices. They can browse the app, purchase, download and install, and update it through their device’s app store.
All the major mobile operating system vendors, including Google, Microsoft, and Apple have their app stores, from where users can control the apps available on app stores. Additionally, some third-party apps are available online, such as Cydia for jailbroken Apple iOS devices and Amazon Appstore for Android devices.
Difference Between App Store vs Google Play Store
It is true that both the app stores have the same objective — to provide their users with quality apps, however, they surely have some differences.
In terms of revenue, Apple App Store leads, and unlike Google Play, it is also available in China. In addition, iOS app users are used to paying for their iOS apps, which contributes to Apple’s revenue.
On the other hand, Google Play differs is more developer friendly than Apple App Store as the app approval process is not that strict.
Additionally, Google Play charges developers only a one-time registration fee of $25 to publish an app, but Apple has a $99 yearly developer fee (to be paid every year if you want your app on Apple AppStore.
Overall Comparison
| iOS | Android |
| Lengthy app submission process | The submission process is simple. |
| High cost for submission $99/year. | Costs $25 to submit an app. |
| Valuable feedback from the App review team. | Less guidance when an app is rejected, no detailed feedback |
| Getting approval can take a long time. | App approval time is 3-4 days. |
| High competition | The platform is highly fragmented. |
| Users generally pay for apps. | The platform is highly fragmented. |
Approval Process: Google Play Store Is Easier
| iOS | Android |
| The approval process can be long and drawn out. | Easy approval process. |
| App approval process is strict, must be aware of the rules and ensure apps are error-free. | Developers are free to experiment and be more creative. |
| Apps are high quality therefore standout | Less high-quality apps can head out to users. |
| Review team gives good and hard-hitting, feedback. | With so many apps let in, it can be hard to stand out. |
Visibility: Pros and Cons for Both Platforms
| iOS | Android |
| Hugely popular platform for Apple devices with great visibility. | Visibility is lower but reach is enhanced in terms of number of potential customers. |
| The keyword search might limit visibility. | The search function boosts visibility. |
Costs and Monetization: Google Play store Is Cheaper Initially
| iOS | Android |
| $99 per year developer fee. | A one-time $25 developer fee. |
| App Store customers are used to paying for apps. | Android customers prefer to download free apps. |
| Developers get 70% of the revenue. (in-app purchases) | Android customers prefer to download free apps. |
Advantages of Apple App Store and Google Play Store
Apple’s App Store is unique from a user’s perspective because it delivers high-quality, thoroughly checked apps. Additionally, customers can safely enjoy iOS apps with budget-friendly prices from the list of available apps.
An advantage for Apple App Store users would be a disadvantage for Google Play Store users. There are many more free apps available for Android users as compared to Apple.
To summarise:
| iOS | Android | |
| Target Audience ROI | More valuable | Less valuable |
| Development Time | 7 Days average | 3 days |
| App Development Language | Swift | Java, Kotlin |
| Design Policy | Specified Requirement | Flexible |
| IDE | Xcode | Android Studio |
| Complexity | High | Average |
| App Store Acceptance | Long app review | Short app review |
Types of developer programs in google and Appstore
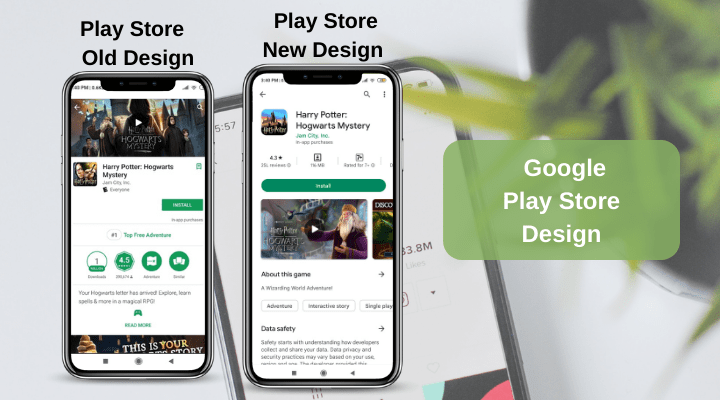
Google charges a one-time $25 fee to get a developer account on Google Play, which lets you publish Android apps on the Google Play Store. Free apps are listed at no cost, and Google takes 30% of the revenues of paid apps for “billing settlement fees”. App developers can develop Android apps using Windows, Linux, or a Mac.
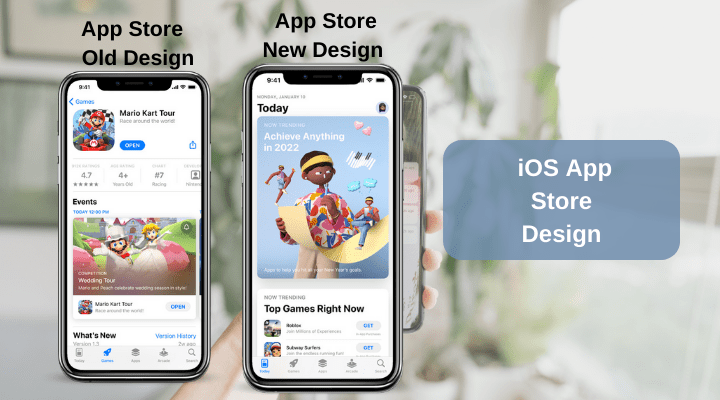
Appstore provides various developer programs suited for diverse needs. These include:
- Apple Developer Program – $99/year
- App Store Small Business Program
- Apple Developer Enterprise Program – $299/year
- Apple Video Partner Program
- iOS Developer University Program
- MFi Program
- News Partner Program
- Security Research Device Program
Steps to publish an app on the App Store
Users must pay the app store fee as a cost to publish their apps, to make them available for download and installation on the Apple AppStore. Let’s go through the following steps to make sure that you publish your app on an app store successfully. We will talk about two kinds of app stores where you can submit your app to the Apple App Store and Google Play Store.
Apple App Store
With the Apple App Store, you can get the latest Apple accessories and products in a more personalized way. With the references based on the Apple product you currently own, you can upgrade your iPhone to a new one and discover the accessories compatible with your device.
Publish your app on the Apple App Store by following these steps:
- Submit App Information
- Create a Bundle Identifier
- App Store Production Certificate
- Create a Production Provisioning Profile
- Create App Store Listing
- Make the release build
- Fill in Version Information
- Submit Version for Review
- Release the app
Gather the pre-required information such as name and icon of the app, detailed features, separate keywords, support, marketing, and privacy policy URLs, rating based questionnaire, copyright and demo account. Go through the above-mentioned steps and follow them to submit your app to the Apple App Store successfully.
Further read: How To Submit Your App To The App Store In 2022
Google Play Store
Google Play Store is one of the largest platforms for selling, promoting and distributing Android apps. It is available on the Home Screen on most of the Android devices.
Google Play Store also has its own set of rules and regulations which must be followed to avoid app rejection. Let us check out the steps to get the app published on Google Play Store:
- Create a Developer Account
- Create Payments Center Profile
- Create an App
- Prepare Store Listing such as product details, graphic assets, languages and translations, categorization, contact details, privacy policy, and others required
- Upload Android Package Kit to an App release
- Provide content rating
- Set up Pricing and Distribution
- Rollout Release to Publish Your App
Follow the above-listed steps to get the app published on the Google Play Store.
Further read: How to submit app on Google Play Store
How do Google Play Store and Apple App Store make money?
App stores typically charge 30% commission for in-app purchases within your app. Specifically, app store revenue comes from commissions on:
- in-app purchases;
- subscriptions;
- downloading paid apps.
Note: In-app purchases (IAP) include any transactions performed within the app, like booking a room in a hotel app. It includes only digital goods and not physical goods. If you use advertising as your app monetization strategy, then app stores cannot charge you for that.
Read more about In-App Purchases On Android & IOS.
Apple App Store fees
With the Apple AppStore app distribution service, you get access to over a billion customers across the globe on iPhone, iPad, Mac, Apple TV, and Apple Watch. There is no app hosting fee, however; there is an annual fee of $99 for the Apple Developer Program and $299 for the enterprise version. Additionally, Apple will take a share of your in-app purchase (digital goods) revenues.
Now you might me thinking -> how much percentage does Apple take from your app revenue? There was a 30% commission on all paid apps and in-app purchases on the App Store until November 2020. However, since then, two rates have been available:
- 30% share if you make more than $1 million in annual net app revenue;
- 15% share if:
- You make less than $1 million in annual app revenue; when you are new to the App Store;
- you’re after 12 months of service in the App Store with a subscription-based app.
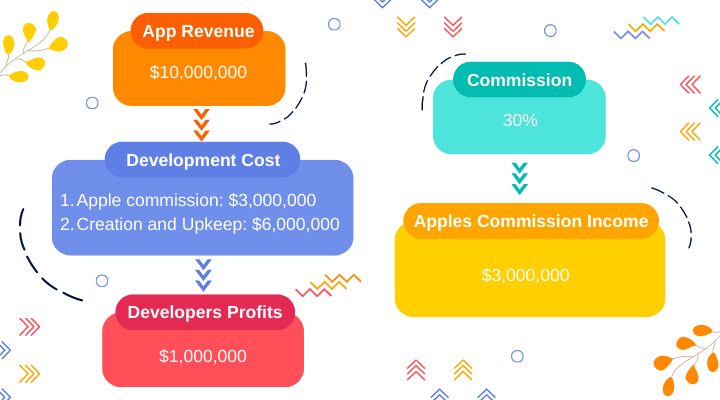
Note: To qualify for the 15% app store commission fee, apply for the App Store Small Business Program that launched on January 1, 2021. It is estimated that 98% of app developers qualify for this Program, according to Sensor Tower.
If you’re wondering how Apple ensures to get a share of your app revenue, here’s the answer:
“If you want to unlock features or functionality within your app (by way of example: subscriptions, in-game currencies, game levels, access to premium content, or unlocking a full version), you must use in-app purchase.” – App Store Review Guidelines
Google Play Store fees
Google also takes 30% of your app revenue, and after a year, it decreases to 15% of subscription revenue. The developer account also requires a one-time registration fee of $25. Understanding the financial aspects of your app model can help you optimize your app for the Google Play Store.
Like Apple, Google also legally obligates you to share your app revenue. Google’s guidelines are as follows:
“Developers charging for apps and downloads from Google Play must use Google Play’s payment system. For in-app purchases, developers must use Google Play In-app Billing as the payment method except if the payment is solely for physical products or digital content.” – Google Play Developer Distribution Agreement
To summarise:
| Apple App Store | Google Play Store | |
| App upload fee | $99 annual fee for the Apple Developer Program $299 annual fee for the enterprise version | One-time $25 registration fee for a developer account |
| In-app payments commission | 30% for apps and in-app products 15% for subscriptions after 12 months | 30% for apps and in-app products 15% for subscriptions after 12 months |
Conclusion
What is better: Play Store or App Store? Surely, it is a constant clash between two giants in the app development industry. A variety of different apps can be found in the Google Play Store and Apple App Store, both of which are thriving marketplaces. Furthermore, their app stores offer excellent resources and monetization opportunities for developers as well as convenience for Android and iOS users.
Both app stores have many positive aspects as well as some downsides that could be improved. Taking into account the Apple App Store vs Google Play Store contest, we can easily conclude that it is a tie.
]]>You probably heard that Apple’s App Store is rather picky when it comes to accepting apps. Apple does indeed make it much more difficult to publish apps than Google. However, that doesn’t mean it’s impossible. You will need patience and, if possible, expert advice.

You need a developer license for both the App Store and Play Store. Play Store licenses are relatively inexpensive ($25) and last forever, but Apple licenses are more expensive ($99), must be renewed every year, and have a more complicated upload process. You should start with the Play Store, test the app with some users in the production environment, then move to the App Store once everything is ready.
In this post, we’ll assume you’ve already signed up for the Apple Developer Program, that your app follows Apple’s App Review and Human Interface Guidelines, and that you’re ready to ship. It incorporates information from the most recent version of XCode and offers context from Apple’s own documentation.
Are you worried about your app being rejected? Then this article is for you.
Read more to find out how to submit your app to the App Store.
Prerequisites
- A project that is ready for submission and passes Apple’s App Store Guidelines
- Valid Apple developer program account (not the Apple Developer Enterprise Program)
- A computer that runs Mac OS X
- Xcode 13 installed.
- Keychain Access
- Minimum SDK
- Online group event in-app purchases (new)
- Account deletion within apps (new)
How to submit your app to the App store
1. Create an app store account
Sign up for the Apple Developer Program
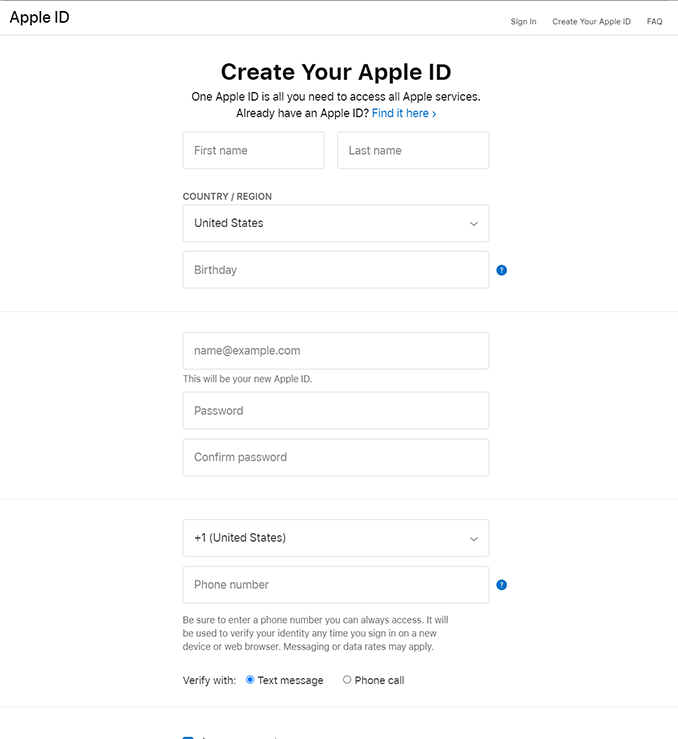

After your Apple Developer Program Enrollment is completed, you will be able to access developer resources from the Apple Developer Portal. Here you will need to create a few items:
Distribution certificate: This certificate that identifies your team and allows you to submit apps to the App Store.
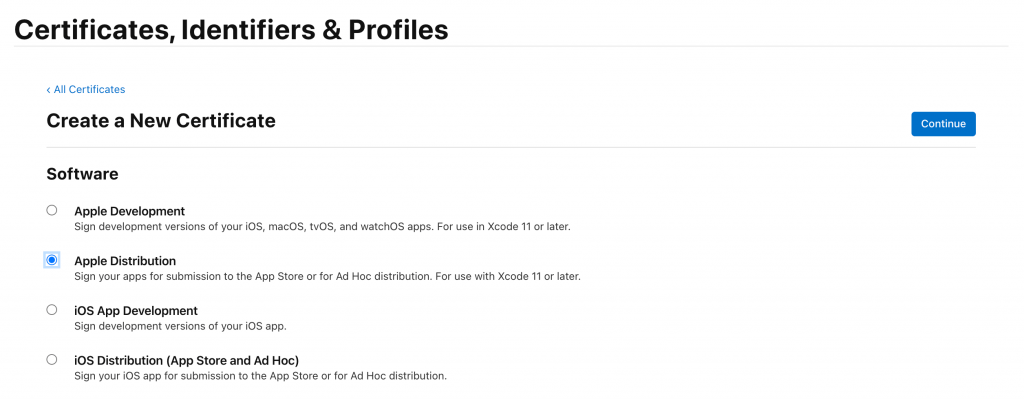
App ID: This is the identifier of your app. The Bundle ID must match the bundle identifier in your app binaries. When you create the App ID manually, you will see a list of features your app can add (like Push Notifications, Sign in with Apple, etc.). If you wish, you can configure those features later.
Provisioning profile: Only apps signed by the Apple can be installed on an iOS device. This becomes an issue for developers, because you will likely want to test the app on a real device before submitting the app for review. This problem can be solved by provisioning profiles. Provisioning profiles are embedded in your app binaries and let the app run before Apple signs it. Every app needs its own provisioning profile.
2. Create an App Store Connect for your app

Having created the items in the Apple Developer Portal as described above, we can move on to App Store Connect (Formerly iTunes Connect), the platform where applications are actually uploaded.
GET AN APP STORE CONNECT ACCOUNT BY:
- Setting up your own App Store Connect organization and being the team agent. Use the Apple ID you registered with when you enrolled in the Apple Developer Program.
- Alternatively, becoming a member of an existing organization as an admin, technical, or app manager.
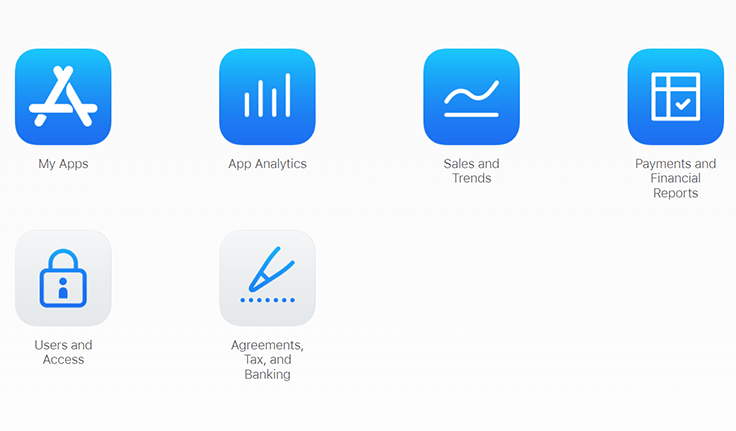
For paid apps :
If you are submitting a paid app, you will need to sign a contract that covers the terms of payment. If your app is free, you can skip ahead.
Add a new app :
Select My Apps from the App Store Connect dashboard.
On the upper-left corner, click the + sign, then select New App.
The following details are required to create an App Store Connect record: platform, app name, default language, bundle ID, and SKU. You can’t change these details later, so be careful of what you enter.
Use keywords in your app name for App Store optimization.
Your Xcode project’s Info. List file must match the bundle ID in the target’s General > Identity section.
It is up to you to set the SKU, and it is not visible to users. It can be an identifier for your company or something else meaningful to you. It must begin with a letter or number, and be a combination of letters, numbers, hyphens, periods, and underscores.
If applicable, you can also set user access at this step.


3. Configure the app’s metadata and other details in its App Store Connect record
In the “App Store” Tab in App Store Connect, on the “App Information” section you can add other languages, categories, and your app’s Privacy Policy URL.
Step1
Select App Information from the left panel. Now add the required, localizable, and editable properties for your app including subtitle and category.
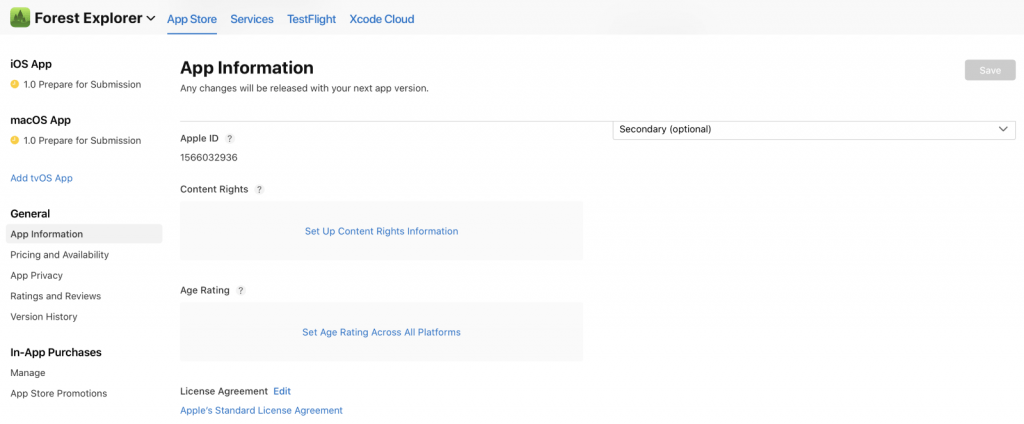
Select content rights for your app to submit your app to the app store.

Select Age Rating for your app

Step 2
In the “Pricing and Availability” section, select your app as free or set its prices.
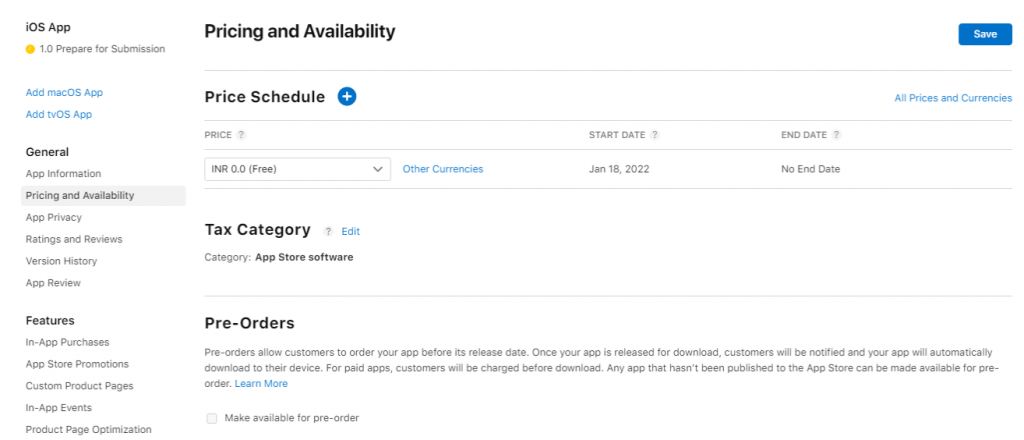
You can add further configurations in your app under the “Features” tab, like Game Center and in-app purchases.
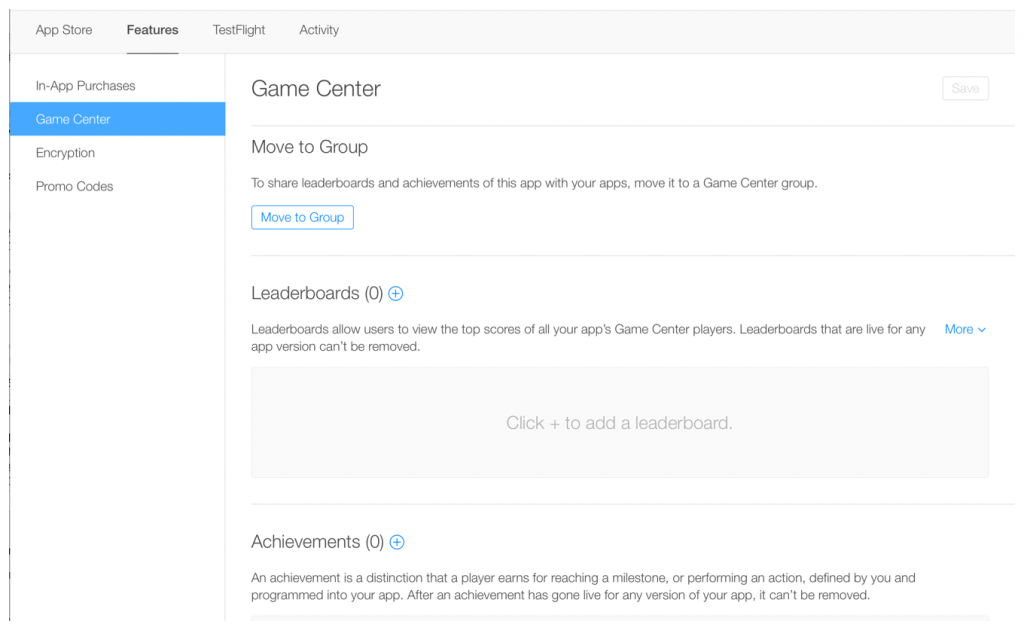
Step 3
The next step is “App Privacy.” As Apple has an extremely strict privacy policy this step is quite important. Enter the Privacy Policy URL for your app. You can use any online privacy policy generator to help you to generate a URL.

Step 4
Add the information of your app for your “product page” on the App Store.
Upload your app’s screenshots only in either JPEG or PNG format and without any status bars. You can upload multiple screenshots for one device and use them for all the other sizes (like iPad pro or mini).
Click on “Save” after your screenshots have finished uploading.
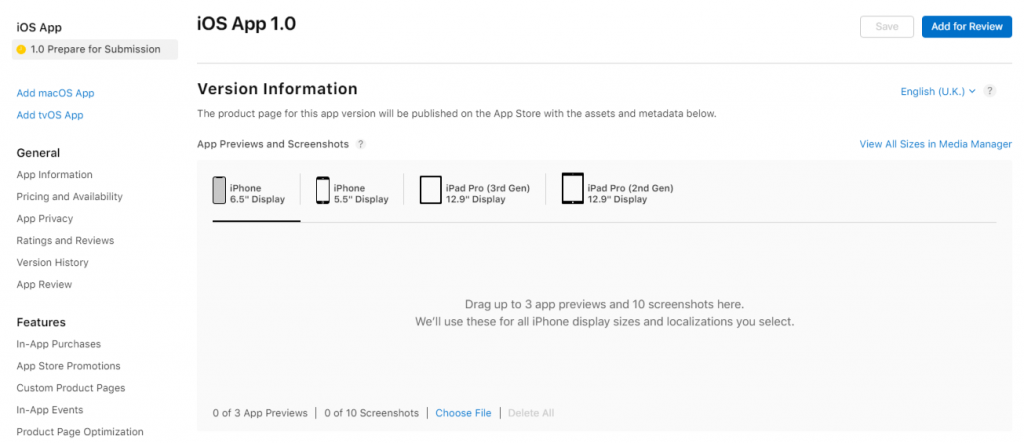
Scroll down a little and enter other details of your app like: app’s description, keywords, support URL, and marketing URL.
In the “General App Information,” upload your app’s icon, and enter its version number, copyright, and contact information.
- There are curtail guidelines that you must follow:
- App icon size should be 1024px x 1024px.
- The version number should exactly match the one in Xcode of your app.
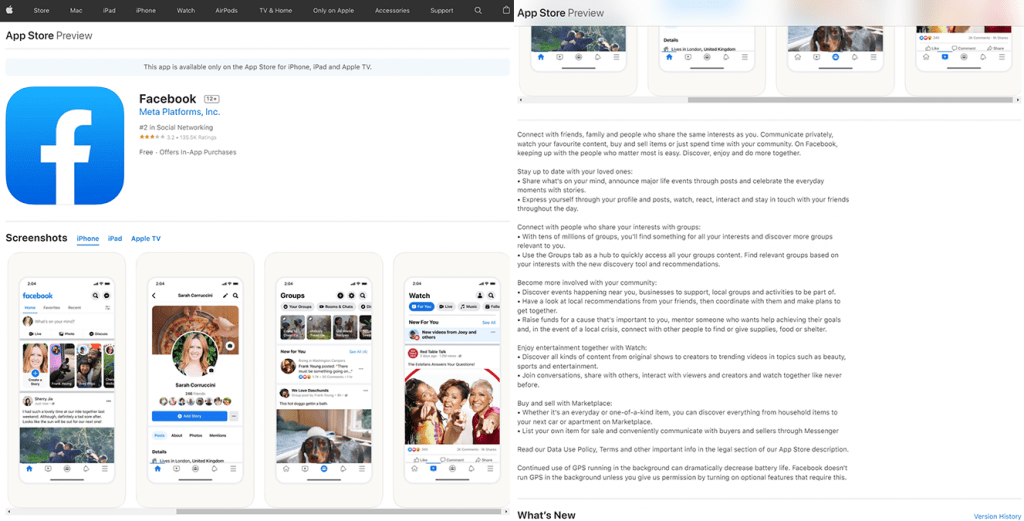
Step 5
Click on Edit next to “Rating” and select the options for your app. Fill this honestly — your app can be rejected during the review if this doesn’t match its rating.
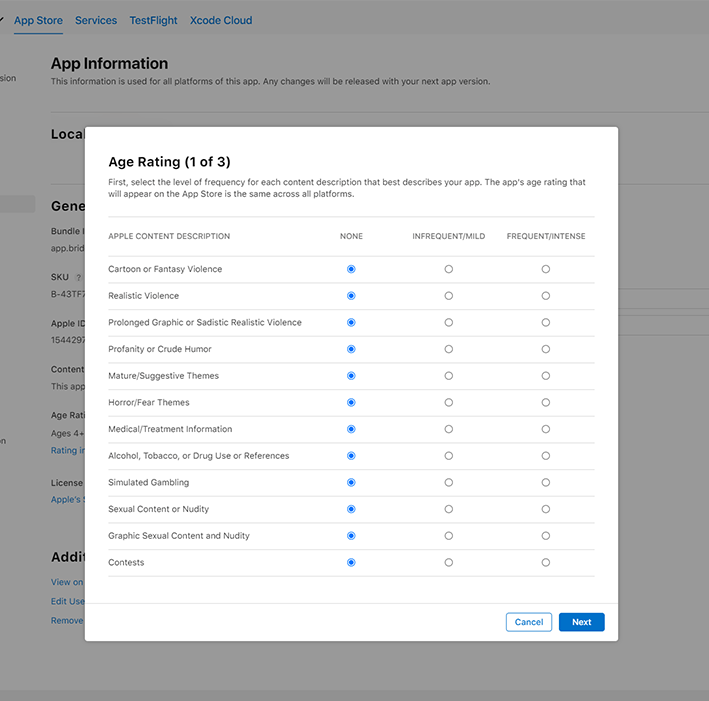
In the “App Review Information” page, enter your contact information, and any key notes you have for the reviewer and set the version release date.
The contact information here is not for users, rather for the reviewer if they need to reach you directly.
For first releases, you should typically set the version release date as automatic.
Finally, click “Save.” Now you are almost ready to “Submit for Review.”
4. Submit your app for review
Go to the “Build” option in your app’s App Store Connect data.

Click on the option “Select a build before you submit your app.”
Select the build that you uploaded through the Xcode. Click “Done” in the bottom right-hand corner, then Save in the top-right hand corner, then Submit for Review.

Finally, submit the Export Compliance, Advertising Identifier questions and Content Rights and click Submit.
Your app’s status should be “Waiting for Review.”
5. Check on the status of your app
In App Store Connect, select the option “Activity in the top horizontal menu, then the option “App Store Versions.”
You can view the various steps and a specific colour before it indicating:
- Red means rejection
- Yellow means under review
- Green means ready for publishing
How long does it take to get app store approval?
Typically, it takes one to three days to receive approval, further it can take up to 24 hours or so for your app to appear in the App Store once approved.
You’ll be notified of each step via e-mail.
Alternatively, if you have an urgent bug fix or need to release your release after a specific event, you can request an expedited review also.
What to do if Appstore rejects your app?
Before your app can be reviewed again, you’ll need to make the necessary changes. If you have any questions, you can contact Apple through the Resolution Center in App Store Connect. Alternatively, if you believe that your application was wrongly rejected, you can escalate the issue and submit an appeal.
Performance is one of the most common reasons for rejection in the Apple App Store. Ensure that your app is complete and that you have thoroughly tested it and fixed all bugs. When beta testing, using a bug reporting tool will reduce your app’s chances of being rejected due to performance issues.
Also read about: Reasons Why Your App Can Get Rejected By Google Play Store
Or use Swing2App instead
You know that submitting your app to the app store is a tedious task, but what if you could skip it completely and still have your app published on the App Store?
Well, this can be done easily with Swing2App!
Though we have covered in detailed steps for how to submit your app to the App store, it would be much easier if you do it using Swing2App.
Create no-code app with Swing2App and leave the job of publishing your app on the Appstore to us.
It is an effortless process:
- Create no-code app using Swing2App
- Buy any plan of your choice (starting from$33) and a $20 AppStore upload ticket. This means you can create as well as upload your iOS app in just $53!
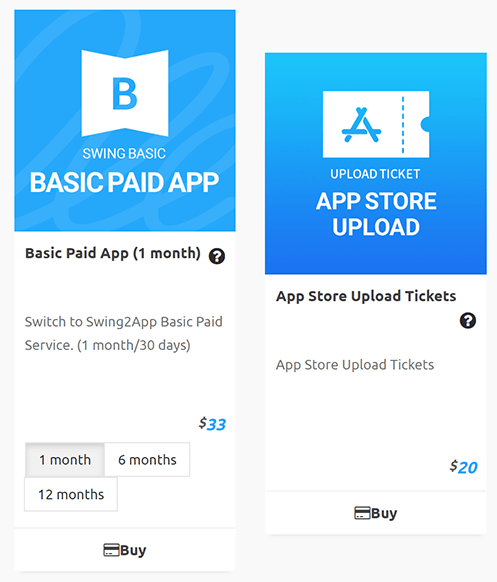
- Swing2App will upload the app on your behalf, and you can sit back and relax.
Moreover, you don’t need to worry about app rejection too, as we will handle that too.
In addition to that, you also get lifetime support from Swing2App.
So, why spend many hours worrying about app rejection when you can just leave everything to Swing2App?
]]>It can be a hassle to submit your app on Google Play Store, especially if your app gets rejected without you knowing why or how to fix the problem.
Unlike Apple’s approval process, Android’s approval process is less stringent and more time-consuming, as it utilizes both experts and automated tools. Although android is less strict than iOS, many app developers still encounter app rejections.
According to Apple, over 150,000 applications were rejected last year for breaking the company’s privacy policies.
Apple claims to have rejected over 1 million app submissions due to unlawful, hazardous, harmful, or objectionable material, though it does not provide a time limit.
Google also rejected nearly 55% More Android Apps in 2018 than 2017 as it formed more strict policies to maintain the quality of play store.
Checks are made to make sure the app does not violate any of Google’s policies by using review algorithms. Then, an internal team of reviewers examines the app. A review typically takes several hours.
Did Google reject your app on the Play Store lately? It’s actually not a big deal and it can be rectified fairly easily. Apps are getting declined quite frequently by Google these days. Typically, apps are rejected if either they do not comply with the publishing guidelines, or they are underperforming. Currently, Google has tightened its approval process for apps in order to offer users bug-free apps. Our smartphones have been spared from damage and data theft by removing such apps from the play store.

To understand how this problem can be resolved, let’s first examine why it occurs. There are a number of app rejection reasons that one should consider before getting it published on the Play Store. You may feel scared about your apps being declined after so much effort, but you can fix it.
We will go through the top reasons why your app might get rejected and how to solve them.
Top reasons Your App Could Be Rejected by Google
1. Issues with the quality of the design
Google provides design guidelines to assist app developers in adhering to all of the basic principles of effective app UI design. You won’t have to worry about your app being rejected by the Play Store if you make sure it follows these standards.
If you follow the guidelines when it comes to colour, fonts, and images, your app will be readily released on the Play Store, or it will be rejected.

Solution
If your app is rejected due to design flaws, we propose spending some money to have it redesigned according to the shared requirements. In this situation, it is the finest viable solution.
However, when you create an app with Swing2App, you will not have to worry about the quality, design, or any other aspect of the app. No-code apps can now be created in much less time with Swing2App, and that too for both iOS and Android.
After app creation, you can leave the app store or play store publishing to us so you can relax. We will make sure that your app is published promptly, and even if it is rejected, we will help you to fix the problem.
Read more about Swing2App no-code mobile app builder.
2. Intellectual Property Rights violation
Infringing upon the intellectual property rights of another mobile application, particularly in a patent or trademark form, is a serious offense. In case you are partnering with another entity and using their trademarks with their consent, be sure to produce their logo as the appropriate documentation will prevent your app from being rejected.
Copyright issues are very strictly monitored by Google. Make sure you don’t violate them. Your app shouldn’t be an imitation of a popular app. Originality should guide your design and coding. It is common for us to use a trademarked title for our app, either intentionally or by mistake, but this is not allowed by Google.

Solution
If your app is rejected because of copyright/trademark issues, simply review the title, description, and images of your app and remove any names that are protected by copyright. However, if you have received permission from the owner, Google will approve the listing with proper proof.
3. Inappropriate app content
Your app will be rejected if it contains graphic violence, racist or sexual commentary or any other inflammatory content.
Any mature content in the description should be clearly identified at the time of rating. Trying to hide that fact or considering it less important will eventually result in your app being rejected by Google.

Solution
If your app is rejected due to inappropriate content, accept the rejection with care. Do not try the same thing with any other apps linked to your account. Your Google Play Store account will be permanently terminated if you violate this guideline repeatedly. For the app which has been previously rejected, publish it with a new account and be careful about spamming this time. Ensure the address on this account is different from the one on the previous account, and don’t link them together in any way.
4. Improper App Rating
When publishing your app to the Google Play Store, make sure to include the app’s rating. Google’s Play Store has an app content rating function that tells you what age category the app is appropriate for.
However, you can’t just pick a rating on your own. You must complete a questionnaire, after which the app will be rated.
You should provide all relevant information about your app and ensure that it has been properly graded for the intended audience. People frequently try to deceive the moderator by providing false information, and as a result, their app is underrated.

Solution
Google offers a simple solution by providing you a second chance to complete the questionnaire. This is a once-in-a-lifetime opportunity for you to supply all of the necessary information about your app and have it properly rated on Google’s Play Store. If you keep making this error, your app will be permanently rejected from the store, rather than being unrated.
5. Suspicious Products
The Play Store will reject your mobile app outright if it poses any threat to the user’s data security or privacy. Google will detect and reject your app if it contains malware, a Trojan horse, or any other flaw or virus that is mentioned in the description or within the app.

Solution
Make sure that all of the URLs and ad networks you utilise in your app are safe and free of viruses. It’s against Google’s standards if these adverts or links lead to something questionable or harmful. If your app has previously been rejected, attempt to remove any viruses and provide a privacy policy if the user is asking for personal information. After that, create a new account and publish an app.
6. Unfinished Versions and Bugs
During the review process, your app is put to the test. If it has any flaws or problems while performing, reviewers will chuck it aside. It’s a reasonable reason for Google to reject an app since it wants to maintain the high quality of applications accessible to customers on the platform.
When customers download an app after hours of searching on the Play Store, they want it to perform smoothly. Users may become frustrated if an app fails every now and then. Therefore, Google does not accept such applications in its store, it becomes one of the primary causes of app rejected by Google.

Solution
Test your app till you’re completely happy with its capabilities. Ascertain that the app has been thoroughly tested in accordance with the Play Store’s criteria. Before you publish your app to the public, make sure it’s fully working. If your app has already been rejected, fix any technical issues and resubmit it.
Wrapping It Up
I hope that this article has provided you with a comprehensive understanding of the various reasons why your Android mobile app may be rejected by the Google Play Store.
There are a variety of additional causes for app rejections, however, the one mentioned above is the most fundamental and is frequently overlooked by developers. Because Google employs both a manual and an automated app review system, keeping the pace of the developer standards might save you time and money.
Build your app using a sophisticated app builder that delivers feature-rich, fully functional apps to make app publication easier and more comfortable for you.
Swing2App is the best no-code app builder where you can create a well-designed app from scratch and convert your website into an app. Moreover, we also provide app upload support for both Appstore and Play store.
Read more about the benefits of creating an app with Swing2App.
]]>There’s an app for everything these days. Websites are embracing apps at an increasing rate. The reason you’re reading this is that you’re thinking to convert your website into a mobile app.
Consumers today expect fast loading and browsing experiences. Users will lose interest if the loading process takes too long. As you can see from the Progressive Web Apps (PWA) statistics:
The Starbucks PWA resulted in 2x daily active users.
AliExpress sales conversions increased by 84% on iOS.
Telegram, an instant messaging app, was launched in 2013. With the company’s PWA, the number of users’ sessions has increased by 50%, as well as the retention rates.

What are the benefits if you convert your website into a mobile app? What are the main challenges? Are there any easy, affordable website to app maker?
Let’s explore these and other questions. You’ll learn about all the options for completing this task – and why Swing2App website to app maker might be right for you.
Why your business might need a mobile app
Businesses and customers alike benefit from converting website mobile apps – that’s why nearly a third of small businesses already have one. Below are a few reasons why you might want to convert your website into a mobile app.
Ease of Access
Once an app has been installed, it’s much easier to engage with that application than it is to open a separate browser application to view a website.
According to research, mobile users spend 83% of their time in apps while only 17% in web browsers — this is due to the convenience of having a mobile app right on the home screen
Search Engine Optimization
Google will display your app as an “app pack” when someone searches for your brand on a mobile device. Google will analyse that the user is browsing on mobile and will want to show results that are best suited for that interface.
A mobile app, your website will rank higher as more people are using mobile devices to browse the internet.
Integrations
Another advantage of turning your website into a mobile app is that mobile applications have more access to your phone’s functionalities than a web browser.
To make your user experience even more engaging and immersive, you may combine your app with phone contacts, browser data, camera functionalities, and other smartphone capabilities like GPS.
Converting website to app gives you added advantage of all these functions which boosts customer retention.
Enhance your Mobile UX
It’s upsetting to find that your favourite brand or product has a fantastic website on the desktop, but when you load it on your phone or tablet, it’s nothing like the desktop version.
Your responsibility as a marketer, website owner, and/or web developer is to produce a positive user experience, but what if your site isn’t mobile-friendly? Should you shut it down and start from scratch, start taking on a website redesign, or try to fix the flaws possibly leading to more issues in the future?
Instead, you may convert your website to app. This manner, you can maintain your desktop version the same while providing a more user-friendly mobile version.
More Loyalty and Engagement
Going to Google Play or the App Store is an act of loyalty in and of itself. Users who do so are demonstrating that they are, or are on their way to being, your most ardent supporters. The 20% of users who are responsible for 80% of your company’s engagement and income.
By converting website to app, you can provide these core consumers a “home” — an icon on their home screen, a more personal contained experience, and a one-tap direct route to your information. You’ll have more chances to develop your relationship by keeping top of mind and interacting easily via push notifications.
Revenue Potential
When you turn a website into a mobile app, you’re laying the foundations for a lucrative income stream for your company.
The main ways to monetize your mobile app are: In-app advertising, eCommerce sales, subscriptions, and in-app.
Furthermore, we’ve seen that income from eCommerce applications has increased at an incredible rate in recent years, to the point where 78 percent of consumers would prefer to visit a eCommerce store via a mobile app over a mobile site. In comparison to eCommerce stores on the mobile web, eCommerce apps have 3x greater conversion rates. Creating website to app is very easy with Swing2App no code app builder.
Other potential monetization strategies are also accessible. You could, for example, develop a subscriber-only app and bundle it with a membership plan, or you could create an ad-free version that users may pay a monthly price to use.
Push Notifications
One of the most significant advantages of converting a website into an app is the ability to provide push alerts.
While push notifications may be sent from a website, they are quite restricted. On iOS, you can’t email them at all and must go through far more permissions hoops. You may send notifications to everyone who has the app installed, regardless of their operating system. This is one of the greatest advantages when you convert website to app.
Push notifications are enabled on 33 percent of persons under the age of 34’s phones for various companies and applications. That’s a significant number of prospective users with whom you can communicate directly via the highly visible lock screen. When compared to email, push notifications offer a considerably greater engagement rate, and you’re not limited in your reach like you are on social media.
Whether your mobile app should be iOS or Android (or both)
As Android and iOS applications have various code versions, you’ll need to pick if your programme is for Android or iOS consumers. In an ideal world, you’d like to cater your app to both sorts of customers; but, if you don’t have the time or money to construct two separate applications, you may have to make a tough choice.
However, with Swing2App you can covert website to app for both iOS and android at the same time. Isn’t it great!
Android has a far greater user base than iOS. The Android OS had an 84 percent market dominance in 2021, while the iOS OS had just around 16 percent. Android smartphones are used by many more people throughout the world than iOS devices.
While Android is the most common operating system worldwide, iOS is the most popular in the United States and Japan, as shown in the graph below.
Both operating systems are functionally similar, and you may host your software on any platform if you like. The biggest difference between the two systems, aside from the quantity of users, is the coding format. APK files are used by Android, while .ipa files are used by iOS.
You may make your app available on both Android and iOS, but you’ll have to develop two unique applications – even if they have the same functionality.
The guidelines for app rejection are another variation between Android and iOS. Apple guidelines have very rigorous criteria, and it prefers to only publish entertaining and useful apps that make use of iOS-exclusive capabilities. As a result, webpages that are transformed into iOS applications are more likely to be rejected by Apple’s App Store.
Apple is equally concerned with the user interface (inappropriate UI is the most frequent rejection reason). It provides designers and developers with “Human Interface Guidelines” and “UI Design Dos and Don’ts.” If Apple thinks your app’s UI isn’t up to par, it will remove it from the App Store.
What to consider when creating a mobile app
There are a number of tools available to assist with the conversion of website into mobile app (iOS or Android). Such services, however, cannot provide much customization. That’s why it’s preferable to build a native app from the ground up rather than use a third-party solution to convert your website.
Keeping that in mind, it’s important to remember that app development necessitates planning and time. You might not know what it takes to construct an app from the ground up if you haven’t built one before. Before you start designing your app, think about the following factors:
Development costs
App development costs are distinct from website development costs in that they cannot be created with a low-cost building tool such as a content management system. In your team, you’ll almost certainly need a developer or a development team.
The cost of developing a native app might be perhaps high. However, investing some money at the outset of the process and getting a decent result right away is preferable to paying a service to design the interface you want over and over again.
We’ll go through price in more detail in the following section, but if you’re spending thousands of dollars on an app, you’ll want to know what the entire cost will be before you commit to app development.
Screen Size
The mobile market is brimming with one-of-a-kind products, including a variety of smartphones and tablets. As a result, while designing a UI/UX, you should take into account different screen sizes and make sure that all pictures, charts, and buttons appear fantastic on different devices.
Pro Tip: To avoid issues, work with a knowledgeable and professional UI/UX designer.
Search Presence
People will often look for your website before downloading your mobile app. While Google will assist you by including “app packs” in search results, you can also inform consumers about your mobile app via a popup on your website. This will entice users to download your app, especially if your website isn’t mobile-friendly.
Now that we’ve covered all of our areas, let’s put our strategy into action and talk about how to turn your website into a mobile app.
Examples of websites converted to an app
1.H&M
2. Canva
How to convert a website into a mobile app
There are several ways by which you can convert your website into a mobile app. Basically there are 5 broad options for you to convert website into a mobile app:
1.Code the mobile app by yourself
2. Hire a freelancer to create the mobile app
3. Hire an app development agency to build the mobile app
4. Use a DIY app creators
5. Convert a website to app with Swing2App
We will discuss the last one that is to convert your website into a mobile app with Swing2App. To know about other options please read our blog:
In Swing2App, we designed it so that anyone (especially non-techies who don’t know coding) can easily convert any website into apps while keeping all the great features of the web. As part of our service, we handle all of the tricky parts like customization, submission and publishing on the App Stores, and ongoing updates.
In addition to providing you with the kind of result you’d expect from custom development, Swing2App also handles all the tricky bits, so you don’t have to. It’s all available at an affordable price.
How to convert website into a mobile app in 3 simple steps?
Converting your website into an app with Swing2App is no rocket science!
It is an application development platform by which anyone can develop their own iOS and Android app. The software includes prototypes, templates, and other features by which users can easily customize apps using different colours, themes, user interfaces etc.
The content editing tools in SWING2APP allow developers to add and delete content in real-time as well as you can see the changes on the virtual screen. It offers different features including posts, bulletin boards, multiple chat rooms, submission to official app stores, custom domain, version tracking and more.
With Swing2App converting a website into an app is a simple 3 step no-code process:
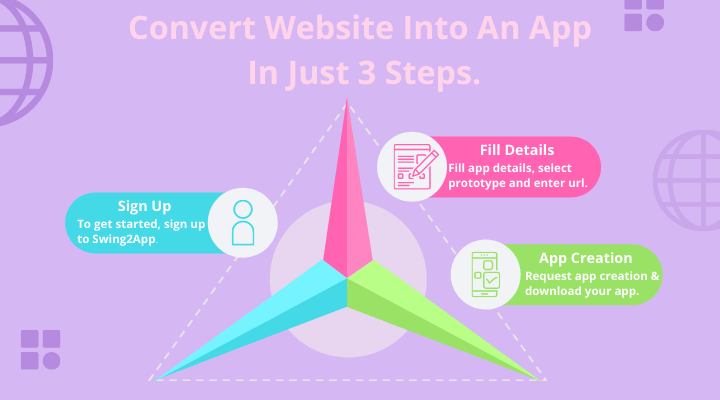
For the detailed process visit our blog on: How To Convert Your Website Into An IOS Or Android App With Swing2App?
Why Swing2App?
Compared to hiring agencies or freelancers, you save tens of thousands of dollars, get better apps, and the apps update automatically with your site so you needn’t add anything new to your work process.
We don’t charge recurring fees; you only pay a one-time fee for converting your website into an app. A single payment allows you to enjoy all the additional benefits such as Swing2App analytics, unlimited push notifications, app maintenance, payment gateways, and much more. This makes Swing2App the best and most cost-effective choice for everyone, especially small businesses.
To know more about the process of converting your website into an app please visit: 3 simple steps to convert a website into an app.
To conclude
You should now be able to answer the question of how to turn a website to app. We discussed the advantages of utilising apps as well as some of the aspects of mobile app creation.
Web-based apps are easier to create, more valuable to your users, to deploy, manage, and protect, and to upgrade as your business grows. The most significant aspect is that the SWING2APP app creator actually offers a code-free experience. Because of the large range of services accessible, it is unquestionably the best free app builder.
]]>Do you want to convert your website to app? You might have come across the idea of creating web apps. However, you are not the first, already, millions of mobile applications are available for download.

Smartphones have changed the world forever, whether for good or for bad. Information is accessed at the touch of a screen, and everything you need to know about a brand is just a few clicks away. As more than half of all visits to websites in 2021 will come from mobile devices, consumers don’t need a desktop computer to explore your website.
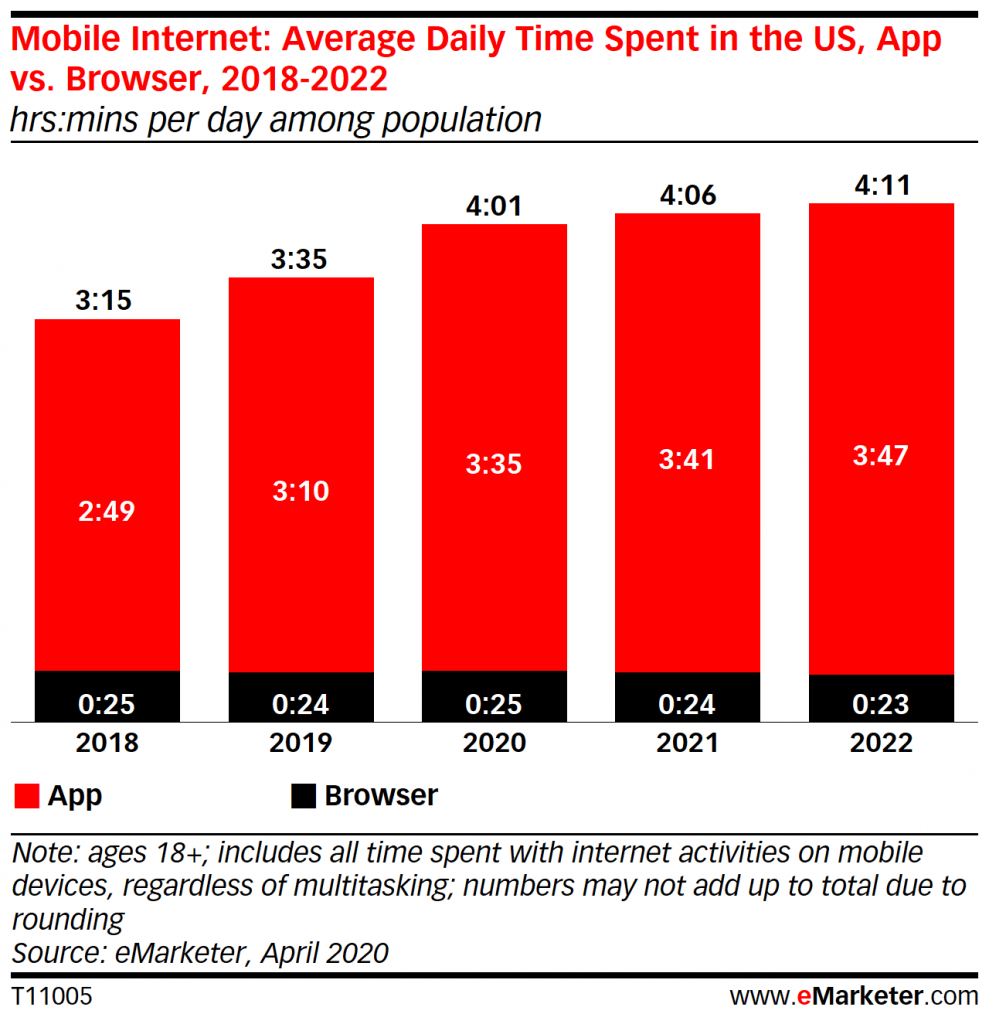
US adults on an average spend at least 4 hours on their mobile devices according to eMarketer.
As per Statista, by 2025 revenue from mobile apps is projected to reach 613 billion U.S. dollars.
Considering the statistics, if you decide to convert a website into an app, you have reached the right place.
To give your customers a mobile-optimized experience, you can convert your website to app (Android or iOS app). The app option is especially useful if your website isn’t the most mobile-friendly on phones or tablets.
In this post, we’ll discuss:
- What is Web application (Web app)
- How Web apps work
- Benefits of Web Apps
- Web Application vs. other application types
Learn More Swing2App Website to app convertor.
What is Web application (Web app)?
The Web application (Web app) is a program that is stored on a remote server and accessed via the Internet through a browser interface. Any component of a web page that performs some function for the user qualifies as a Web app according to Web.AppStorm editor Jarel Remick.
A web application can be used by organizations as well as individuals for numerous reasons and can be designed for a variety of purposes. Webmail, online calculators, and e-commerce shops are common Web applications. Google Sheets, Quora, and Evernote are some of the most popular web apps.
Checkout our Swing2App free website to app creator:
From ordering takeout to planning vacations, web applications may be used for a variety of tasks. A web app might be anything as basic as a contact survey form on a website or an online calculator. Most Web apps can be accessed with any browser; however, some are only accessible through one specific browser.
Web applications are extremely adaptable, allowing users to execute a wide range of tasks. Consumers can use websites to place orders, create a Wishlist, and inquire about items or services, among other things. Employees may also use apps to exchange papers, interact with one another, modify files, and work on projects together. This is especially significant in the current era of remote working.
How Web apps work
Web applications don’t have to be downloaded because they are accessed through the internet. A web browser such as Chrome, Firefox, or Safari can be used to access a Web application.
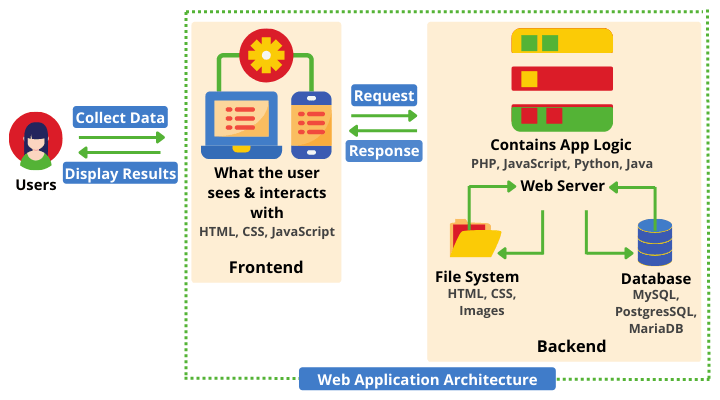
But how web apps work? What are the technical aspects?
The following is a common web application workflow:
- A user sends a request to the server via the internet, either through a web browser or through an app’s user interface.
- The web server sends the request to the appropriate web application server.
- After that, the web application server completes the required job (for example, processing new data) and returns the relevant results.
- The results are then transferred from the web application server to the webserver, along with the required information.
- The web server then replies to the client, displaying the requested information to the user.
Web apps may be created by small teams of developers since they have quick development cycles. JavaScript, HTML5, and Cascading Style Sheets (CSS) are used to create most Web applications. These languages are commonly used in client-side programming to assist develop an application’s front-end. To construct the scripts that a Web app will employ, server-side programming is used. In server-side programming, languages like Python, Java, and Ruby are frequently utilized.
Don’t worry about all this coding, we have a perfect no-code website to app builder solution for you!
Swing2App no code website to app converter you can convert your pre-existing website to app in just 5 minutes!
To know more about top node app builders read our blog: No Code App Builders For 2022: What Is The Best No-Code App Builder?
Benefits of Web Apps
Web apps have many advantages, the main benefits of which are:
1.Cost-efficient
Lowering expenditure is the greatest advantage of web apps, especially small businesses and individuals. This is because they require less maintenance and may have fewer computing requirements (in terms of processing power and so on)
With Swing2App you can convert your website to app for both android and iOS devices at the same time! Confused about whether to make an Android or iOS app. Check out our blog: IOS Vs Android: Which Is Suitable For Your First App?
2. Easy to maintain
Web apps are easier to maintain than a desktop website since they use the same code across the application. There are no compatibility problems.
3. Multi-platform
Web applications may run on any platform, including Windows, Linux, and Mac, as long as recent browsers are installed. They provide mobile like features on website as well as mobiles, thus creating brand recognition. For example, Amazon.
4. App store and updates
In online apps, permission from the app store is not necessary.
Another advantage of adopting web apps is that updates are automatic, and because they’re deployed centrally, everyone should be using the same version.
5. Save space (storage efficiency)
Web applications are Internet-enabled apps that may be accessed using the web browser on a mobile device. As a result, there is no need to download or install them.
Subscription-based web apps, such as software as a service (SaaS), also aid in the reduction of online software piracy, which can cause significant issues. Because SaaS is only accessible via the cloud, consumers can only utilize it after paying for it. Because such programs may be accessed totally online, they do not require installation.
6. Enhanced user experience
You may improve your entire mobile UX by converting a website into an app.
Web Apps provide a direct path from a single touch, which may be initiated by a home screen icon or a push notification. The native navigation and functionality inside the app provide for a significantly smoother, slicker experience.
They have easier access to common device controls like swiping and pinching, which improves the user’s experience. Web Apps are just better designed for mobile devices and hence enhance user experience.
Web Application vs. other application types
We’ve previously mentioned that there are several sorts of applications. Although we’re primarily concerned with web apps, it’s worth pausing to consider other types, such as mobile and hybrid apps. We’ll give you a fast rundown of what they are, what functions they have, and a quick summary of their many benefits and drawbacks.
Web apps, mobile apps, and hybrid apps each offer their own set of benefits. As a result, it’s critical to examine the benefits and drawbacks of each before determining which is ideal for you. Each application has a distinct function.
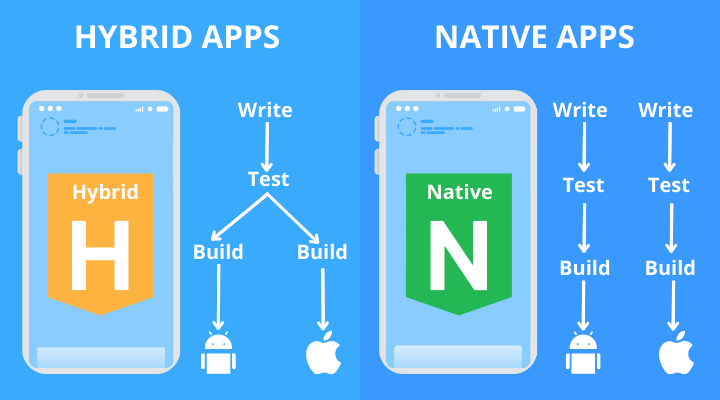
Mobile apps
Mobile applications (also known as native apps) are particularly popular. Native apps are software programmes created specifically for a platform or device, such as Android or iOS. For that reason, they’re written in a specific programming language. Users often obtain them via app stores and install them directly on the devices in question.
Web apps are occasionally contrasted with native apps in the mobile computing industry, which are programs that are designed expressly for a platform or device and deployed on that platform or device. The two, however, are not mutually exclusive.
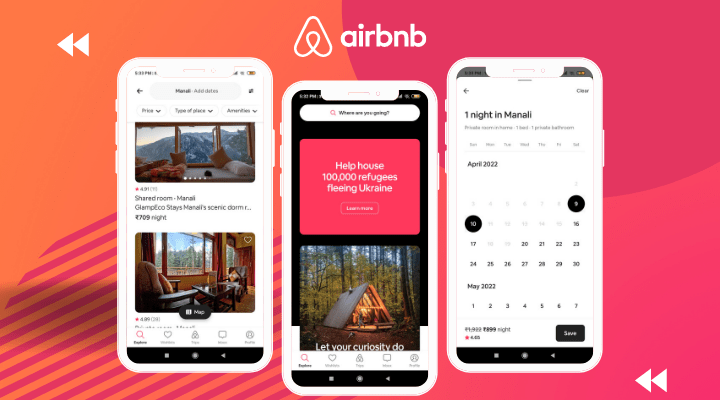
Native programs are those that are downloaded and built expressly for the device on which they are installed. On a mobile device, native apps may frequently take advantage of device-specific hardware, such as a GPS or camera.
Mobile applications may serve a wide range of purposes, from assisting us in finding routes to our desired locations to delivering multimedia material to our mobile devices.
Hybrid apps
The Hybrid applications are programs that mix the two methodologies. These applications function similarly to Web apps, but they are installed on the device in the same way that native apps are. Internal APIs allow hybrid apps to take use of device-specific resources.
Hybrid apps do not have this capability; nonetheless, downloaded native programs can occasionally work offline. Because hybrid applications are built on Web apps, they will usually include comparable navigation components.
There are also hybrid applications, which include characteristics of both mobile and online apps, as the name implies. On the surface, hybrid apps appear to be identical to native apps. They’re made with Ruby, JavaScript, HTML5, and Cascading Style Sheets, among other computer languages (CSS).
Hybrid applications are installed on a mobile device in the same way that native apps are, and they appear to the end-user to be the same. Internally, though, they are just web applications with a frontend dashboard.
Advantages and drawbacks
Both native and hybrid apps offer advantages. Offline functionality is available in both mobile and hybrid applications (despite the latter’s underlying resemblance to web apps). They can also use the resources of the device on which they’re installed.
This implies they’ll be able to employ features like cameras and GPS. Web applications, on the other hand, must be accessible through a web browser; as a result, web apps cannot be used when users are offline.
When compared to online applications, however, there are several drawbacks. To begin, mobile and native applications must be obtained from an app store and installed. They must be installed on the smartphone, which means they consume storage space, which can quickly run out, causing users to shuffle their current programs to find places for new ones. Web browser plugins may be available for mobile apps.
There’s also the problem of upgrades to consider. Users of mobile and hybrid applications may be required to download updates manually, which implies that various versions of the same software may be used by different people, making team cooperation more difficult.
Web applications, on the other hand, are automatically updated from a central location. Users are not forced to perform any tasks, which saves them time and allows for more effective communication.
Conclusion
A hybrid app is a good choice if you’re searching for a low-cost bespoke app development alternative. Swing2App, a website to app converter and no-code app developer, offers a variety of mobile app services to assist your company in growing.
We’ve also turned several websites into mobile applications for clients all around the world. As a result, we can better understand your business and design the finest app possible while keeping your budget and deadline in mind.
]]>